

This guide uses the classic JavaScript SDK. If you're starting a new project, consider using TalkJS Chat UI components, which are more customizable.
Bubble is a no-code platform that allows you to build marketplaces, SaaS apps, dashboards, social networks, CRMs, and other tech products, fast. By integrating TalkJS chat into your Bubble app, you can build one-on-one conversations, group chat, a messaging and notification center, or integrate an AI chat bot with a superior chat experience right from your app—all within minutes, not months.
This how-to guide will help you integrate TalkJS messaging functionality into your Bubble app. By the end of this guide you will have a working example of TalkJS chat in Bubble.
Assumptions
For the purposes of this guide, we assume that:
- You have a TalkJS account. If you do not yet have a TalkJS account, you can try it for free.
- You have a Bubble account with a Bubble app to which you would like to add TalkJS chat. If you do not yet have a Bubble account, you can sign up. If you do not yet have a Bubble app, you can either build one from scratch, or start from a template.
Identification, authentication, and authorization of users in Bubble falls outside the scope of this guide.
1. Create an area for your chat
The first step in integrating TalkJS into your Bubble app is to create an area for the chat in the design of your app. To do so, you will use one of the core building blocks of creating apps in Bubble, namely Elements. To create an area in your app where your chat will live, you will use an HTML element.
- In the workspace of your Bubble app, from the left sidebar menu, go to the Design section. From the list with available elements, choose the option HTML.
- Click on any location in your page index in your Bubble workspace to create a new HTML element. A new HTML element with the placeholder text “edit me …” appears.
- Resize and position the HTML element to fit where you want the TalkJS chat UI to display in your app. Ensure the element has a height of 500px. You can always adjust the size and position later.
- Double click on the HTML element you have just created to access a pop-up editor for that element. In the Appearance tab of the element editor, find the HTML editor field and replace the placeholder text
<i>edit me …</i>with the following code snippet:
<!-- minified snippet to load TalkJS without delaying your page -->
<script>
(function(t,a,l,k,j,s){
s=a.createElement('script');s.async=1;s.src="https://cdn.talkjs.com/talk.js";a.head.appendChild(s)
;k=t.Promise;t.Talk={v:3,ready:{then:function(f){if(k)return new k(function(r,e){l.push([f,r,e])});l
.push([f])},catch:function(){return k&&new k()},c:l}};})(window,document,[]);
</script>

<!-- container element in which TalkJS will display a chat UI -->
<div id="talkjs-container" style="width: 90%; margin: 30px; height: 500px">
  <i>Loading chat...</i>
</div>
Code snippet to place in your HTML element editor

- Once your changes have been automatically saved, click on Preview in the top right of your Bubble workspace to preview your app. You should see the text “Loading chat …” in the area where you placed your HTML element.
2. Enable Javascript in Bubble
To build your TalkJS app, you’ll need to run Javascript in Bubble. Bubble does not allow you to run Javascript directly. To run Javascript, you will need to install a plugin. In this guide we’ll use the Toolbox plugin, but other plugins are available.
- In your Bubble editor, from the left sidebar menu, go to the Plugins section. From the top right, select the + Add plugins button. This will open a pop-up that will allow you to search for a plugin.
- Search for the Toolbox plugin and click Install to install the plugin. The Toolbox plugin will now be listed in your Plugins section under Installed Plugins. The Toolbox plugin’s functionalities, including the ‘Run Javascript’ action, are now available to use in your Bubble project.
3. Create a chat session
You currently have an area for your TalkJS chat, but no active session with users and messages yet. Let’s change that. You will use Bubble Workflows to add and run the Javascript code needed to create a TalkJS chat session.
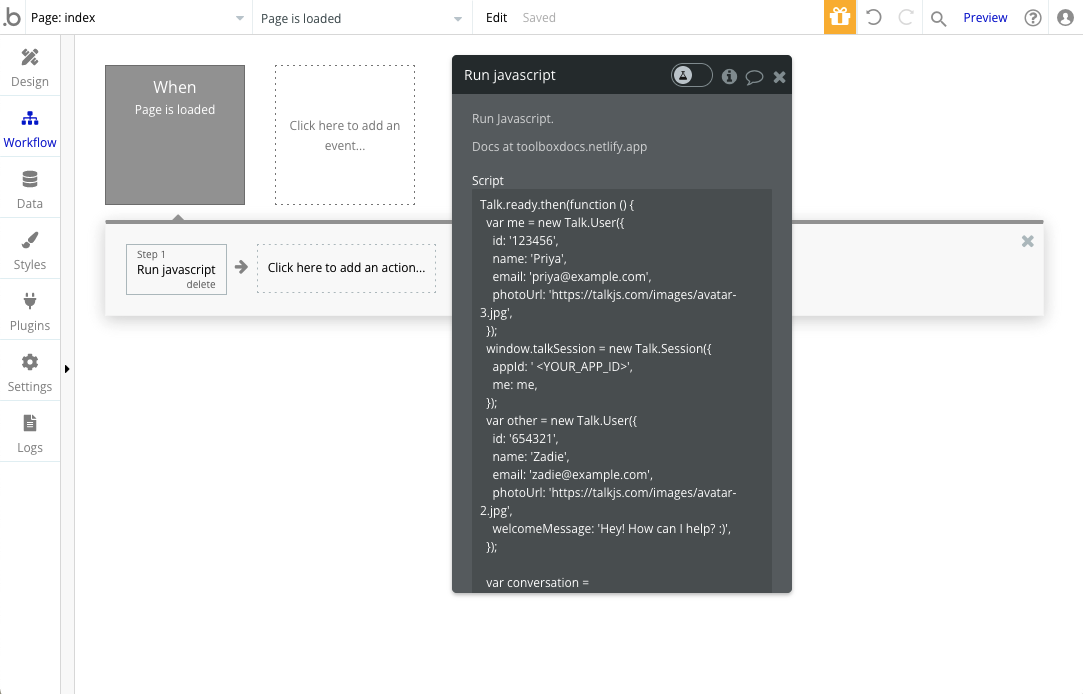
- In the Workflow section in the left sidebar menu of your Bubble workspace, click the box with the dotted outline and the text “Click here to add an event …” to create a new workflow.
- From the dropdown menu that appears, choose the option Page is loaded to ensure that your Javascript code runs whenever the page for your app has loaded. Once selected, the box turns solid gray and shows the text “When Page is loaded”.
- Underneath the box with the text “When Page is loaded”, click the box with the dotted outline and the text “Click here to add an action…”. In the dropdown menu that appears, from Plugins select Run javascript.
- A pop-up editor for the Run javascript action appears. In the Script rich text editor at the top of the pop-up editor, place the following code snippet:
Talk.ready.then(function () {
 var me = new Talk.User({
   id: '123456',
   name: 'Priya',
   email: 'priya@example.com',
   photoUrl: 'https://talkjs.com/images/avatar-3.jpg',
 });
 window.talkSession = new Talk.Session({
   appId: '<YOUR_APP_ID>',
   me: me,
 });
 var other = new Talk.User({
   id: '654321',
   name: 'Zadie',
   email: 'zadie@example.com',
   photoUrl: 'https://talkjs.com/images/avatar-2.jpg',
   welcomeMessage: 'Hey, how can I help?',
 });

 var conversation = talkSession.getOrCreateConversation(
   Talk.oneOnOneId(me, other)
 );

conversation.setAttributes({
 subject: 'New conversation',
});

 conversation.setParticipant(me);
 conversation.setParticipant(other);

 var chatbox = window.talkSession.createChatbox();
 chatbox.select(conversation);
 chatbox.mount(document.getElementById('talkjs-container'));
});
Code snippet to place in the Script section of your Run javascript action editor
- In the Javascript code snippet, replace
<YOUR_APP_ID>with your own TalkJS app ID. You can find your app ID in your TalkJS dashboard, in the Settings section. - Once your code is automatically saved, click on Preview in the top right of your Bubble workspace to preview your app. You should see a working example of your chat with Zadie, and a subject header “New conversation”. The chat is functional, so you can type your own messages in this chat.
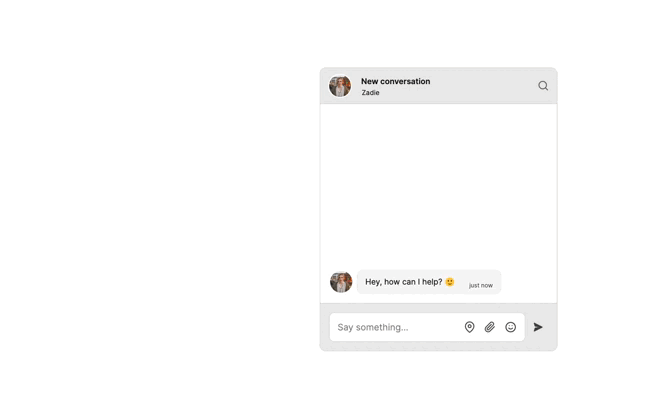
You have now created a one-on-one chat with a Chatbox UI. TalkJS also allows you to create group chats. And instead of a chat box interface, you can also choose an Inbox UI, which includes a message list and allows users to switch conversations, or a Pop-up UI, which only shows up when a user clicks to open it.
Next steps
You now have a working example of a TalkJS chat in your Bubble app.
The current working example still contains hard-coded dummy data both for users and for the conversation. In a production environment, you will want to replace these hard-coded values with data loaded dynamically from your database. In the code snippet that you entered in the Script editor in the Run javascript action, this concerns the current user of the conversation:
var me = new Talk.User({
   id: '123456',
   name: 'Priya',
   email: 'priya@example.com',
   photoUrl: 'https://talkjs.com/images/avatar-2.jpg',
});
Code snippet that sets data for the current user
The other user in the conversation:
var other = new Talk.User({
  id: '654321',
  name: 'Zadie',
  email: 'zadie@example.com',
  photoUrl: 'https://talkjs.com/images/avatar-3.jpg',
  welcomeMessage: 'Hey, how can I help?',
});
Code snippet that sets data for the other user
The optional conversation subject:
conversation.setAttributes({
 subject: 'New conversation',
});
Code snippet that sets an optional conversation subject
Bubble allows you to fetch user data either directly from your Bubble database, or from a connected external SQL database.
Dynamically loading user data from either a Bubble database or from an external database falls outside of the scope of this how-to guide. For those further steps, Bubble has detailed information in the Bubble manual:
- Working with Data in Bubble.
- Setting up an external database for your Bubble app, using the SQL database connector.
You might also benefit from reading the documentation of the Toolbox plugin, which provides additional instructions on how to load data into Bubble dynamically.
Do you have further questions about integrating TalkJS into Bubble? Get in touch as we’re happy to help.


