Approval workflows
Let users approve or reject requests inside the chat.
 View as Markdown
Many apps want users to discuss a request, and approve or deny it. This guide puts the decision in the chat, so the person reviewing the request can approve or reject it where they’re discussing it. In this example, Jamie asks their manager Alex to approve a €120 design workshop.
When your backend receives Jamie’s workshop request, send a message on Jamie’s behalf to the chat with Alex. Put the request details in the message’s custom data. Send a message with the REST API
POST https://api.talkjs.com/v1/<APP_ID>/conversations/{conversationId}/messages
Authorization: Bearer <ADMIN_JWT>
Content-Type: application/json
[
{
"sender": "jamie",
"type": "UserMessage",
"text": "Can I book the €120 design workshop on 12 December?",
"custom": {
"kind": "approval",
"requestId": "request_1042",
"approverId": "alex",
"status": "pending"
}
}
]TalkJS returns the new message ID, for example [{"id": "msg_abc123"}]. Save that ID and the conversation ID with the approval request in your database. When Alex makes a decision, your backend will use them to update the card.
Jamie and Alex both see the workshop request, but only Alex can approve it. We’ll use the TalkJS theme system to give each of them the right view of the same message.
Here’s what Alex sees while the request is pending.
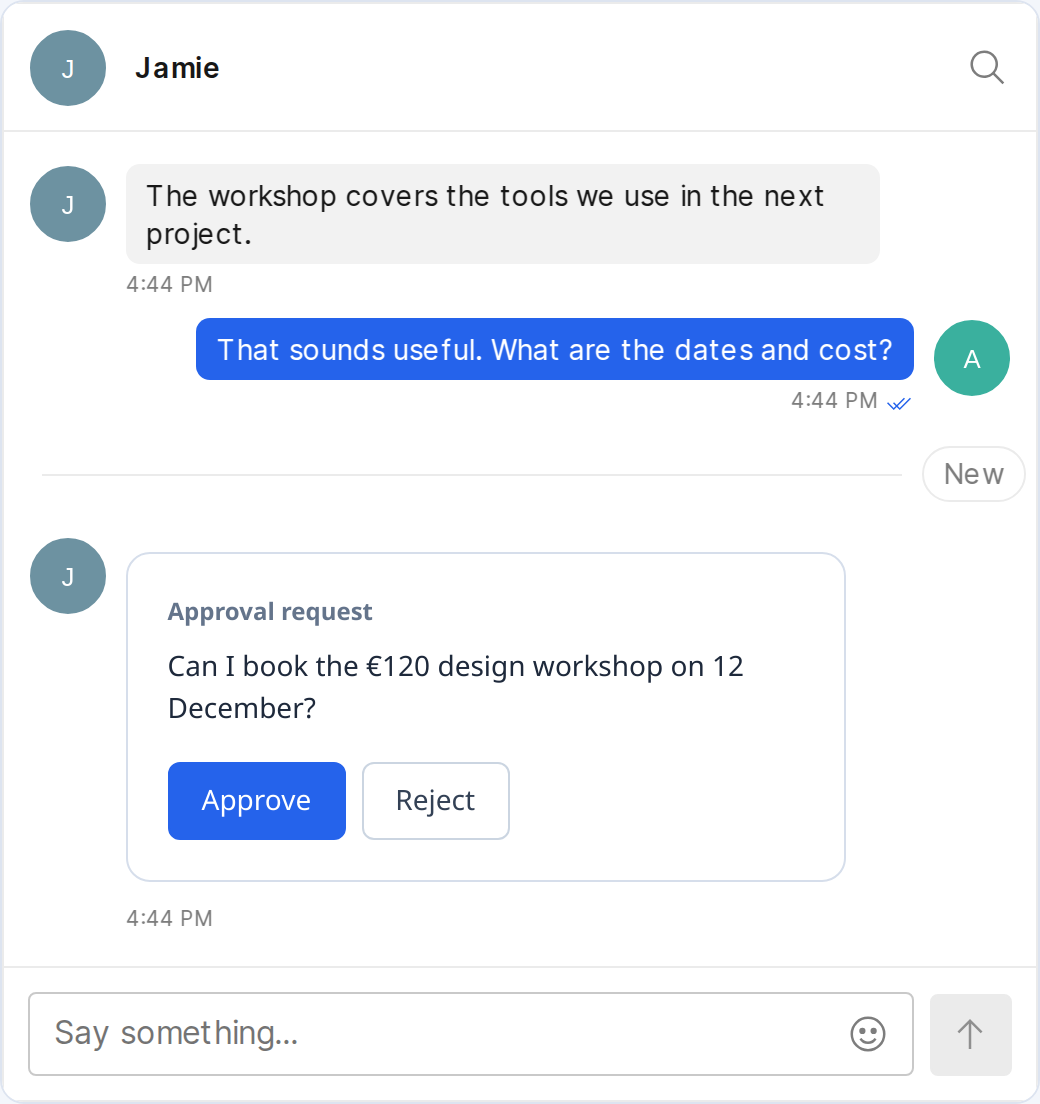
Create an ApprovalCard component that shows Jamie’s question. For a pending request, it compares the viewer’s TalkJS user ID with the approverId on the message. Alex gets the decision buttons, which we’ll build next. Everyone else in the chat, including Jamie, sees “Awaiting a decision”. Once Alex approves or rejects the request, everyone sees the result.
import { ApprovalButtons } from './ApprovalButtons.jsx';
export function ApprovalCard({ approval, text, currentUserId, onDecision }) {
const { requestId, approverId, status } = approval;
const canDecide = currentUserId === approverId;
const statusLabel = { approved: 'Approved', rejected: 'Rejected' }[status];
return (
<article className="approval-card" aria-label="Approval request">
<p className="approval-card-label">Approval request</p>
<p className="approval-card-text">{text}</p>
{status === 'pending' && canDecide && (
<ApprovalButtons
onDecision={decision => onDecision(requestId, decision)}
/>
)}
{status === 'pending' && !canDecide && (
<p className="approval-card-status">Awaiting a decision</p>
)}
{status !== 'pending' && (
<p className="approval-card-status" role="status">
{statusLabel || 'Status unavailable'}
</p>
)}
</article>
);
}When Alex clicks Approve, the buttons tell the card which choice Alex made. The card knows which request it belongs to, so it can give your app both pieces of information, for example onDecision('request_1042', 'approved'). Disable the buttons while your app saves the decision. If saving fails, show Alex an error and let them try again.
import { useState } from 'react';
export function ApprovalButtons({ onDecision }) {
const [saving, setSaving] = useState(false);
const [error, setError] = useState('');
async function decide(decision) {
setSaving(true);
setError('');
try {
await onDecision(decision);
} catch {
setError("Couldn't finish updating the request. Please try again.");
} finally {
setSaving(false);
}
}
return (
<>
<div className="approval-card-actions">
<button className="approval-card-approve" disabled={saving}
onClick={() => decide('approved')}>
Approve
</button>
<button disabled={saving} onClick={() => decide('rejected')}>
Reject
</button>
</div>
{saving && <p role="status">Saving…</p>}
{error && <p role="alert">{error}</p>}
</>
);
}To give the card the appearance shown above, save these styles in approval-card.css.
Card styles
.approval-card {
align-self: flex-start;
width: min(360px, 100%);
box-sizing: border-box;
margin: 8px 0;
padding: 20px;
border: 1px solid #d6deeb;
border-radius: 12px;
background: white;
color: #1e293b;
font: 14px/1.5 system-ui, sans-serif;
}
.t-theme-message .t-message-body:has(.approval-card) {
padding: 0;
background: transparent;
}
.approval-card-label {
margin: 0 0 8px;
color: #64748b;
font-size: 12px;
font-weight: 600;
}
.approval-card-text { margin: 0 0 16px; }
.approval-card-actions { display: flex; gap: 8px; }
.approval-card-status { margin: 0; font-weight: 600; }
.approval-card button {
padding: 8px 16px;
border: 1px solid #cbd5e1;
border-radius: 6px;
background: white;
color: #334155;
font: inherit;
cursor: pointer;
}
.approval-card .approval-card-approve {
border-color: #2563eb;
background: #2563eb;
color: white;
}
.approval-card button:disabled { opacity: 0.6; cursor: wait; }
.approval-header { padding: 0 12px; }Load the card styles in the same place you load the TalkJS stylesheet, just after it.
import '@talkjs/react-components/default.css';
import './approval-card.css';Now that we have the card, we need TalkJS to show it whenever someone sends an approval request. TalkJS uses a theme component called TextBlock to display the text inside a message. Replacing that component lets us put the card where Jamie’s question would normally appear, with Jamie’s avatar and the time still visible.
Create ApprovalTextBlock to choose what to show. If the message has kind: 'approval', it reads the request details from the message and gives them to the card. TalkJS also supplies the ID of the person viewing the chat, so the card knows whether to show the buttons. For any other message, use the usual TalkJS text block.
import { defaultTheme } from '@talkjs/react-components';
import { ApprovalCard } from './ApprovalCard.jsx';
export function ApprovalTextBlock(props) {
if (props.message.custom.kind !== 'approval') {
return <defaultTheme.TextBlock {...props} />;
}
return (
<ApprovalCard
approval={props.message.custom}
text={props.message.plaintext}
currentUserId={props.common.currentUser.id}
onDecision={props.common.themeCustom.onDecision}
/>
);
}Alex’s choice needs to reach the app that owns the workshop request. Write an onDecision function that sends the choice and request ID to your backend. Use your app’s usual way of making authenticated requests. The example below uses fetch.
export async function onDecision(requestId, decision) {
const response = await fetch(
`/api/approval-requests/${encodeURIComponent(requestId)}/decision`,
{
method: 'POST',
headers: { 'Content-Type': 'application/json' },
body: JSON.stringify({ decision }),
}
);
if (!response.ok) {
throw new Error('Could not update the approval request.');
}
}In your existing chatbox, set the theme’s TextBlock to ApprovalTextBlock and pass onDecision in themeCustom.
'use client';
import { Chatbox } from '@talkjs/react-components';
import { ApprovalTextBlock } from './ApprovalTextBlock.jsx';
import { onDecision } from './approval-api.js';
export function ApprovalChat({ appId, userId, conversationId }) {
return (
<Chatbox
appId={appId}
userId={userId}
conversationId={conversationId}
theme={{ TextBlock: ApprovalTextBlock }}
themeCustom={{ onDecision }}
/>
);
}When your backend receives Alex’s choice, look up the request and check that the signed-in user is allowed to decide it. Save the decision in your app. Then use the conversation and message IDs you stored with the request to edit Jamie’s message. If Alex approved the workshop, set its status to approved.
PUT https://api.talkjs.com/v1/<APP_ID>/conversations/{conversationId}/messages/{messageId}
Authorization: Bearer <ADMIN_JWT>
Content-Type: application/json
{
"custom": {
"status": "approved"
}
}If Alex rejected the request, use rejected. Make this call from your backend with an Admin JWT. Once TalkJS has updated the message, return success to the browser.
If the TalkJS update fails after you’ve saved the decision, return an error so Alex can retry. On the next attempt, read the decision you already saved and use it to update the message.
TalkJS sends the updated message to both people. Alex’s buttons and Jamie’s “Awaiting a decision” now show the same result, including when either of them opens the chat again.
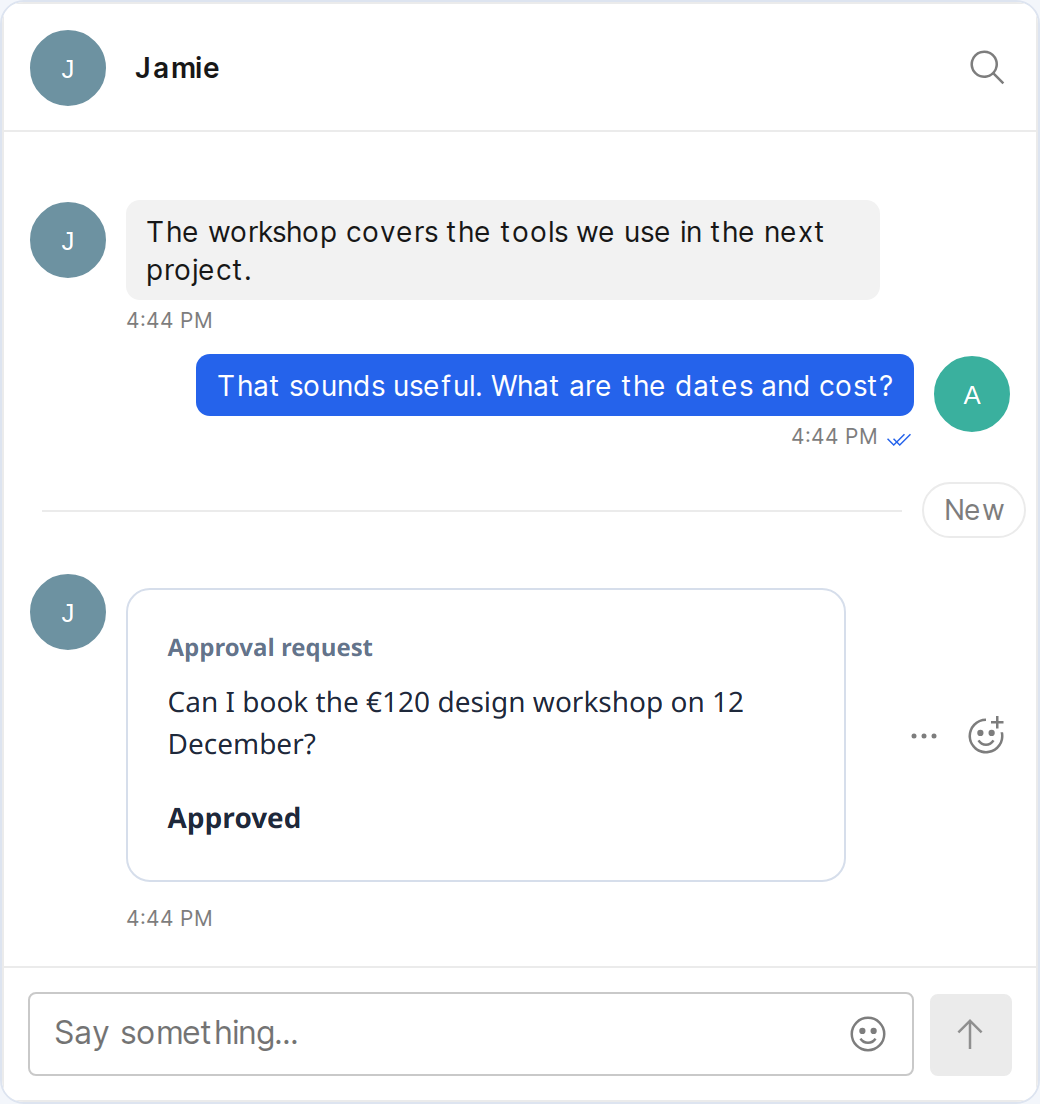
An approval message works well when Jamie occasionally asks for approval in an ongoing chat with Alex. If your app opens a new conversation for each request, put the card in the chat header so it stays visible as the discussion grows. In that version, the request details and status belong to the conversation itself.
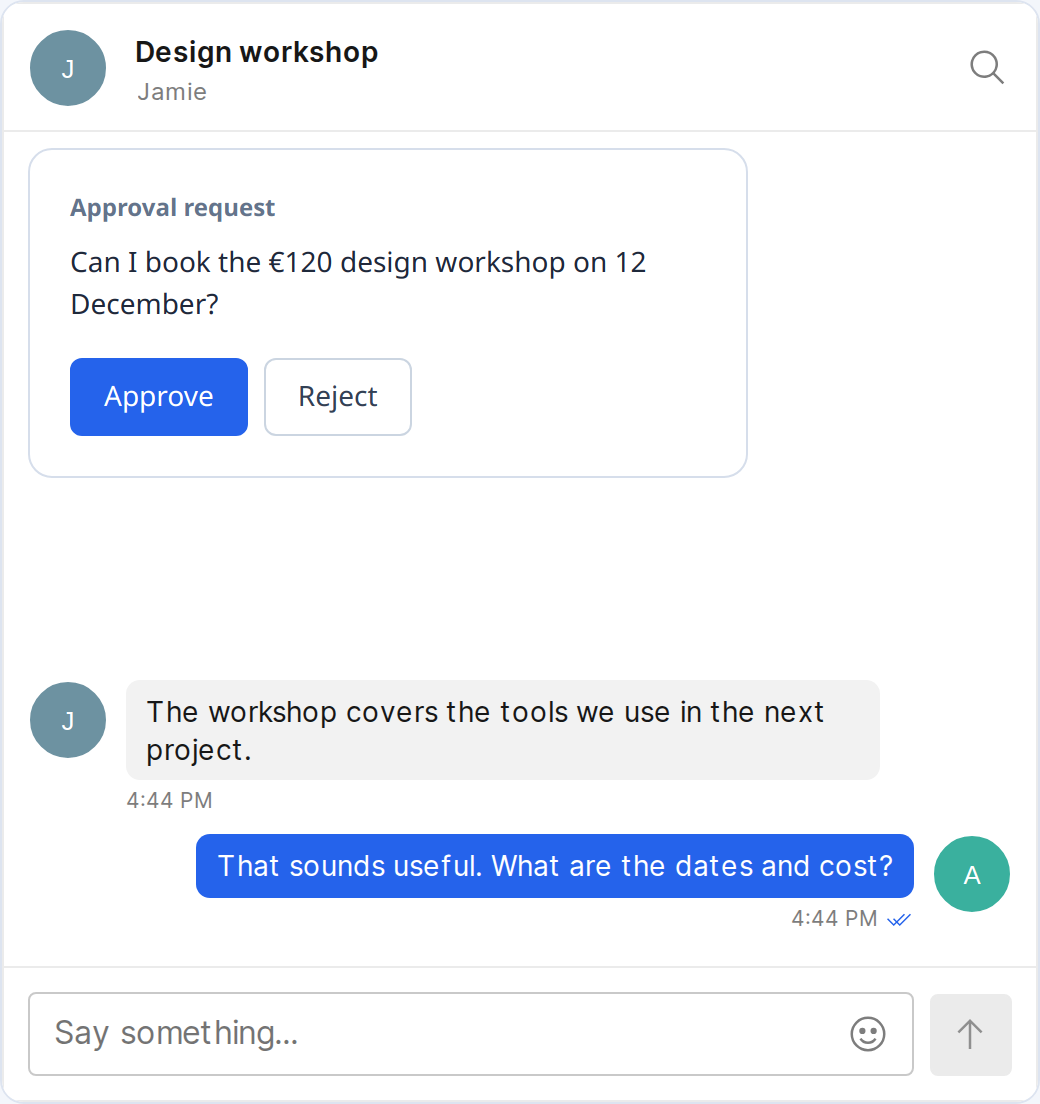
Set the approval details in the conversation’s custom data.
await conversation.set({
subject: 'Design workshop',
custom: {
kind: 'approval',
requestId: 'request_1042',
approverId: 'alex',
status: 'pending',
description: 'Can I book the €120 design workshop on 12 December?',
},
});Save the conversation ID with the workshop request. You can reuse the card and buttons you already built. This time, create a ChatHeader component that reads the request from the conversation’s custom data and displays the card just below the title.
import { defaultTheme } from '@talkjs/react-components';
import { ApprovalCard } from './ApprovalCard.jsx';
export function ApprovalHeader(props) {
const { common } = props;
const approval = common.conversation.custom;
if (approval.kind !== 'approval') {
return <defaultTheme.ChatHeader {...props} />;
}
return (
<>
<defaultTheme.ChatHeader {...props} />
<div className="approval-header">
<ApprovalCard
approval={approval}
text={approval.description}
currentUserId={common.currentUser.id}
onDecision={common.themeCustom.onDecision}
/>
</div>
</>
);
}Set the chatbox’s theme to { ChatHeader: ApprovalHeader } and keep the same themeCustom.onDecision callback.
After your backend saves Alex’s choice, update the conversation using the ID you stored with the request. For an approval, the update looks like this.
PUT https://api.talkjs.com/v1/<APP_ID>/conversations/{conversationId}
Authorization: Bearer <ADMIN_JWT>
Content-Type: application/json
{
"custom": {
"status": "approved"
}
}For a rejection, set the status to rejected. Jamie and Alex will see the decision at the top of the chat, with their discussion underneath.