This guide uses the classic JavaScript SDK. If you're starting a new project, consider using TalkJS Chat UI components, which are more customizable.
In this post we’ll explore how we can add video call functionality to a TalkJS' classic JavaScript SDK. With remote work more popular than ever, video calling is in high demand and considered a must-have feature for many chat applications. We’ll be making use of the Daily video API, which will allow us to get up and running quickly!
Setting up a simple TalkJS chat
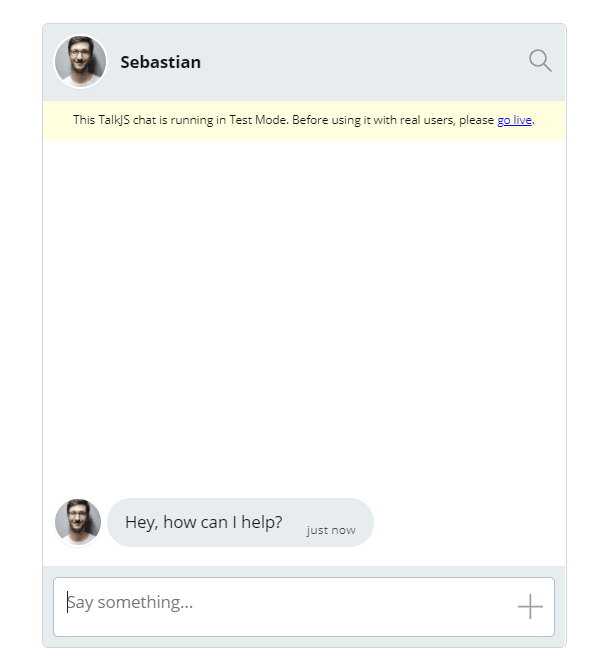
First of all, we’ll set up a simple conversation. Follow this Getting Started guide. You may also want to change the photoUrl of each user to an actual image address. You can use free images to act as the profile pictures of your users.
For this tutorial, we will use a chatbox (a single conversation) instead of an inbox that allows you to swap between conversations. Make sure you change this code from the Getting Started guide from:
const inbox = session.createInbox({selected: conversation});
inbox.mount(document.getElementById("talkjs-container"));
To the new code for a chatbox:
var chatbox = session.createChatbox(conversation);
chatbox.mount(document.getElementById("talkjs-container"));
Run your application, it should look something like this:
Perfect! Let’s move on to adding a button to the chat header that will allow us to make video calls.
Adding a video call button to TalkJS chat
We want to add a video call button to our chat header. We will use the button to toggle whether the video call dialog is shown. Unfortunately we cannot use the in-built ChatHeader component that comes with the chatbox out-of-the-box. TalkJS does not allow click handlers to be added to buttons there. To get around this we can use custom chat headers. This blog post also nicely describes how to customize the chatbox UI header.
Let’s get started!
Using a custom chat header in TalkJS
First, change our chatbox code to not use the default chat header.
Change the code from:
var chatbox = session.createChatbox(conversation);
To the new version that won’t use the default header:
var chatbox = session.createChatbox(conversation, {showChatHeader: false});
Incorporate the talkjs-container div into the structure shown below. As you can see we have a div for our entire chatbox, and a separate div for our header. We also have a div called button-container where we’ll add our video call button.
<!-- Container element for all TalkJS UI elements -->
   <div class="chatbox-container">

    <!-- Custom TalkJS chat header -->
    <div id="chatbox-header">

        <div id="header-bg"></div>
         <div id="user-avatar"></div>
         <p id="header-subject"><span id="header-username"> Username</span></p>


        <div class="button-container">
            <div class="call-button">
                <!--input type="checkbox" name="notificationToggle" class="toggle-checkbox" id="toggle"-->
                <input type="image" name="videoCallButton" id="videocall" src="https://img.icons8.com/material-sharp/24/ffffff/video-call--v1.png"/>
            </div>
        </div>
    </div>

    <!-- container element in which TalkJS will display a chat UI -->
    <div id="talkjs-container" style="width: 100%;  height: 500px"><i>Loading chat...</i></div>

</div>
Adding a username and picture to a TalkJS custom chat header
Add the following code to incorporate your user’s name and profile picture into the custom header:
// Add the participant user's name and photo to the custom header
var headerUsername = document.getElementById('header-username');
headerUsername.textContent = other.name;
document.getElementById('user-avatar').style.backgroundImage = "url(" + other.photoUrl + ")";
Styling a custom chat header in TalkJS
Finally, we’ll add some basic CSS so that child elements in the chatbox-container are centered horizontally and scale their width similar to how the default Chatbox.
<style>
/* Container for everything TalkJS*/
.chatbox-container {
    width: 420px;
    max-width: 100%;
    margin: auto;
}

/* Custom header for the chatbox*/
#chatbox-header {
    height: 110px;
    position: relative;
    background-color: #000;
    display: flex;
    flex-direction: row;
    justify-content: flex-start;
    /* Slightly curve the top of the header */
    border-radius: 10px 10px 0 0;
    margin-bottom: -3px;
    padding: 10px;
    position: relative;
}

#header-bg {
  position: absolute;
  top: 0;
  left: 0;
  width: 100%;
  height: 100%;
  background-size: cover;
  background-repeat: no-repeat;
  background-position: center;
  border-radius: inherit;
  opacity: 0.6;
}

#user-avatar {
  position: absolute;
  height: 50px;
  width: 50px;
  background-size: cover;
  background-repeat: no-repeat;
  background-position: center;
  border-radius: 50%;
  border: 2px solid #eee;
}

#chatbox-header p {
  font-family: "Helvetica", sans-serif;
  color: #eee;
  margin: 0;
}

#header-subject {
  position: absolute;
  font-size: 32px;
  left: 70px;
  top: 7px;
}

/* Notification toggle */
.button-container {
    text-align: right;
    position: absolute;
    bottom: 15px;
    right: 10px;
}

.button-container p {
    display: inline;
    font-size: 10px;
    padding-right: 10px;
    vertical-align: middle;
}
.call-button {
    vertical-align: middle;
    display: inline-block;
    position: relative;
    width: 51px;
    -webkit-user-select:none;
    -moz-user-select:none;
    -ms-user-select: none;
    user-select: none;
    height: 18px;
}
    </style>
After these changes your chat should resemble the following screenshot:
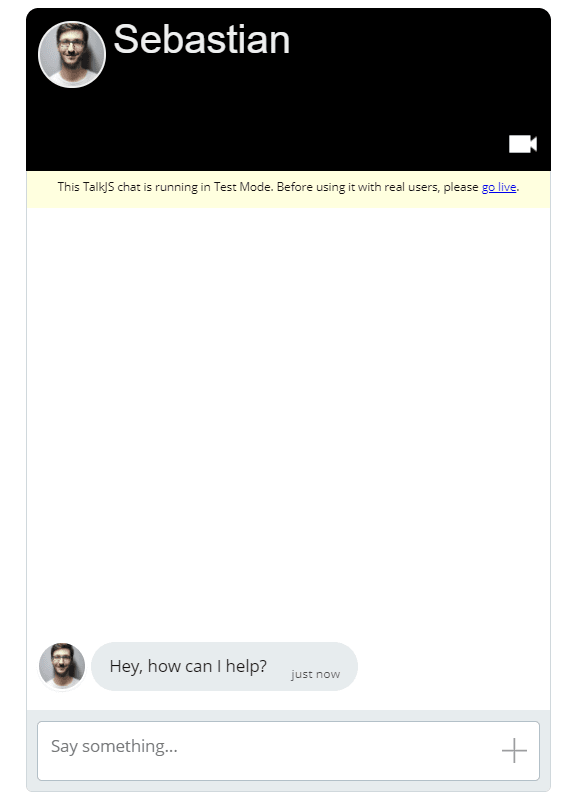
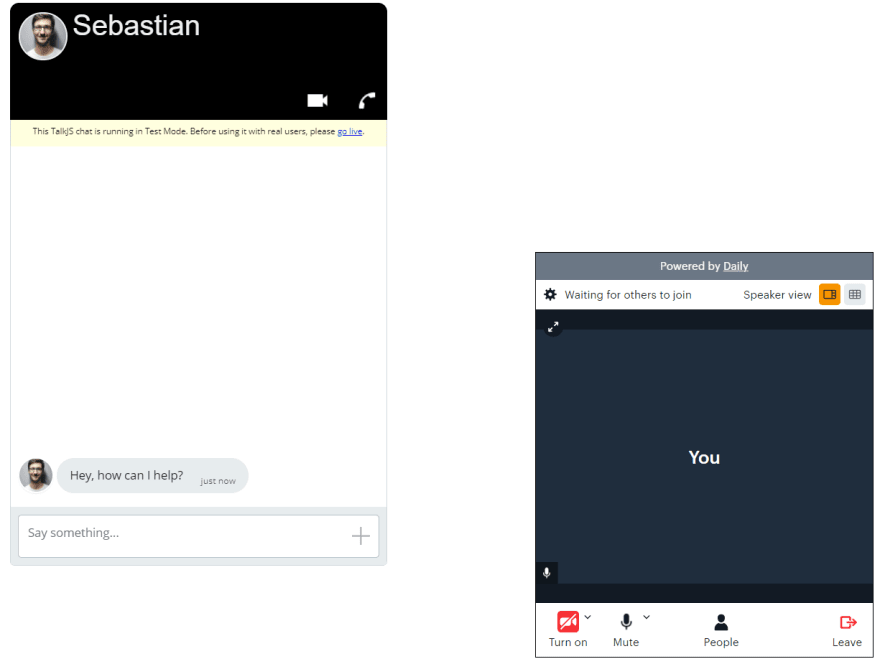
Wow, we’ve made a lot of progress. You can see our new video button, but it currently does not have any functionality.
Time to hook up the Daily API and have this button open the video call dialog.
Setting up the Daily API
First you need to sign up for the Daily API. Their free plan allows you to get building and prototyping straight away, without adding any form of payment!
Creating a Daily room by following this guide. Each Daily room has an associated URL, we will need this to have our video call.
To hook up our button to the Daily API we will have to make two additions to our current code:
Simply add these script tags to your html page:
<script crossorigin src="https://unpkg.com/@daily-co/daily-js"></script>
Add the following code, make sure to use your own Room URL we set up here
```
var callButton = document.getElementById('videocall');

    callButton.addEventListener('click', function() {
        callFrame = window.DailyIframe.createFrame({
            showLeaveButton: true,
            showFullscreenButton: true,
        });
        callFrame.join({ url: 'https://talkjstest.daily.co/{your-video-call-room-id}' })
    });

```
You can see we passed in some additional properties like showLeaveButton and showFullscreenButton. Check out this guide for more information on what you can do with the premade Daily UI.
Let’s run the application and check out our brand new video call functionality!
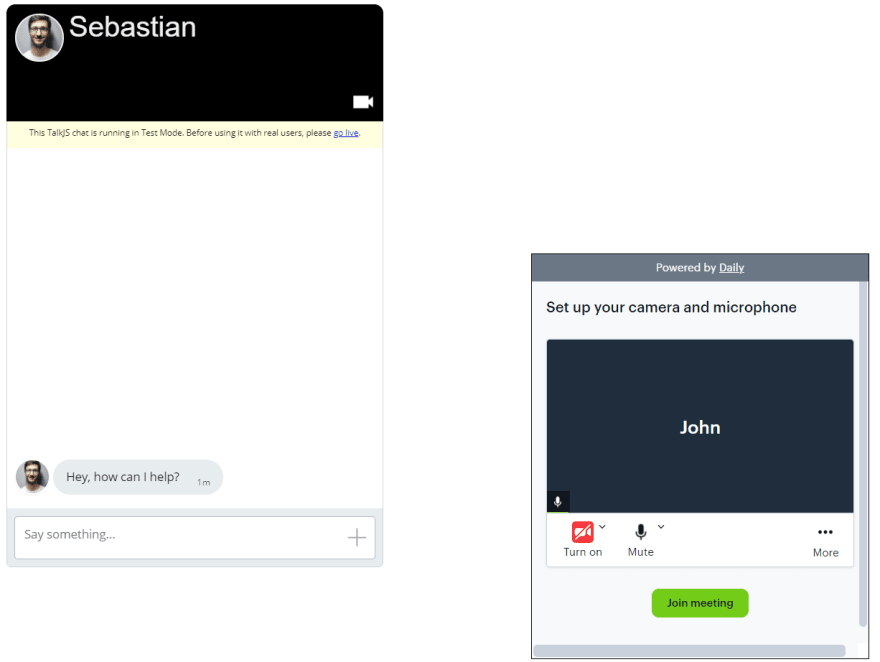
Perfect! Note, if you would like to change anything about how the video call dialog behaves, try changing your Room settings.
Adding regular audio calls to a TalkJS chat
We’ll also add another button, this time for regular audio calls. The main difference here is the user will be placed directly into the call without being shown an option to set up their microphone and camera.
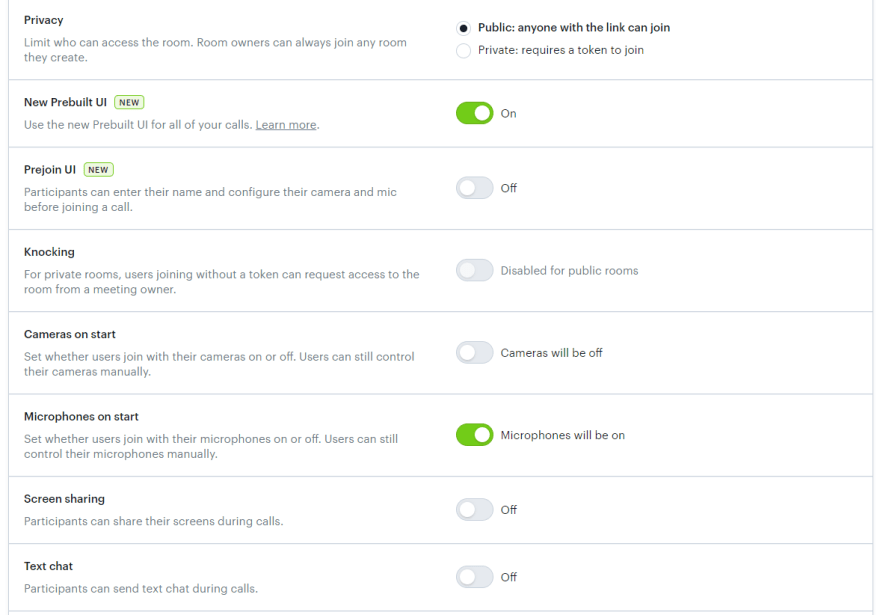
Go back to your Daily API dashboard and create a new room. Select settings that are typical of regular calls like:
- Turning off the Prejoin UI
- Turning off video by default
- Turning off screen share by default.
Here are the settings I have selected:
Now that our room is set up let’s add the actual call button icon. Update our button-container div to the following:
<div class="button-container">
            <div class="call-button">
                <input type="image" name="videoCallButton" id="videocall" src="https://img.icons8.com/material-sharp/24/ffffff/video-call--v1.png"/>
            </div>
            <div class="call-button">
                <input type="image" name="audioCallButton" id="audiocall" src="https://img.icons8.com/material-rounded/24/ffffff/phone-disconnected.png"/>
            </div>
</div>
That will add the call icon to our custom chat header panel, but the button will have no functionality. Let’s add functionality by following similar steps as before. Make sure your new code looks as follows:
var callButton = document.getElementById('videocall');
    var audioCallButton = document.getElementById('audiocall');

    var callFrame;

    callButton.addEventListener('click', function() {
        if(callFrame != null){
            callFrame.destroy();
        }
        callFrame = window.DailyIframe.createFrame({
            showLeaveButton: true,
            showFullscreenButton: true,
        });


        callFrame.join({ url: 'https://talkjstest.daily.co/{your-video-call-room-id}' })
    });

    //audio button listener
        audioCallButton.addEventListener('click', function() {


        if(callFrame != null)
        {
            callFrame.destroy();
        }

        callFrame = window.DailyIframe.createFrame({
            showLeaveButton: true,
            showFullscreenButton: true,

        });
        callFrame.join({ url: 'https://talkjstest.daily.co/{your-audio-call-room-id}' })
    });
You can see that we now destroy the callFrame Chat frame each time the button is pressed, and proceed to load the new audio or video UI depending on what button was clicked. This will ensure only one frame is displayed at any one time.
Try out your new audio call button. You should be placed directly into a call without having to set up your microphone or camera. It should be similar to having a call on Microsoft Teams, Slack, or Facebook Messenger.
There you have it, both audio and video calls integrated with a TalkJS chatbox! Don’t be afraid to take this project further. This JSFiddle project from TalkJS, along with this sample project from Daily, are great resources that show you even more functionality.


