
This guide uses the classic JavaScript SDK. If you're starting a new project, consider using TalkJS Chat UI components, which are more customizable.
In this tutorial, we'll show you how to integrate the TalkJS' classic JavaScript SDK with Spring Boot to build a chat app. We'll build a Spring Boot backend that stores user data in a database and serves it from a REST endpoint, and then use this data in our frontend to create TalkJS users and start a chat between them. To keep things simple, we will use the in-memory H2 database, but you can expand it to other popular database options.
You can find the entire source code for this project on GitHub.
Note
This tutorial focuses on the basics of how to store and access user data, and does not implement authentication and authorization. In a production environment, you will need to use Spring Security to set up password access for your app.
Setting up the Spring Boot application
To set up the Spring Boot application, the easiest way is to install Spring Tool Suite. Launch the application and create a new Spring Starter project. The wizard will ask for a name and all the dependencies that you want to add. For this application, we need the following:
- Spring Data JPA
- Spring Web
- H2 Database
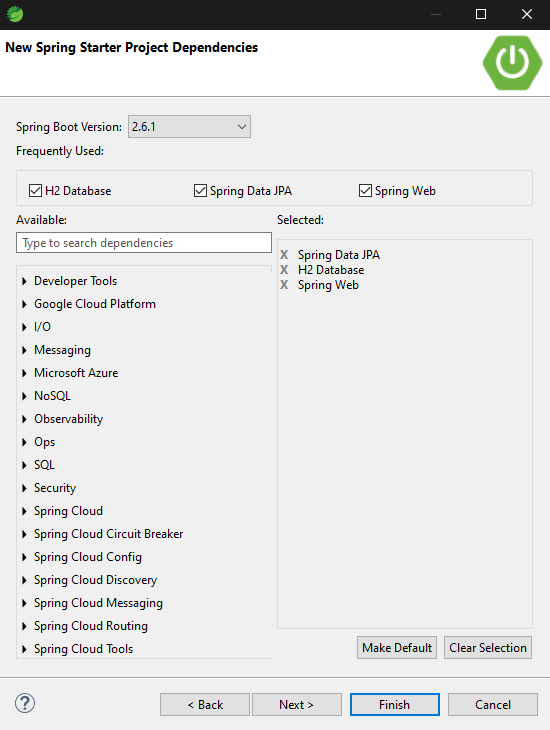

Once you click Finish, it will set up a Spring Boot application that is ready to run. Open, application.properties present inside src/main/resources. Add the following lines to set up the H2 in-memory database.
spring.datasource.url=jdbc:h2:mem:testdb
spring.datasource.driverClassName=org.h2.Driver
spring.datasource.username=sa
spring.datasource.password=
spring.jpa.show-sql=true
spring.jpa.properties.hibernate.dialect=org.hibernate.dialect.H2Dialect
spring.jpa.hibernate.ddl-auto= update
spring.h2.console.enabled=true
This will configure the H2 database and also enable the console to visually view and manage the data present inside the database.
Creating the Model and Repository
We will now model the user and create a repository to save and retrieve users. Spring Boot provides an easy-to-use interface JpaRepository, that already has most of the methods we need. The model class is shown below. We use the @Entity annotation to mark the class as an entity that will be present in a database. The @Table annotation denotes the name of the table.
@Entity
@Table(name = "users")
public class User {
    @Id
    @GeneratedValue(strategy = GenerationType.AUTO)
    private Long id;
    @Column(name = "name")
    private String name;
    @Column(name = "dp")
    private String dp;
    @Column(name = "email")
    private String email;
    @Column(name = "role")
    private String role;
}
There are five fields for the user. The id is automatically generated by Hibernate which is used within Spring Boot for Object-Relational Mapping (ORM). The @Column annotation denotes each column's name within the database. We also have a constructor, getters, and setters for the above class, but it is not shown above since they are auto-generated.
The repository interface is by far the smallest in the project. We just need to have an empty interface that implements the JpaRepository. This lets us use all the methods that come with it.
@Repository
public interface UserRepository extends JpaRepository<User, Long> {
}
Creating the Controller
Next, we'll create a controller for our API enpoints. We'll create two endpoints, /createUser and /getUser. The following code outlines the controller:
@CrossOrigin("*")
@RestController
public class UserController {

    @Autowired
    UserRepository userRepository;

    @PostMapping(value = "/createUser")
    public ResponseEntity<User> createUser(@RequestBody User user) {
    return new ResponseEntity<>(userRepository.save(user), HttpStatus.OK);
    }

    @GetMapping(value = "/getUser")
    public ResponseEntity<User> getUser(@RequestParam(required = true) Long userId) {
    return new ResponseEntity<>(userRepository.findById(userId).get(), HttpStatus.OK);
    }

}
The @Autowired annotation is used for dependency injection. We have the @GetMapping annotation to denote a GET request and a @PostMappingannotation to denote a POST request. To create a user, we use the save() method present inside the userRepository. Note that in a production scenario, you would also need error checks to ensure that the data is correct. The @CrossOrigin annotation lets you specify which domains to accept requests from. For the purposes of this example we''ll accept requests from all domains.
Creating users using the API and verifying them
Use the following payload to create an agent and a user. The application will be running on localhost:8080. You can use curl or an API platform like Postman to perform the API calls.
curl -X POST http://localhost:8080/createUser \
     -H "Content-Type: application/json" \
     -d '{
           "name": "Tom Hardy",
           "dp": "https://randomuser.me/api/portraits/men/1.jpg",
           "email": "tom.hardy@operator.com",
           "role": "AGENT"
         }'
curl -X POST http://localhost:8080/createUser \
-H "Content-Type: application/json" \
-d '{
"name": "John Morrison",
"dp": "https://randomuser.me/api/portraits/men/62.jpg",
"email": "john.morrison@operator.com",
"role": "USER"
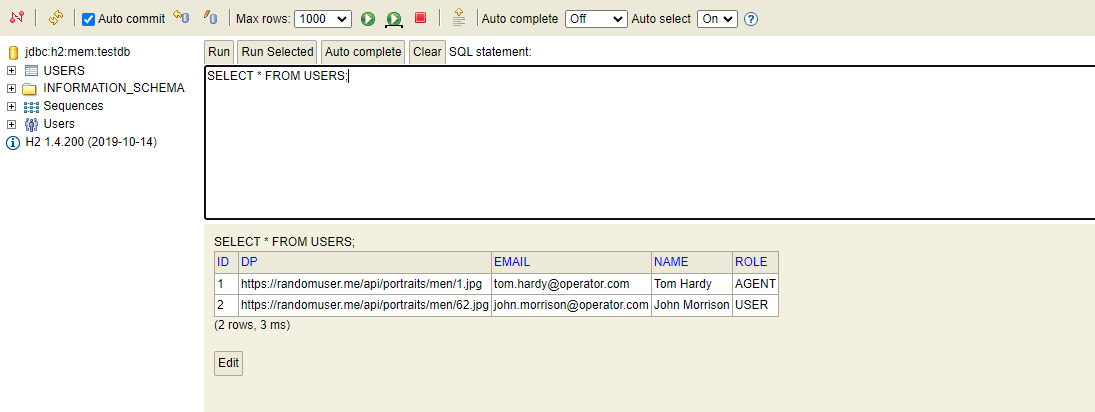
}'You should get a 200 OK response and the created user for both the API calls. Since we enabled the H2 console, we can also view the database contents at localhost:8080/h2-console:
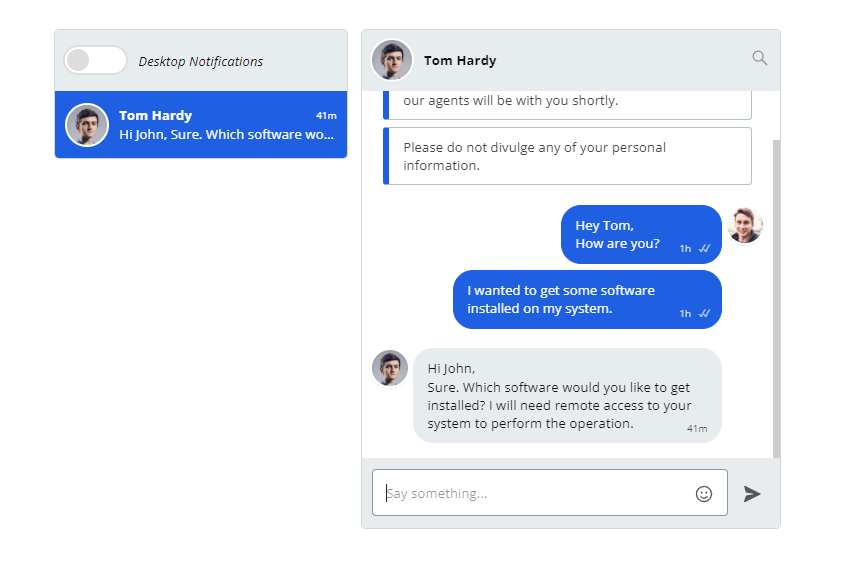
Setting up the frontend application
Now we'll create the frontend, following the TalkJS getting started guide to set up a inbox. Make changes to the code as follows:
(
    async function() {
    await Talk.ready;
    let agent = await getAgent();
    let user = await getUser();

    const session = new Talk.Session({
        appId: '<APP_ID>',
        me: user,
    });
    var conversation = session.getOrCreateConversation(Talk.oneOnOneId(user, agent));

    conversation.setAttributes({
        welcomeMessages: ["You can start typing your message here and one of our agents will be with you shortly.", "Please do not divulge any of your personal information."]
    })
    conversation.setParticipant(user);
    conversation.setParticipant(agent);

    var inbox = session.createInbox(conversation);
    inbox.select(conversation);
    inbox.mount(document.getElementById("talkjs-container"));
}());
You will need to replace your app ID with with the value found in the Settings tab of your TalkJS dashboard.
Note that we use two asynchronous functions here, getAgent() and getUser() to retrieve the agent and user data. Add the following functions above the existing code inside the script file.
const getAgent = async () => {
    const response = await fetch('http://localhost:8080/getUser?userId=1');
    const data = await response.json();
    let agent = new Talk.User({
        id: data.id,
        name: data.name,
        photoUrl: data.dp,
        email: data.email,
        role: data.role
    });
    return agent;
}
const getUser = async () => {
    const response = await fetch('http://localhost:8080/getUser?userId=2');
    const data = await response.json();
    let user = new Talk.User({
        id: data.id,
        name: data.name,
        photoUrl: data.dp,
        email: data.email,
        role: data.role
    });
    return user;
}
Once we receive the user and agent data from our database through the API calls, we create Talk.User objects and map them to it. This will allow us to start a conversation with the users retrieved from the database.
Conclusion
We have successfully integrated a Spring Boot application with TalkJS and retrieved user data from an in-memory database through API calls. Even though this is a very simple example that showcases the capabilities of TalkJS, you can expand it to any production scenario by implementing authentication, authorization, role-based dashboards, and more. The entire source code for this project is available on GitHub.


