

This guide uses the classic JavaScript SDK. If you're starting a new project, consider using TalkJS Chat UI components, which are more customizable.
Rails, popularly known as Ruby on Rails, is a fullstack web application framework written in the Ruby programming language. It follows the traditional MVC (Model-View-Controller) paradigm providing a database (model), web pages (view), and services (controller).
This tutorial shows you how to use TalkJS's classic JavaScript SDK to add chat to your Rails application:
To follow along with the tutorial, you'll need:
- A TalkJS account. TalkJS provides a ready-to-use chat client for your application. Your account gives you access to TalkJS's free development environment.
- A Ruby installation.
You may also already have a Rails project that you want to add TalkJS to. If not, we'll walk you through how to install Rails and set up a new project in the next section.
All the code for this example can be found in our GitHub repo.
Install and set up Rails
We'll start by installing Rails. Open your terminal and run:
gem install rails
Now, go to the folder where you want to create your new project. Inside the directory, run:
rails new rails-talkjs
This creates a new folder called rails-talkjs inside the directory you're currently in. Move into the folder by running cd rails-talkjs. To test your app, you can run:
rails server
This starts the development server at localhost:3000.
Create a user model
Next, we must create a model for storing user data. To do this, run:
rails generate model User name:string email:string photoUrl:string id:string role:string
This creates a migration file inside the /db/migrate folder of your project. Note that, by default, Rails creates models with an integer id field. We're going to use a string id field since it's easier to create TalkJS users. To do this, open the migration file and alter it as shown:
class CreateUsers < ActiveRecord::Migration[7.1]
  def change
    create_table :users, id: false do |t|
      t.string :name
      t.string :email
      t.string :photoUrl
      t.string :id, primary_key: true
      t.string :role

      t.timestamps
    end
  end
end
This ensures that the default id field is not created and the one we created is used as the primary key. Note that 7.1 here is the version of ActiveRecord used to create the migrations – if you're adding TalkJS to your own project you might see a different version.
Now, run the migration script to create the table:
rails db:migrate
Add user data
Next, we'll create some user data. For the purposes of this tutorial, we'll store it in a SQLite database. SQLite is included with Rails, so this means we can get started without installing anything else. If you want to use a different database in your project, see the configuration guide.
There's a file called seeds.rb inside the db folder. Open it and add the following:
User.create(name: "John", email: "christopher.garcia@example.com", id: "john.garcia", photoUrl: "https://talkjs.com/new-web/avatar-2.jpg", role: "default")
User.create(name: "Leroy", email: "leroy.stanley@example.com", id: "leroy.stanley", photoUrl: "https://talkjs.com/new-web/avatar-3.jpg", role: "default")
User.create(name: "Ray", email: "ray.mitchelle@example.com", id: "ray.mitchelle", photoUrl: "https://talkjs.com/new-web/avatar-4.jpg", role: "default")
These are commands to create three users with the fields specified. We've used fields that match those of a TalkJS user so that it is straightforward to create them and start conversations. To add this to our database, run:
rails db:seed
To make it easier to test the app out, the example code for this tutorial includes a seeds.rb file that creates users in the database. You can run it using the same command shown above.
Add a controller
Now we're going to create a controller called Chat. To do this, run:
rails generate controller Chat
This creates a new file called chat_controller.rb inside the rails-talkjs/app/controllers folder. It also creates a new empty folder called chat inside rails-talkjs/app/views.
In our controller we'll want to use the gon gem, which makes it easier to use Rails variables inside JavaScript. To install this, open your Gemfile and add a new entry:
gem "gon"
Then, run the command to install the gem:
bundle install
This installs gon in your project. To start using it, we must make one more change. Go to the application.html.erb file present inside rails-talkjs/app/views/layouts. Just under the <%= javascript_importmap_tags %>, add:
<%= Gon::Base.render_data %>
Now that you've installed gon, go inside the chat_controller.rb file and add the following:
class ChatController < ApplicationController
  def index
    @users = User.all
    gon.users = @users
  end

  def conversation
    @users = User.all
    gon.mainUser = User.find_by(id: 'john.garcia')
    gon.users = @users
  end
end
This creates two actions inside the chat_controller. The first one, called index, assigns all the users from the database to a variable @users. This is then also assigned to the gon.users variable.
The second action does the same thing, but also assigns another variable called gon.mainUser with the value of the user John Garcia. In the next section, we're going to add two views for the two actions we just created.
Add a view
A view in a Rails application handles the presentation of the application's data. We use an extension called .erb that stands for Embedded Ruby. It is a mix of HTML and Ruby. This is similar to .jsx that is a mix of JavaScript and HTML. We're going to create two erb files. The first one corresponds to the initial screen where the user can make a chat selection. The second one displays the actual chat itself.
Index view
Inside the empty chat folder in rails-talkjs/app/views, create a new file called index.html.erb. Add the following code inside it:
<div class = "button-container">
<h3 class="index-title">John's chats</h3>
<%= button_to 'Chat with Leroy', chat_conversation_path(@users.second.id), method: 'get', class: 'chat-button' %>
<%= button_to 'Chat with Ryan', chat_conversation_path(@users.third.id), method: 'get', class: 'chat-button' %>
</div>
This contains a div that houses a title and two buttons. The buttons are created using Rails' Action View URL Helpers.
Conversation view
Next, create another file called conversation.html.erb and add the following code inside it.
<%= javascript_import_module_tag "conversation" %>
<div class = "main-container">
<%= content_tag :button, type: 'button', class: 'chat-button', onclick: "window.location='#{chat_path}'" do %>
<!-- SVG left arrow icon -->
<svg
xmlns="http://www.w3.org/2000/svg"
width="16"
height="16"
viewBox="0 0 24 24"
fill="none"
stroke="currentColor"
stroke-linecap="round"
stroke-linejoin="round"
stroke-width="2"
>
<path d="m15 18-6-6 6-6" fill="none" />
</svg>
John's chats
<% end %>
<div id="talkjs-container">
<i>Loading chat...</i>
</div>
</div>
The first line is to use the conversation.js file with this view. We'll be creating this in the section where we include TalkJS. Next, we have a div that houses a button and another div to add the TalkJS chat. On clicking the button, we go back to the index view.
Include TalkJS
It's now time to add TalkJS to our project. TalkJS provides pre-built chat UIs that allow you to quickly add chat to your application. In this tutorial, we'll use the Chatbox UI.
We'll use TalkJS's classic JavaScript SDK to add the chatbox. Go to the application.html.erb file once again and add the following under the line you previously added:
<script>
  (function(t,a,l,k,j,s){
s=a.createElement('script');s.async=1;s.src="https://cdn.talkjs.com/talk.js";a.head.appendChild(s)
;k=t.Promise;t.Talk={v:2,ready:{then:function(f){if(k)return new k(function(r,e){l.push([f,r,e])});l
.push([f])},catch:function(){return k&&new k()},c:l}};})(window,document,[]);
</script>
Alternatively, if you already use NPM or yarn to manage your JavaScript packages, you can install TalkJS with:
npm install talkjs
or
yarn add talkjs
Then, create a file called conversation.js inside rails-talkjs/app/javascript. Add the following code:
document.addEventListener("DOMContentLoaded", () => {
  const users = gon.users;
  const mainUser = gon.mainUser;

  const pathSegments = window.location.pathname.split("/");
  const name = pathSegments[pathSegments.length - 1];
  const otherUser = users.find((user) => user.id === name);

  Talk.ready.then(function () {
    const me = new Talk.User({
      id: mainUser.id,
      name: mainUser.name,
      email: mainUser.email,
      photoUrl: mainUser.photoUrl,
      role: mainUser.role,
    });

    const other = new Talk.User({
      id: otherUser.id,
      name: otherUser.name,
      email: otherUser.email,
      photoUrl: otherUser.photoUrl,
      role: otherUser.role,
    });

    window.talkSession = new Talk.Session({
      appId: "<APP_ID>",
      me: me,
    });

    const conversation = talkSession.getOrCreateConversation(
      Talk.oneOnOneId(me, other)
    );
    conversation.setParticipant(me);
    conversation.setParticipant(other);

    let chatbox = talkSession.createChatbox();
    chatbox.mount(document.getElementById("talkjs-container"));
    chatbox.select(conversation);
  });
});
Remember the variables gon.users and gon.mainUser we had in the chat_controller? With the help of the gon dependency, we're able to use them inside our JavaScript file. This code sets up a conversation between the main user (John Garcia) and the other user. The user data is provided by the chat view. For more explanation of the TalkJS code, see our getting started guide.
You'll need to replace <APP_ID> with your app ID, which you can find on the Settings tab of your TalkJS dashboard.
Lastly, we must add an entry inside the importmap.rb file inside the rails-talkjs/config folder to load this module. Go to the file and add the following line at the very end:
pin "conversation", preload: false
Add routes
Now we'll add routes. Open the routes.rb file inside the rails-talkjs/config folder. Then, replace the code with the following:
Rails.application.routes.draw do
  get 'chat', to: 'chat#index'
  get 'chat/:id', to: 'chat#conversation', as: 'chat_conversation'
  # other routes
end
This specifies that if we go to the /chat path, it should open the index view and if we select a conversation, then it opens the conversation view.
Style the chat
Lastly, we need to add some styles to make our application look good. In Rails, CSS files need to be added inside the app/assets/stylesheets folder. There's already an application.css file that you can use. We don't need to provide additional configuration for Rails to use this. Open the file and add the following styles:
body {
  font-family: Arial, sans-serif;
  background-color: #f4f4f4;
}

h1, h3 {
  text-align: center;
  color: #333;
  margin-top: 10px;
}

#talkjs-container i {
  color: #888;
}

.button-container {
  width: 415px;
  margin: 30px auto;
  display: flex;
  flex-direction: column;
  align-items: flex-start;
  border: 1px solid #888;
  padding: 1rem;
  border-radius: 10px;
}

.main-container {
  width: 415px;
  margin: 30px auto;
  display: flex;
  flex-direction: column;
  align-items: flex-start;
}

#talkjs-container {
  width: 100%;
  height: 500px;
  border-radius: 8px;
  display: flex;
  justify-content: center;
  align-items: center;
}

.chat-button {
  display: inline-flex;
  align-items: center;
  margin-bottom: 10px;
  padding: 10px 20px;
  font-size: 16px;
  color: #fff;
  background-color: #007bff;
  border: none;
  border-radius: 4px;
  cursor: pointer;
  text-align: center;
  text-decoration: none;
}

.chat-button:hover {
  background-color: #0056b3;
}
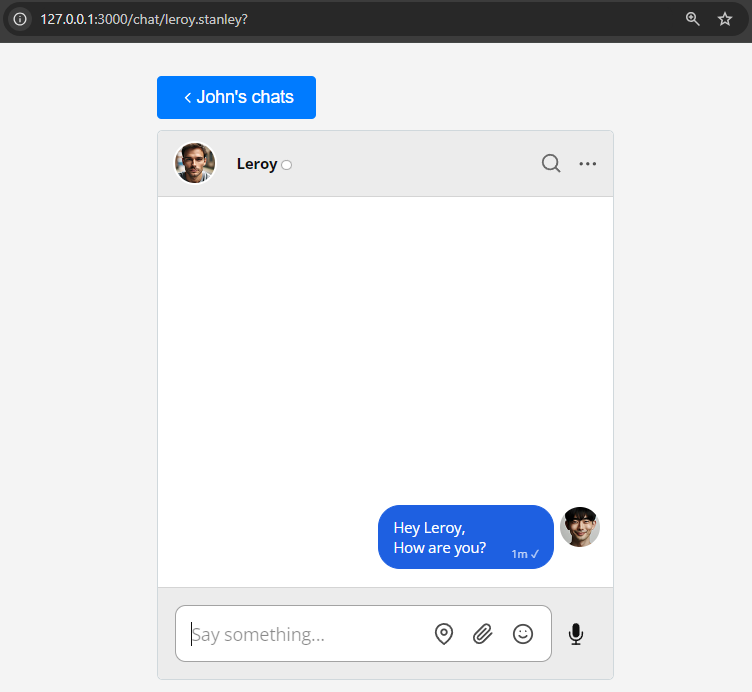
You can view the styles we're using for our example in the GitHub repo. After applying these styles your chat should look something like this:
Summary
You now have a working demonstration of how to integrate TalkJS with Rails! To recap, in this tutorial we have:
- Created a Rails model corresponding to a TalkJS user and stored some data in a SQLite database
- Created a controller with two actions
- Set up routes
- Added a chatbox to the template with TalkJS's classic JavaScript SDK
- Styled the template
For the full example code for this tutorial, see our Github repo.
If you want to learn more about TalkJS, here are some good places to start:
- The TalkJS Docs help you get started with TalkJS.
- TalkJS tutorials provide how-to guides for many common TalkJS use cases.
- The talkjs-examples Github repo has larger complete examples that demonstrate how to integrate with other libraries and frameworks.


