


This guide uses the classic JavaScript SDK. If you're starting a new project, consider using TalkJS Chat UI components, which are more customizable.
With many conversations going on, you might want to offer your users a way to easily switch between chats. For example, you might offer an option to quickly get all contacts, or to chat with a different team.
This guide will show you how to add tabs to your inbox UI that allow users to switch between the following overviews:
- Chats for an overview of all conversations
- Contacts for all direct messages with individual contacts
- Groups for all groups chats
To see the full code for this example, see the accompanying GitHub example.
You can of course use a different set of tabs, and tailor the filters associated with each tab to fit your own use case.
Prerequisites
To follow along with this guide, make sure you have:
- A TalkJS account.
- An existing chat using the inbox pre-built chat UI to which you would like to add tabs.
This guide uses the classic JavaScript SDK to add the tabs, but can be adapted to other SDKs as well.
Step 1: Add tabs for filtering
Begin by adding the tab buttons themselves.
- In the HTML for your site or app where you’ve added TalkJS chat, find the lines in which you added the container in which to load TalkJS inbox. It’ll likely look as follows:
<div id='talkjs-container'>
    <i>Loading chat...</i>
</div>- Add HTML to create tab buttons for navigation, for example with the following code:
<div id="main-wrapper">
<div id="tab-navigation">
<button id="tab-chat" class="tab active-tab">Chats</button>
<button id="tab-contacts" class="tab">Contacts</button>
<button id="tab-groups" class="tab">Groups</button>
</div>
<div id="talkjs-container">
<i>Loading...</i>
</div>
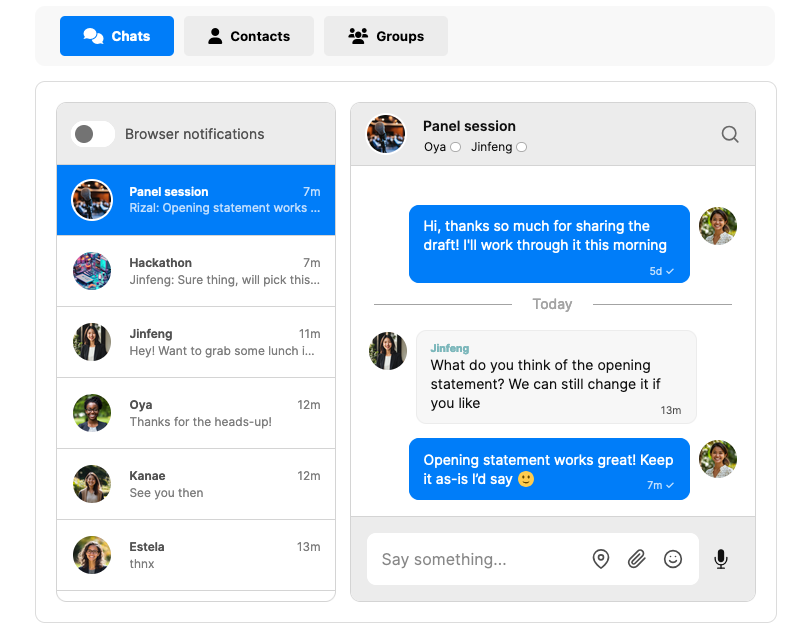
</div>This code adds three tab buttons right above the conversation list header: one for chats, one for contacts, and one for groups.
- Style your tab buttons. The following code uses default TalkJS colors and styling, and includes Font Awesome icons to distinguish the tabs:
<link rel="stylesheet" href="https://cdnjs.cloudflare.com/ajax/libs/font-awesome/6.0.0-beta3/css/all.min.css">

<div id="main-wrapper">
    <div id="tab-navigation">
        <button id="tab-chat" class="tab active-tab"><i class="fas fa-comments"></i> Chats</button>
        <button id="tab-contacts" class="tab"><i class="fas fa-user"></i> Contacts</button>
        <button id="tab-groups" class="tab"><i class="fas fa-users"></i> Groups</button>
    </div>
    <div id="talkjs-container">
    	<i>Loading...</i>
    </div>
</div>

<style>
#main-wrapper {
    width: 700px;
    margin: 10px auto;
}

#tab-navigation {
    display: flex;
    justify-content: flex-start;
    background-color: #f8f8f8;
    border-radius: 10px;
    padding: 10px 20px;
    margin-bottom: 15px;
    width: 100%;
}

.tab {
    padding: 12px 24px;
    cursor: pointer;
    border: none;
    background-color: #ececec;
    border-radius: 5px;
    font-weight: bold;
    transition: background-color 0.2s ease;
    display: flex;
    align-items: center;
    margin: 0px 5px;
    gap: 8px;
}

.tab i {
	font-size: 16px;
}

.tab:hover {
	color: #007DF9;
}

.active-tab {
    background-color: #007DF9;
    color: white;
}

.active-tab:hover {
    background-color: #014e9b;
    color: white;
}

#talkjs-container {
    height: 500px;
    width: 100%;
    background-color: #ffffff;
    border: 1px solid #dcdcdc;
    border-radius: 10px;
    padding: 20px;
}
</style>
You now have three styled tab buttons for all chats, contacts, and groups above your conversation list.

Right now the buttons don’t do anything yet. Let’s change that in the next steps.
Step 2: Set custom conversation properties for filtering
To make sure that each tab shows the correct selection of conversations in the conversation list, you can use conversation list filters.
This guide will use the tab buttons to filter conversations in the conversation list based on their type, namely whether a conversation is a 1-on-1 chat (direct messaging) with a contact, or a group chat. While type isn’t a built-in property of conversations, you can add this property yourself using custom conversation properties. For example, you could set the custom conversation property to dm for direct messages, and to group for group chats.
You can add a custom property to a conversation in several ways, including with the REST API, or when creating or updating a conversation with the JavaScript SDK.
Option 1: Add a custom conversation type property with the JavaScript SDK
You could automatically set the conversation property type directly when creating a conversation using the JavaScript SDK. For example, the following code snippet for creating a conversations adds the custom property of type to all conversations, and sets it to the value group for conversations with more than two participants, and to dm otherwise:
Talk.ready.then(function () {

    // Define current user
    const me = new Talk.User({
        id: "rizal",
        name: "Rizal",
        email: "rizal@example.com",
    });

    // Initialize the TalkJS session
    const talkSession = new Talk.Session({
        appId: '<APP_ID>',
        me: me,
    });

    // Add other user
    const oya = new Talk.User({
        id: 'oya',
        name: 'Oya',
        email: "oya@example.com",
    });

    const jinfeng = new Talk.User({
        id: 'jinfeng',
        name: 'Jinfeng',
        email: "jinfeng@example.com",
    });

    // Get or create the conversation
    const conversation = talkSession.getOrCreateConversation('summer-hike');

    // Set the conversation participants
    conversation.setParticipant(me);
    conversation.setParticipant(oya);
    conversation.setParticipant(jinfeng);

    // Function to add the conversation type
    function updateConversationType(conversation) {
        const participantCount = Object.keys(conversation.participants).length;

        // Set the conversation type based on the number of participants
        const conversationType = participantCount > 2 ? 'group' : 'dm';

        // Update the custom property 'type' on the conversation
        conversation.setAttributes({
        	custom: { type: conversationType }
        });
    }

    // Update the conversation type
    updateConversationType(conversation);

    // Create the inbox, select the conversation, mount the UI
    const inbox = talkSession.createInbox();
    inbox.select(conversation);
    inbox.mount(document.getElementById('talkjs-container'));
});
In this code snippet, replace <APP_ID> with your own app ID, which you can find on the Settings page of your TalkJS dashboard.
Note: The function in the previous code snippet sets the conversation type based on the number of conversation participants. It doesn’t detect guest users of a conversation.
Option 2: Add a custom conversation property with the REST API
To set a custom property on a conversation using the REST API, you can use the Setting conversation data option. For example, to identify group chats, you could add a custom conversation property of type group to all conversations with more than two participants, as follows:
"custom": {
    "type": "group"
}
Using either the REST API or the JavaScript SDK, you now have made sure that your conversations have the custom property type set to either dm or group, depending on the number of conversation participants.
You can now use the custom conversation property type to filter the conversation list based on which tab the user selects. This way, switching between tabs allows the user to switch between showing either all chats, only 1-on-1 conversations with their contacts, or only group chats.
Step 3: Add filtering to your tabs
Next, add filtering capacity to your tabs.
To filter conversations shown in each tab based on their type (in this case: dm or group), you could add the following to your existing code:
    // Define filters for each tab
    const filters = {
        chat: {},
        contacts: { custom: { type: ["==", "dm"] } },
        groups: { custom: { type: ["==", "group"] } }
    };

    // Set chat as the default tab
    let tab = 'chat';

    // Handle tab switching
    const tabButtons = {
        'tab-chat': 'chat',
        'tab-contacts': 'contacts',
        'tab-groups': 'groups',
    };

    Object.keys(tabButtons).forEach(tabId => {
    document.getElementById(tabId).addEventListener("click", () => {
            tab = tabButtons[tabId];
            inbox.setFeedFilter(filters[tab]);
            inbox.select(null);
            setActiveTab(tabId);
        });
    });

    // Set active tab style
    function setActiveTab(activeTabId) {
        document.querySelectorAll('.tab').forEach(tab => tab.classList.remove('active-tab'));
        document.getElementById(activeTabId).classList.add('active-tab');
    }
Also, find the lines in which you create the inbox, and update it as follows, so that it uses setFeedFilter to apply the filtering:
// Create the inbox with a filter
const inbox = talkSession.createInbox();
inbox.select(conversation);
inbox.setFeedFilter(filters[tab]);
inbox.mount(document.getElementById('talkjs-container'));
This defines filters for each tab, and applies the correct filter to the conversation list of the inbox whenever a user selects that tab. It sets the Chat tab as the default.
To try out the tab filters in action, make sure that your current user has at least one conversation of each type: a 1-on-1 chat with a contact, and a group chat. Once the user is a participant in these conversations, the Chats tab should show the user all their conversations, while Contacts tab only shows the one-on-one conversation, and the Groups chat shows only the group conversation.
You’ve now added working tab buttons with filters to your chat, which allow your user to easily switch between conversations of different types, and as a result quickly find what they’re looking for.
Do you have questions about adding tabs to your inbox? We’re happy to help. Get in touch.


