
This guide uses the classic JavaScript SDK. If you're starting a new project, consider using TalkJS Chat UI components, which are more customizable.
Recently, we have been looking at how we can use the Theme Editor present in the TalkJS' classic JavaScript SDK to theme our chat. We previously themed the chat to make it look more like WhatsApp and even Discord. Today, we are going to try our hands at making it look like the LinkedIn chat. LinkedIn has had major UI overhauls in the recent past and we will try to implement the latest theme which is mostly white and black with a subtle hint of that famous LinkedIn blue.
Things to do
Log in to your TalkJS dashboard and create a new theme. We are going to name it ‘LinkedIn’. Then head over to the ‘Roles’ section and select the default role. When you scroll down, you can see the UI Theme section. Select the ‘LinkedIn’ theme that you created earlier in this section and save it. Now, the changes that you make on the Theme Editor can be viewed live just by refreshing your browser. The default theme on the TalkJS chatbox looks like this.
Here is a brief summary of the changes that we need to make.
- Change the header color to white, and the header text to black.
- Remove avatar from the header.
- Remove the chat bubbles and their background colors.
- Move the user avatar to the left side.
- Add the user’s name to the chat bubble.
- Change the format of the time and move it next to the user’s name
- Change the message field background and highlight color
You have to set up a very basic chatbox on your system to view these changes. To do that, follow our Getting Started guide. You can also find the starting point for this tutorial in our accompanying GitHub example.
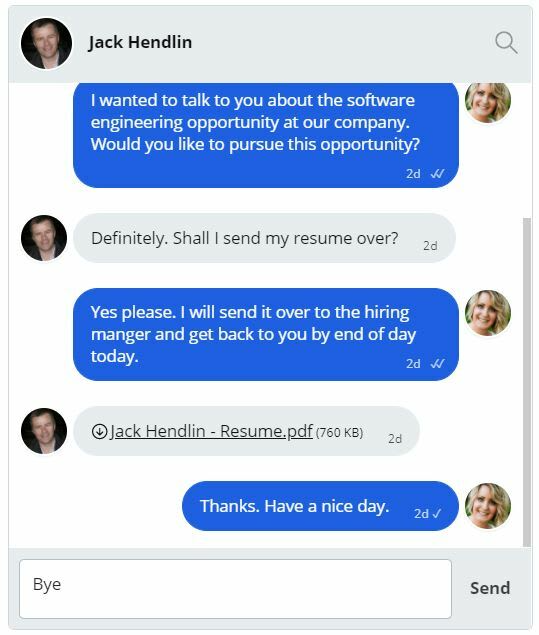
After all of these changes have been made, your chat should look like this. As you can see, it is almost identical to the LinkedIn chat. Without further ado, let’s dive in to see where we made these changes and explain what they are.
ChatHeader
The first section that we will look at is the ChatHeader. Open up the stylesheet for the ChatHeader from the left menu and you will see a header class there. Change the background color to #FFF and the color to #000. This will give the header the brand new look present in LinkedIn and the text inside it will be black. Scroll down to the content class and add a padding-left of 3rem. This will move the name of the person towards the right-hand side, just like how it is on the LinkedIn chat.
Avatar
Next, we need to alter the avatar ever so slightly. Find the avatar class on the stylesheet and change the width and height to 2.8rem and the align-self property to center.
UserMessage
The majority of the changes are present in the UserMessage section of your TalkJS Editor. We need to first edit the code to ensure that the user’s name is displayed above the message. For that, change line 67 to this:
<div t:if="{{ sender.id != previousSenderId and conversation.others.length > 0 }}"
This will ensure that for every conversation whose length is greater than 0 and is not sent from the same user as the current user, the user’s name will be displayed. We will also change the color of the user’s name to black and increase its font-size to 13. This will be on line 69.
style="font-size: 13px; color: #000">
Now, in the LinkedIn chat, we have the timestamp next to the user’s name. For that, we will use the timestamp variable inside a tag and filter it using the available filters on line 70.
{{ sender.name }} <span class = "time-sent"> • {{ timestamp | date: "%H:%m %p"}}</span>
Next, we need to remove the tick marks from the message as well as the time. For that, we need to remove the timestamp property and the showStatus property from line 73. Once these changes are completed, we will now scroll down to the style classes. First up, we have the message-row class. We need to change the margin-bottom to 0.1rem and margin-top to 0.1rem. This will reduce the gap between each message.
To ensure that both the sender and receiver messages are on the same side, we need to remove the flex-direction: row-reverse property from the class message-row by-me. After that, edit the message class so that it looks like this:
.message {
    white-space: normal;
    overflow: hidden;
    word-wrap: break-word;
    position: relative;
    display: inline-block;
    max-width: calc(100% - 4rem - 0.2rem - 0.2rem);
    color: #000;
}
In the by-me message class, change the color to #000 (black). If you noticed before, we had added a new class to the timestamp next to the user’s name. This new class is called time-sent and we will add the following styles to it.
.time-sent{
    font-size: 10px;
    color: #8F8F8F;
    font-weight: normal;
}
One last change we need to make is to change the padding-right to padding-left in the by-me previous-same class.
Layout
The last section we need to edit is the layout. Head over to the panel footer sub-section and make the following changes.
backgroundColor #F9FAFB
borderTopWidth 2px
borderTopColor #E5E5E5
We have a few changes to make in the message field sub-section. The changes are given below.
borderRadius 10px
borderColor #D9D9D9
backgroundColor #FFFFFF
color #232529
Lastly, in the ‘Highlights’ section change the background color to #0866C8 and you should be all set.
With that, you should have a chat that looks like this. It is very close to the actual LinkedIn chat and thanks to the Theme Editor on TalkJS, you can come up with many such themes with its easy-to-use interface and minimal coding requirement. We can’t wait to see what you guys come up with using the Theme Editor. The possibilities are endless.


