This guide uses the classic JavaScript SDK. If you're starting a new project, consider using TalkJS Chat UI components, which are more customizable.
Channel lists are common features of popular chat applications like Discord and Slack. In this article, we’ll show you how to create your very own fully functional channel list that will work with TalkJS' classic JavaScript SDK. You can see the completed project in the GitHub example that accompanies this tutorial.
For your own applications, it is likely that you will retrieve the list of relevant channels for a user from a database or as an API response, but for the sake of this tutorial, we’ll be using a hardcoded list of channels.
Let’s get started!
Creating a channel list like Slack or Discord in HTML
We’ll be populating our channel list using an array. But first, we need a div to contain our channel list. Add the following HTML:
<div id = "channel-list">
    <h2>Channels</h2>
</div>
Great! Now we can populate this container with our list.
Create a new asynchronous function called makeList. The next thing we’ll do is create our array of channels like so:
const makeList = async function () {
    await Talk.ready;

    // Establish the array which acts as a data source for the list
    const channelData= [
    {name: "#general", id: 1},
    {name: "#dev-team", id: 2},
    {name: "#random", id: 3},
    {name: "#qa-team", id: 4},
    {name: "#release-tickets", id: 5},
    {name: "#demo-env", id: 6}
    ]
}
As you can see, each element has a name (the name of the channel) and an id(A unique identifier for each channel). The id of each channel will play an important role later on.
We now have our channel data. But how do we create a clickable list from this? Simple! We’ll dynamically create our list based on the number of elements inside that list, and place it inside of our channel-list container.
Just below your channelData array, add the following code:
    // Get the container element for the list
    const listContainer = document.getElementById('channel-list');

    // Make the list
    const listElement = document.createElement('ul');

    // Add the list to the container
    listContainer.appendChild(listElement);

    // Set up a loop that goes through the items in channelData one at a time
    for (let channel of channelData) {
// create a list item for each channel
const listItem = document.createElement('li');

// Add the channel text and id to the list item
listItem.innerHTML = channel.name;
listItem.id = channel.id;

// Add the list item to listElement
listElement.appendChild(listItem);
}
Add a call to the makeList method outside of the function itself.
// Usage
makeList();
If you run your program you should now see an HTML like so:
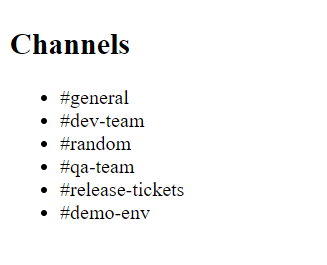
Our list is populating correctly! However, it looks very basic at the moment. Let’s add some style to our list. Add the following code to a linked CSS file, or directly to <style></style> tags.
#channel-list{
            width: 300px;
            font-family: arial;
      margin-right: 1rem;
        }
        #channel-list h2{
            position: relative;
            color: #fff;
            background: #1C2833;
            padding: 10px 20px;
            font-size:20px;
            font-weight: 700;
            border-top-left-radius: 10px;
            border-top-right-radius: 10px;
            margin: 0;
        }

        #channel-list ul{
            background:#212F3D;
            margin-top: 0;
            margin-bottom: 0;
        }

        #channel-list ul li{
            left:0;
            list-style: none;
            background: #212F3D;
            color: #999;
            transition: 0.5s;
            cursor: pointer;
            padding: 5px;
        }

        #channel-list li:hover {
            color: #fff;
        }
Change the color scheme as needed to fit the theme of your application. Run your application again to see the results:
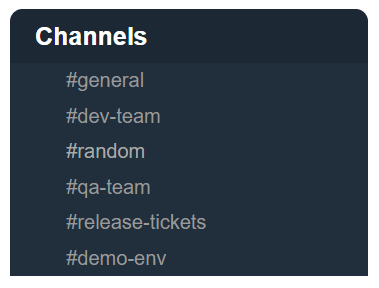
That looks much better! It looks like the type of channel list we would see in an application like Slack or Discord.
Make a HTML list clickable
We have to make our list clickable, and enable it to swap between TalkJS conversations.
Go back to our makeList function. Modify the existing code from the snippet below:
listItem.innerHTML = channel.name;
listItem.id = channel.id;
To the new code that includes addEventListener:
listItem.innerHTML = channel.name;
listItem.id = channel.id;
listItem.addEventListener('click', clickList, false);
This adds an event listener to each item in our list, where it will call a function called clickList.
Let’s create this function:
function clickList() {
    console.log(this.id);
}
For now, this method just prints out the id of the list item you clicked. Run your application and ensure that the method works. Each time you click an item in the list, it should print out the associated id value, which in this case is a number between 1 and 6.
Great! Our list is now clickable. Let’s add our TalkJS chatbox, and have the channel list change the currently selected conversation that appears in the chatbox.
Setting up TalkJS conversations
Follow this Getting Started guide to set up a simple conversation. You may also want to change the photoUrl of each user to an actual image address. You can use free images to act as the profile pictures of your users.
For this tutorial, we’ll need to create multiple conversations and multiple users. We also need to change the id of the conversations, to match the id values of our channelData. Here are the conversations I have created:
            //#general
            conversation1 = session.getOrCreateConversation("1");
            conversation1.setParticipant(me);
            conversation1.setParticipant(user1);
            conversation1.setParticipant(user2);
            conversation1.setParticipant(user3);


            //#dev-team
            conversation2 = session.getOrCreateConversation("2");
            conversation2.setParticipant(me);
            conversation2.setParticipant(user1);
            conversation2.setParticipant(user2);

            //#random
            conversation3 = session.getOrCreateConversation("3");
            conversation3.setParticipant(me);
            conversation3.setParticipant(user1);
            conversation3.setParticipant(user2);
            conversation3.setParticipant(user3);

            //#qa-team
            conversation4 = session.getOrCreateConversation("4");
            conversation4.setParticipant(me);
            conversation4.setParticipant(user3);

            //release-tickets
            conversation5 = session.getOrCreateConversation("5");
            conversation5.setParticipant(me);
            conversation5.setParticipant(user1);
            conversation5.setParticipant(user2);

            //#demo-env
            conversation6 = session.getOrCreateConversation("6");
            conversation6.setParticipant(me);
            conversation6.setParticipant(user1);
            conversation6.setParticipant(user3);

            chatbox = session.createChatbox(conversation1);
            chatbox.mount(document.getElementById('talkjs-container'));
When setting up actual conversation id’s, it is not wise to use simple numbers as we have here as it poses a security risk. Check out the TalkJS documentation on setting up secure conversation id’s.
Mounting a channel list to a TalkJS chatbox
Let’s make our channel list appear beside our TalkJS chatbox. From the Getting Started guide, you should have added a div called talkjs-container. To get our channel list appearing beside the TalkJS chatbox, modify your HTML code like so:
<!-- Container element for all TalkJS UI elements-->
<div style="display: flex; width:100%;">
    <div id = "channel-list">
        <h2>Channels</h2>
    </div>

    <!-- container element in which TalkJS will display a chat UI-->
    <div id="talkjs-container" style="width:30%; height: 500px;">
        <i>Loading chat...</i>
    </div>
</div>
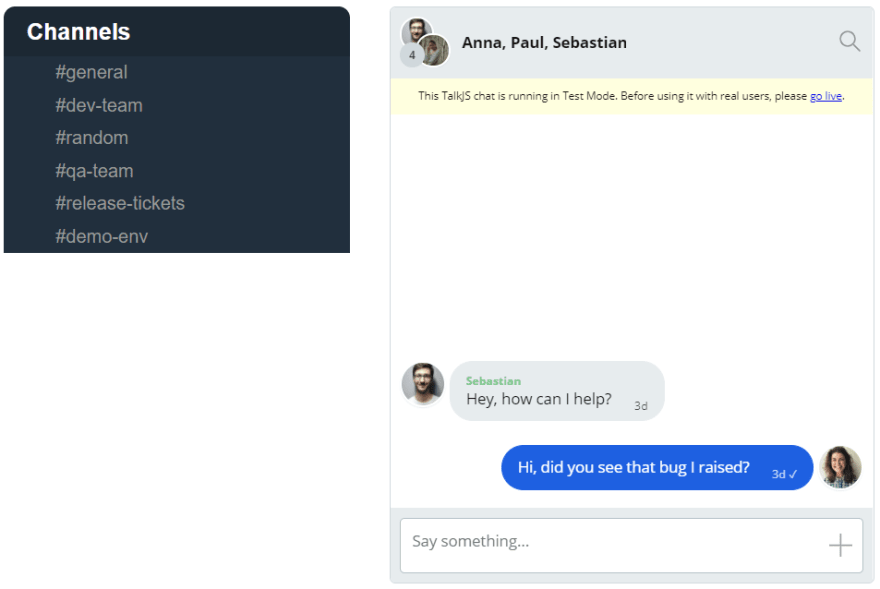
Run our application again to see if our changes were successful. You should see the channel list displaying next to the TalkJS chatbox.
At the moment, our channel list has no functionality. Before we add the ability to switch between conversations using the channel list, let’s populate each conversation with some actual text.
Run your application, ensuring the chatbox is being created with conversation1 selected:
chatbox = session.createChatbox(conversation1);
chatbox.mount(document.getElementById('talkjs-container'));
Write some text in the chat.
Repeat this process for each conversation from 1 to 6. For example, run your application again, this time with conversation2 selected:
chatbox = session.createChatbox(conversation2);
chatbox.mount(document.getElementById('talkjs-container'));
Repeat this until every conversation has some messages being sent back and forth.
With our conversation data in place, it’s time to add the final piece of functionality, making our channel list switch between the conversations.
Switch between TalkJS conversations using chatbox.select
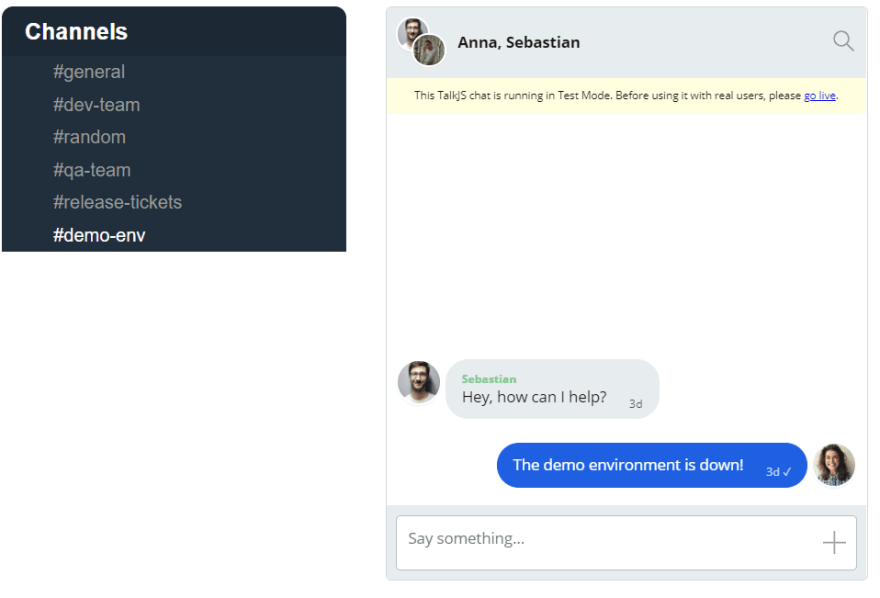
Return to the clickList method. Add the following line of code:
function clickList() {
   console.log(this.id);
   chatbox.select(this.id.toString());
}
We’ve added a call to the chatbox.select method. This method allows us to easily switch between the conversations in our channel list. It’s as simple as that, no further changes are needed!
Relaunch our application and click on each channel. It should open up the relevant conversation.
There you have it! We’ve replicated the channel lists that are typically used in modern chat applications. This list is built dynamically, creating a channel for each element in your array of data. This tutorial is only the beginning. You can continue to tweak and build out this application, which will result in a fully-fledged, scalable, and robust chat application.


