

This guide uses the classic JavaScript SDK. If you're starting a new project, consider using TalkJS Chat UI components, which are more customizable.
When keeping track of incoming messages, it’s important to separate answered and unanswered conversations in your inbox. For example, a support team may want to filter for conversations where the customer is waiting for a reply.
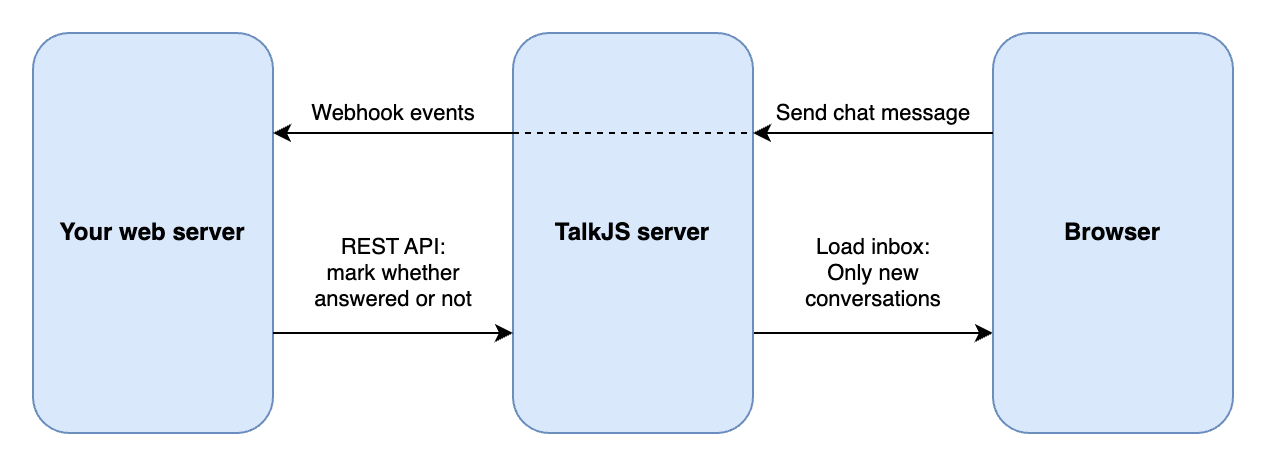
TalkJS makes it easy to add custom data to your conversations so that you can automatically track which conversations have been answered. In this tutorial we’ll walk you through how to do this, using TalkJS’s webhooks feature and REST API.
To follow along, you’ll need:
- A TalkJS account. TalkJS provides a ready-to-use chat client for your application. Your account gives you access to TalkJS's free development environment.
- An existing TalkJS project using the classic JavaScript SDK. See the accompanying Getting Started guide for an example of how to set this up.
- An installation of Node.js along with the npm package manager. We’ll use this to create our webhook server.
We’ll build up the feature step by step in the following sections. If you would rather see the complete example code, see the Github repo for this tutorial.
Getting notified about new messages
First we’ll enable TalkJS webhooks, which allow the TalkJS server to notify your server when a message is sent. Webhooks let you use an event-driven architecture, where you get told about events when they happen rather than having to constantly check for new messages. There are lots of events you can listen for, but we’re only interested in new messages being sent.
Webhooks are server-side only, so we’ll need a web server. We’ll be using Express in this tutorial, but feel free to use your favourite web server library instead:
import express from "express";
const app = express().use(express.json()); // creates http server

app.listen(3000, () => console.log("Server is up"));

app.post("/talkjs", (req, res) => {
 console.log(req.body);
 res.status(200).end();
});
This script sets up a POST endpoint at /talkjs that monitors incoming events from the TalkJS server.
For TalkJS to communicate with your server, you must expose it to the internet. This can be very difficult when developing locally, with endless firewalls and port-forwarding to set up. Instead, we’ll use ngrok to create a secure tunnel to your local server. See our tutorial on How to integrate ngrok with TalkJS for instructions on how to install ngrok.
Once you have installed ngrok, run the following command:
ngrok http 3000This command starts a secure tunnel to your local port 3000. The output should include the URL that ngrok exposes:
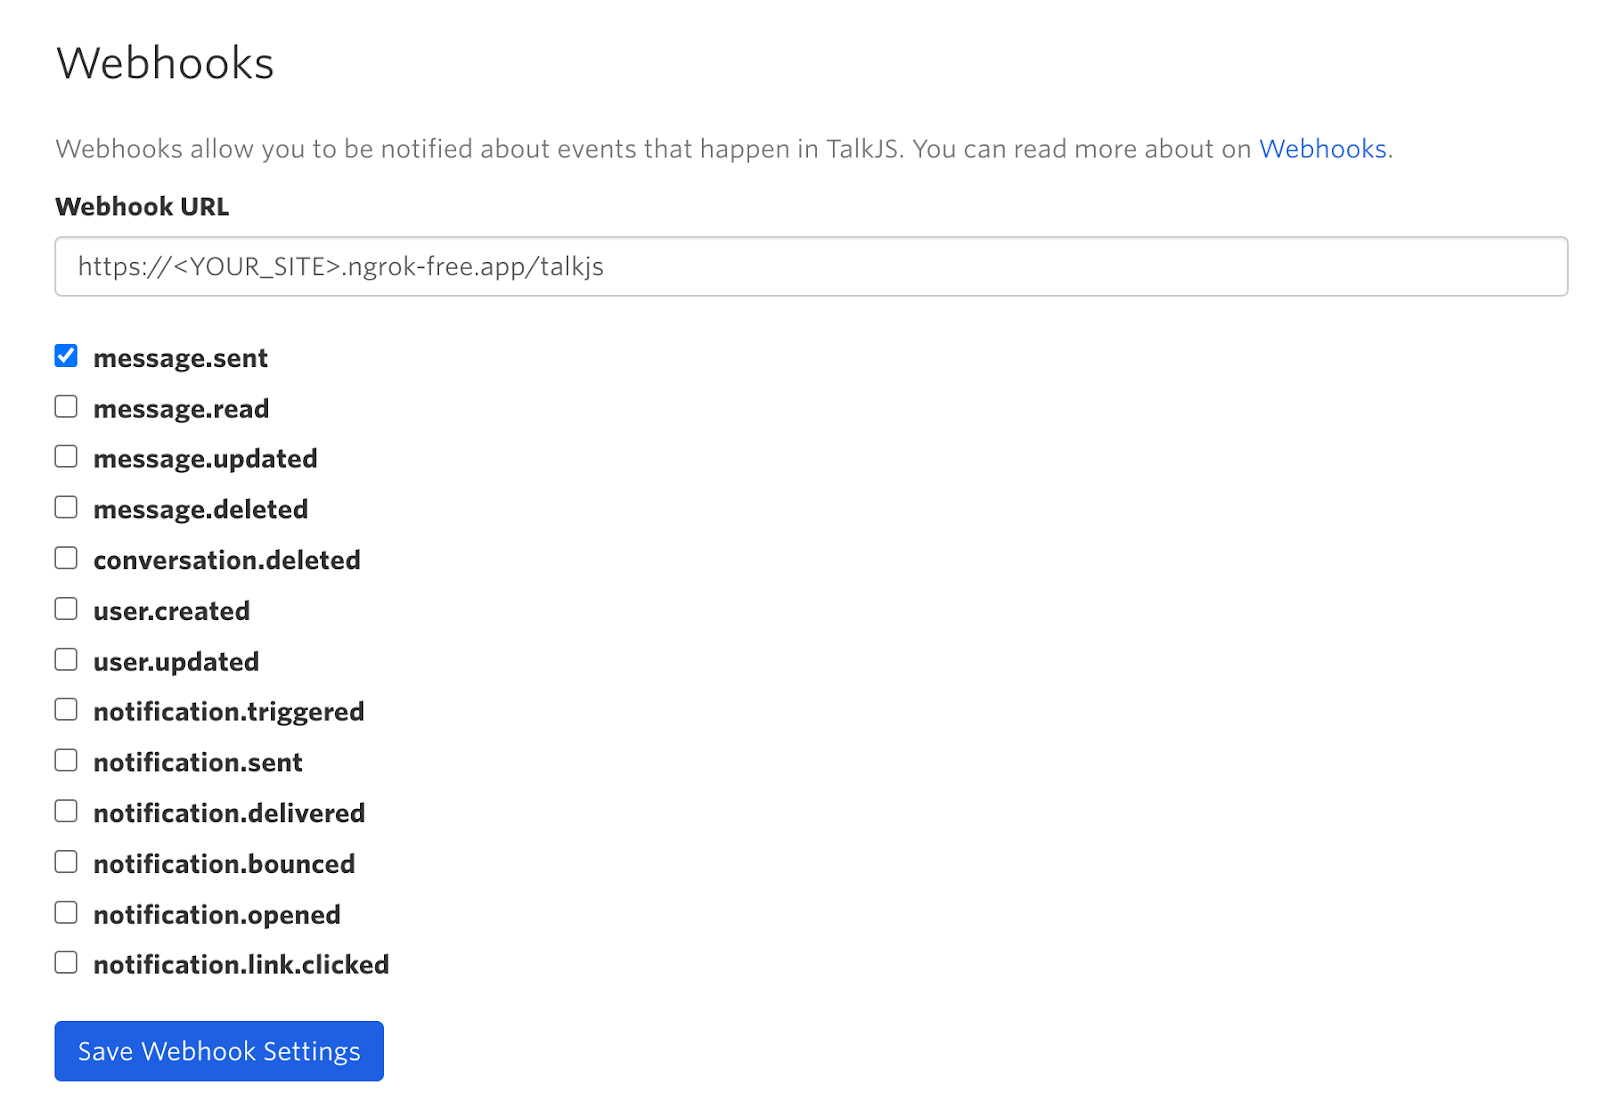
Forwarding https://<YOUR_SITE>.ngrok-free.app -> http://localhost:3000 You’re now ready to enable webhooks. You can do this in the TalkJS dashboard under Webhooks. Paste the URL above into the Webhook URL field, including the /talkjs path: https://<YOUR_SITE>.ngrok-free.app/talkjs.
Select the message.sent option:
TalkJS will now send a web request to your server when a message is sent. To test this, write another message in your chat UI. You should see the event in your server’s console:
{
  createdAt: 1683276915840,
  data: {
    conversation: {
      createdAt: 1683275536667,
      custom: [Object],
      id: '15966c817cb1473d9b0a',
      // ... more fields here ...
    },
    message: {
      // ... message fields here ...
    },
    sender: {
      // ... sender fields here ...
    }
  },
  id: 'evt_AVL7tDG9V7CPSXBfG4',
  type: 'message.sent'
}
Test the TalkJS REST API
Next, we’ll react to the events by calling the TalkJS REST API to add custom data to conversations. We’ll use this to set the answered: true property on conversations where the latest message is from the support team. This lets us filter out these conversations from the support inbox, so we only see unanswered messages.
In this tutorial we will use the node-fetch module to send the HTTP requests, but you can use another library if you prefer.
import fetch from "node-fetch";

const appId = "<APP_ID>";
const secretKey = "<SECRET_KEY>";

const basePath = "https://api.talkjs.com";
const path = basePath + "/v1/" + appId + "/conversations/";
This imports the node-fetch module and sets up the URLs you will need to call. Fill in the app ID and secret key with the values from your TalkJS dashboard. Make sure you protect that secret key and never expose it in frontend code – it has full admin access to your TalkJS account.
As a first test of the API, try running a GET request to get all conversations. Add the following to your script below the const path = ... line:
const response = fetch(path, {
 method: "get",
 headers: {
   "Content-Type": "application/json",
   Authorization: `Bearer ${secretKey}`,
 },
})
 .then((res) => res.json())
 .then((data) => console.log(data));
Now run the script. You should get a list of all your conversations:
{
  data: [
    {
      createdAt: 1683275536667,
      // ... more fields ...
    },
    // ... more conversations ....
  ]
}
Mark conversations as answered
This time, instead of a GET request, we’ll use a PUT request to update the conversation data when a sent message event arrives at your local server. The conversation data includes a custom field which you can use to add an extra answered property.
In this example, we’ll assume you are using TalkJS’s Roles feature to define support and customer roles for users. You will then see these roles in the role field of the user data you receive from the sent message event. Alternatively, you could use the custom data for each user to indicate whether they are a member of the support team, and check that property here instead.
Either way, we’ll set an answered: "true" property on the conversation if the new message is from support, and an answered: "false" property otherwise.
Replace your previous app.post method with the following:
async function setAnswered(conversationId, isSupport) {
  console.log("Setting answered on", conversationId, "to", isSupport);
  return fetch(`${basePath}/v1/${appId}/conversations/${conversationId}`, {
    method: "put",
    headers: {
      "Content-Type": "application/json",
      Authorization: `Bearer ${secretKey}`,
    },
    body: JSON.stringify({
      custom: {
        answered: isSupport ? "true" : "false",
      },
    }),
  });
}

app.post("/talkjs", async (req, res) => {
  const data = req.body.data;
  const role = data.sender.role;
  const conversationId = data.conversation.id;

  await setAnswered(conversationId, role === "support");
  res.status(200).end();
});
This method calls the API when the server receives a new message event, and sets the answered property to "true" if the message is from support and "false" otherwise.
Filter the inbox
Finally, we want to filter conversations so that only unanswered ones appear in the inbox. To do this, use the setFeedFilter method.
Add the following line before mounting your inbox, to only show conversations where custom.answered is not true. This means that any pre-existing conversations that are missing the answered property will still appear:
inbox.setFeedFilter({ custom: { answered: ["!=", "true"] } });
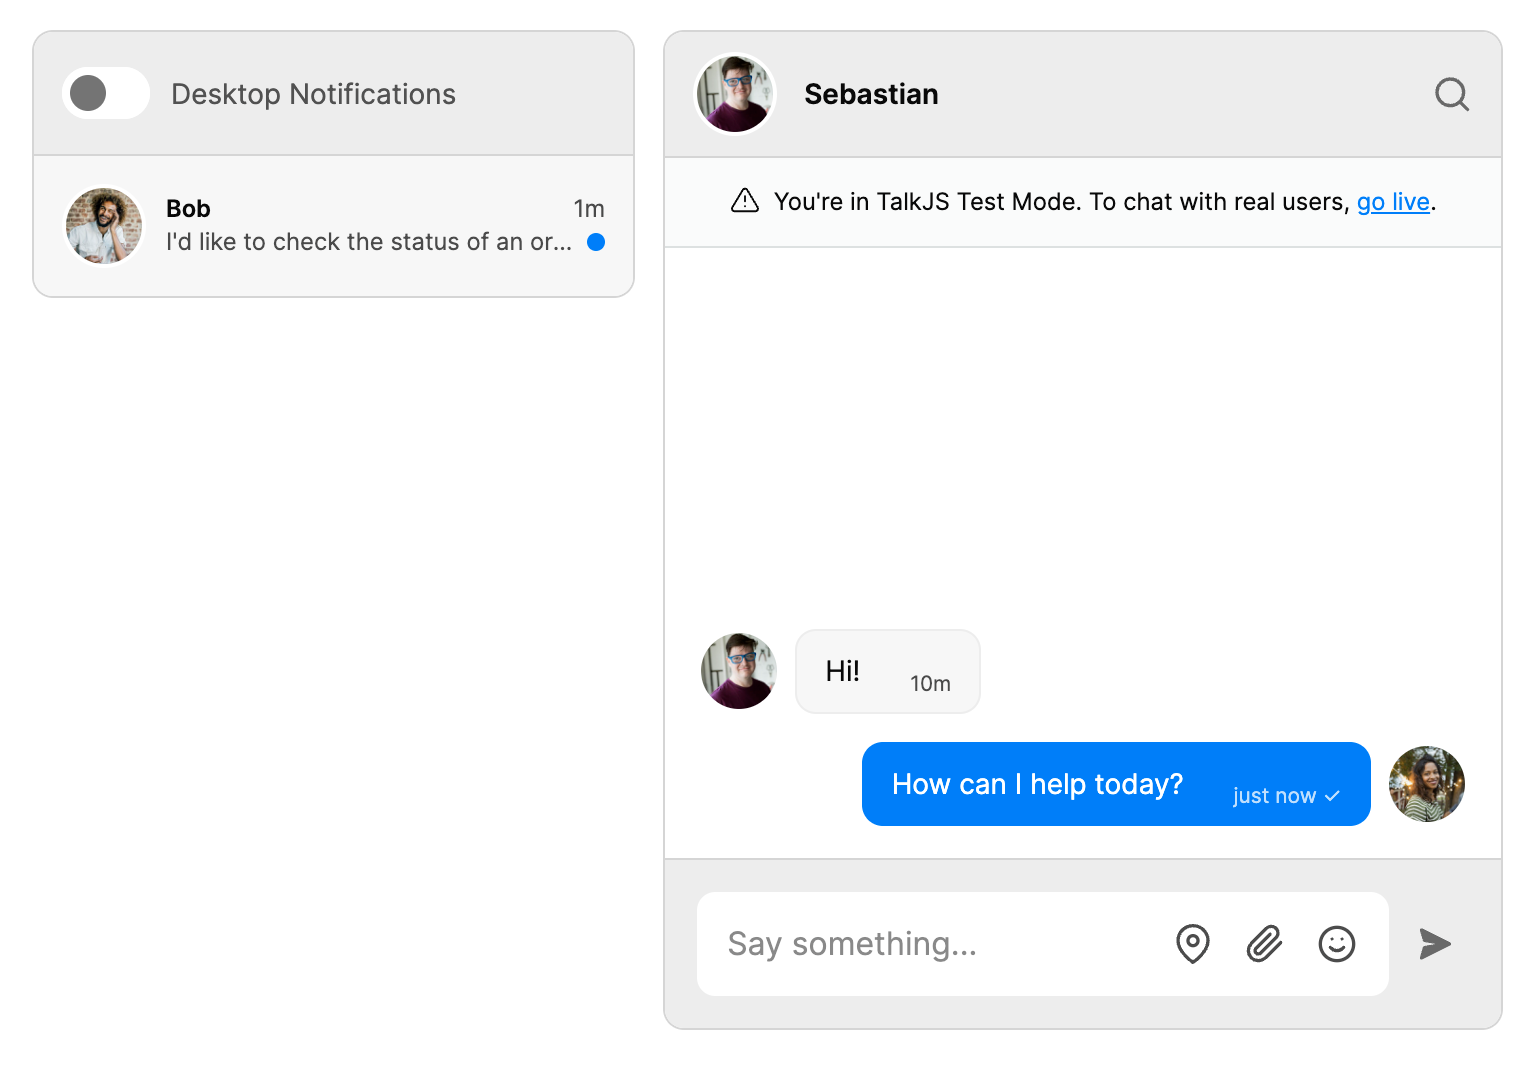
You should now see only unanswered messages in your conversation list on the left hand side of the screen:
Conclusion
You now have a working demonstration of how to filter an inbox for unanswered messages! To recap, in this tutorial we have:
- Set up a web server to receive webhook events from the TalkJS server
- Called the REST API to add custom data to mark conversations as answered when a new message is sent from support
- Filtered the chat inbox so that only unanswered messages are displayed
For the full example code for this tutorial, see our Github repo.
If you want to learn more about TalkJS, here are some good places to start:
- The TalkJS Documentation helps you get started with TalkJS
- TalkJS tutorials provide how-to guides for many common TalkJS use cases
- The talkjs-examples Github repo has larger complete examples that demonstrate how to integrate with other libraries and frameworks


