
This guide uses the classic JavaScript SDK. If you're starting a new project, consider using TalkJS Chat UI components, which are more customizable.
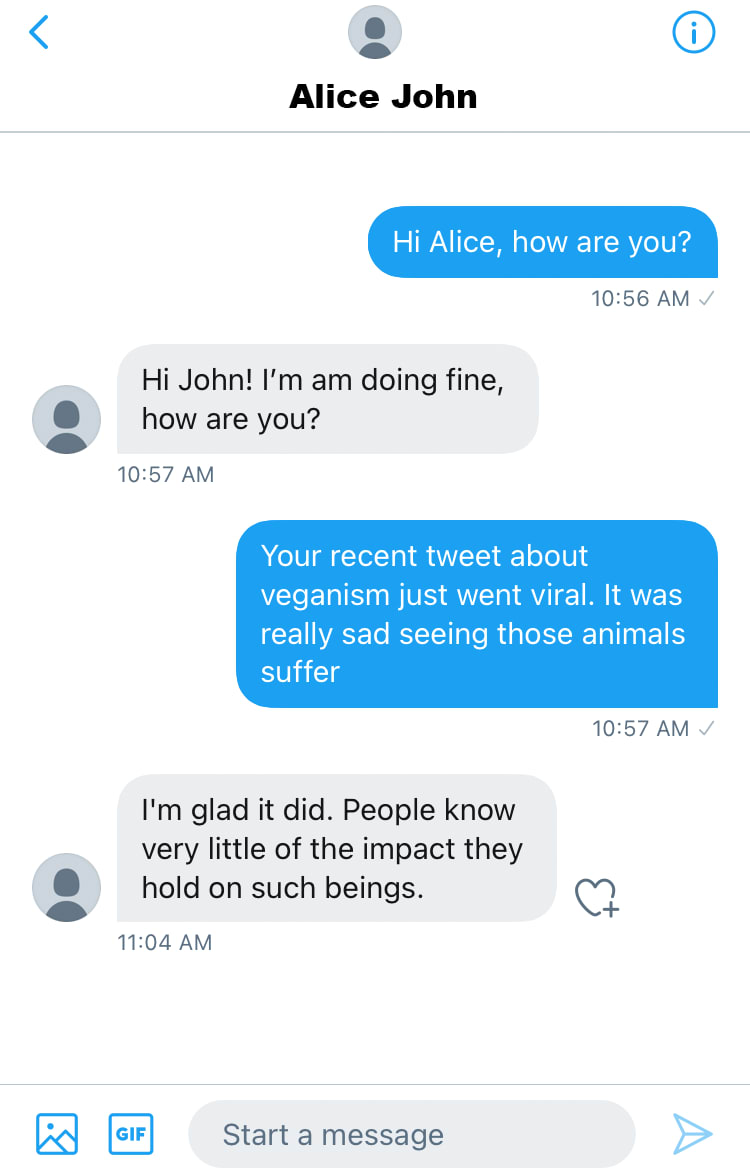
Would you like to build a DM functionality of one of the most popular social media platforms? If you answered yes, you have come to the right place. We will look at how we can implement the direct messaging functionality of Twitter with TalkJS' classic JavaScript SDK. So far, we’ve seen how powerful the Theme Editor in TalkJS is by creating messaging features like on WhatsApp, Discord, Slack, LinkedIn, and more being implemented with ease. Today, we are going to be taking it to the next step. Here is a snapshot of what we will try and clone.
Things to do
- Change the header color to white and center the image and the user’s name
- Change the style of the message bubbles
- Change the color of the user’s message as well as the other’s message
- Add timestamp under each message
- Change the style of the message field
- Show avatar in chat for the other user only
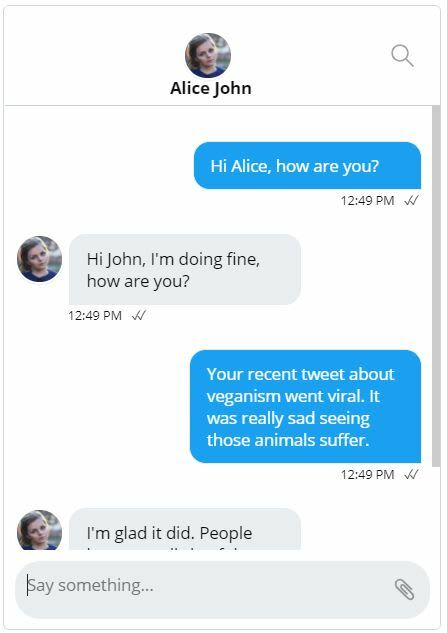
There’s also a Desktop/Web version of the chat, which we will be implementing using the Inbox mode from TalkJS. We will be making some more edits over the ones mentioned above to achieve this, and we will go over this in the subsequent sections. The end product of the mobile UI looks like this after theming with the TalkJS themes. It is nearly identical to the Twitter chat we saw above. Now, let’s see how we can achieve this.
ChatHeader
The Twitter chat header has the user’s name and avatar in the center. The background color is white and the text color is black. The .header class should be edited as given below.
.header {
    display: flex;
    height: 6rem;
    background-color: #e7ecee;
    flex-shrink: 0;
    border-bottom: 1px solid #C5CFD6;
    background-color: #FFF;
    padding: 0px;
    margin: 0px;
}
After that, we need to edit two more classes: .image and .info. These need to have the following changes.
.image {
    width: 45px;
    text-align: center;
    margin-right: 0.5rem;
    flex-shrink: 0;
    position: absolute;
    margin-left: 37%;
    margin-top: 0px;
}

.info {
    flex-grow: 1;
    flex-basis: 0;
    min-width: 0;
    position: absolute;
    margin-left: 34%;
    margin-top: 15%;
}
Once you have made those changes, the header should look close to the Twitter DM header. We’ll move to the UserMessage component next, which has the majority of our changes as usual.
UserMessage
The first change we need to make here is for the avatars in the chat. Replace lines 60-62 with the following.
<Avatar t:if="{{ sender.isMe == false and sender.id != previousSenderId }}"
photoUrl="{{ sender.photoUrl }}"
/>
This will ensure that the avatar is displayed only for the other user and only for their first message. To remove the timestamp and status ticks from the message, we need to remove the timestamp, floatTimestamp, and showStatus properties from the <MessageBody> element.
Next up, we need to add a timestamp under the message. This timestamp has subtle differences for the user as well as the other user, therefore, we need two style classes and two components. Add the following lines below the <MessageBody> element to get the timestamp.
<div t:if="{{ sender.isMe == false }}"
class = "timestamp {{ sender.isMe | then : 'by-me' | else: 'by-other' }}"> {{ timestamp |  date: "%l:%M %p"}} <StatusTicks/>
</div>
<div t:if="{{ sender.isMe == true }}"
class = "timestamp {{ sender.isMe | then: 'by-me' | else: 'by-other' }}">
{{ timestamp |  date: "%l:%M %p"}} <StatusTicks/>
</div>
Change the margin-bottom for the .message-row class from 0.5rem to 0.1rem. We now need to alter the .message and .by-me .message classes. Make the following changes for the two.
.message {
    white-space: normal;
    overflow: hidden;
    border-radius: 1rem 1rem 1rem 0px;
    border-width: 1px;
    border-style: solid;
    word-wrap: break-word;
    position: relative;
    display: inline-block;
    max-width: calc(100% - 12rem - 0.25rem - 0.25rem);
    border-color: #E7ECEE;
    background-color: #EAEEF0;
    color: #000;
}

.by-me .message {
    border-color: #1E60E1;
    background-color: #1E60E1;
    color: #fff;
    /* Space between avatar and the message */
    margin-right: 0.25rem;
}
Since we don’t have the avatar for the user inside the chat, remove the padding from the .by-me.previous-same class. For styling the timestamps, add the following two classes.
.timestamp.by-me{
    font-size: 10px;
    padding-left: 3.2rem;
    margin-left: 67%;
}
.timestamp.by-other{
    font-size: 10px;
    padding-left: 3.2rem;
}
Your chat should now look very similar to the Twitter DM. We just need to make a few more changes in the layout component to make it even better.
Layout
Chatbox
Change the maxWidth from 420px to 350px
Panel Footer
Change the background color to #FFF (white)
Message Field
Change the borderRadius from 4px to 20px. Set the borderWidth as 0px and borderColor as #FFF. Next, set the background color to #EAEEF0.
Highlights
Lastly, change the highlights’ background color to #1CA1F2.
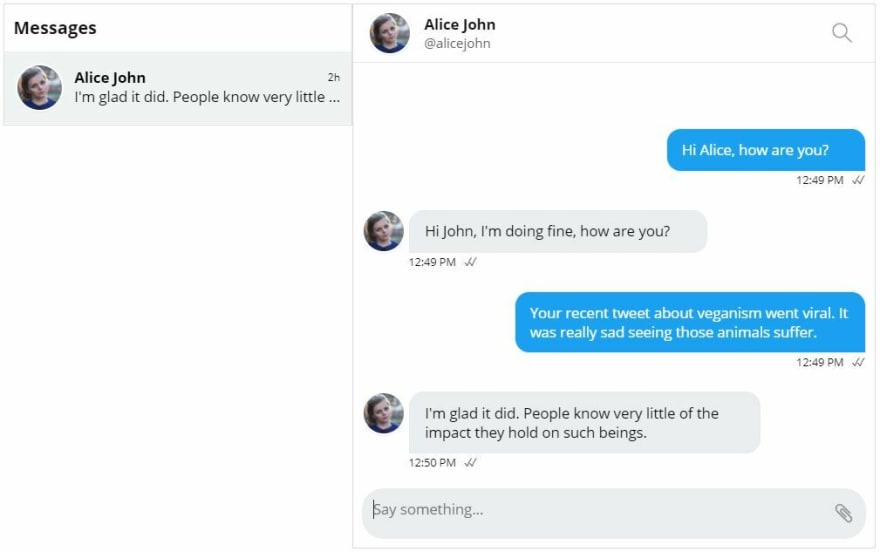
Desktop/Web UI
If you want a Desktop/Web version of the Twitter chat, you will have to make a different set of changes. For example, the desktop/web version has the user’s name aligned to the left. They also have their @username mentioned below their actual name on the header. This can only be static as of now with an additional element in the HTML. The desktop/web version of the Twitter DM looks like this. We will try and implement the same using our TalkJS Inbox with some additional changes over the ones we mentioned.
ChatHeader
Add an HTML element after line number 48 to add the user’s @username. We will give it a class of tag as well.
<div class="tag">@alicejohn</div>
Give the tag class the following styles.
.tag{
    font-size: 12px;
    color: #5F6165;
}
Now, if the API gives the option to add a user’s username apart from their full name, we can just replace it with the value from the API rather than the static value mentioned above. Now change the header class’s style to the following. Do not change any of the default styles.
.header {
    display: flex;
    height: 4rem;
    background-color: #FFF;
    flex-shrink: 0;
    border-bottom: 1px solid #E6E6E6;
}
ConversationListHeader
Remove line number 15 to delete the desktop toggle and change the label to ‘Messages’. For the .conversation-list-header class change the padding to 15px 12px and the background-color to #FFF. Now, scroll down to the .toggle-label class and replace the contents with this.
.toggle-label {
    float: left;
    padding-top: 7px;
    font-style: italic;
}
Layout
Panels
In the panels sub-section, change the borderRadius to 0 and the borderColor to #DDDDDD.
Inbox conversation list panel
In this sub-section, change the width to 100%, maxWidth and minWidth both to 320px, borderRadius to 0, borderWidth to 1px and borderColor to #DDDDDD.
Inbox chat panel
For the Inbox chat panel, change the width to calc(70% - 1rem), maxWidth to 480px and set the marginLeft as 0px.
Highlights
We’re at the end now. Change the backgroundColor of the highlights to #EFF3F4 and color to #000 and your inbox should look nearly identical to the Twitter DM.
Wrapping Up
There you have it. We have successfully managed to clone the Twitter direct messages interface from both web/desktop as well as mobile devices. The versatility of the TalkJS Theme Editor allows us to style our chat very efficiently and we have been proving it time and again through our series of theming how-tos. Until the next one, happy coding!


