

This guide uses the classic React SDK. If you're starting a new project, consider using TalkJS Chat UI components for React, which are more customizable.
Next.js is a popular React-based framework that provides features for your web application like routing, image optimization and server-side rendering.
This tutorial will show you how to use TalkJS's classic React SDK to add chat to your Next.js application.
We'll follow a very similar approach to the classic React SDK getting started guide, but there will be some differences because of Next.js's ability to render components on the server. The classic React SDK uses the TalkJS classic JavaScript SDK to create and update users and conversations. The JavaScript SDK can only run in the browser, so we will use Next.js's Client Components to render our chat component on the client only.
To follow this guide, you will need a TalkJS account. TalkJS provides a ready-to-use chat client for your application. Your account gives you access to TalkJS's free development environment.
You'll need a Next.js app to add TalkJS to. If you don't have an existing app, you can create a Next.js starter app.
For the complete example code, see the GitHub repo for this tutorial.
Set up your project
First, add your TalkJS App ID as an environment variable. In your .env file, add the following line (if you're using the Next.js starter app, create a .env file in the root directory):
NEXT_PUBLIC_APP_ID="<APP_ID>"
You can find your App ID in the Settings tab of the TalkJS dashboard. For this tutorial, we recommend using the App ID for TalkJS's Test Mode, which has built-in sample users and conversations that you can use.
We've prefixed the environment variable with NEXT_PUBLIC_ so that Next.js makes it accessible in the browser – see Next.js's docs on Bundling environment variables for the browser.
Then install @talkjs/react in your app along with the regular talkjs package.
To install with npm, run:
npm install talkjs @talkjs/react
To install with yarn, run:
yarn add talkjs @talkjs/react
Connect to TalkJS
To use TalkJS in your app, you'll need to create a connection to the TalkJS servers, known as a session.
Our React SDK provides a built-in Session component. Import the Session component in the component where you want to add your chat session:
import { Session } from "@talkjs/react";
We recommend rendering the session component at the top of your component hierarchy. The connection to the TalkJS servers will live as long as the Session component is mounted, so that it is active even when no chat UI is being shown. This allows you to continue to listen for events or show desktop notifications for new messages.
Next, add the Session component:
import { Session } from "@talkjs/react";

function Chat() {
    return (
    <Session appId={process.env.NEXT_PUBLIC_APP_ID} syncUser={syncUser}>
      <Chatbox
        syncConversation={syncConversation}
        style={{ width: "100%", height: "500px" }}
      ></Chatbox>
    </Session>
  );
}

export default Chat;
The appID prop of the Session component takes your TalkJS App ID, which you provided in the .env file. You'll also need to specify a current user to send messages as. In this example, we've used the userId prop to specify the user ID of an existing user, the sample_user_alice sample user.
View an existing conversation
So far, we have created a connection to the TalkJS servers and added our sample user. Next, we want to create the chat UI and view an existing conversation.
TalkJS offers multiple pre-built chat UIs out of the box for your project. This guide uses the chatbox, but the other UIs work the same way.
Import the Chatbox component in the component where you want to have your chat UI (this should be a descendant of your Session component so it has access to the connection):
import { Chatbox } from "@talkjs/react";
Next, add the Chatbox component:
<Chatbox
  conversationId="sample_conversation"
  style={{ width: "100%", height: "500px" }}
></Chatbox>
You'll need to specify the conversation that you want to view. We'll use the conversationId prop to view a built-in sample conversation with an ID of sample_conversation. We'll also pass in a style prop with some CSS styling to set the size of the chatbox:
Check your browser, and you should see a fully-featured chat window running in your app that looks something like this:
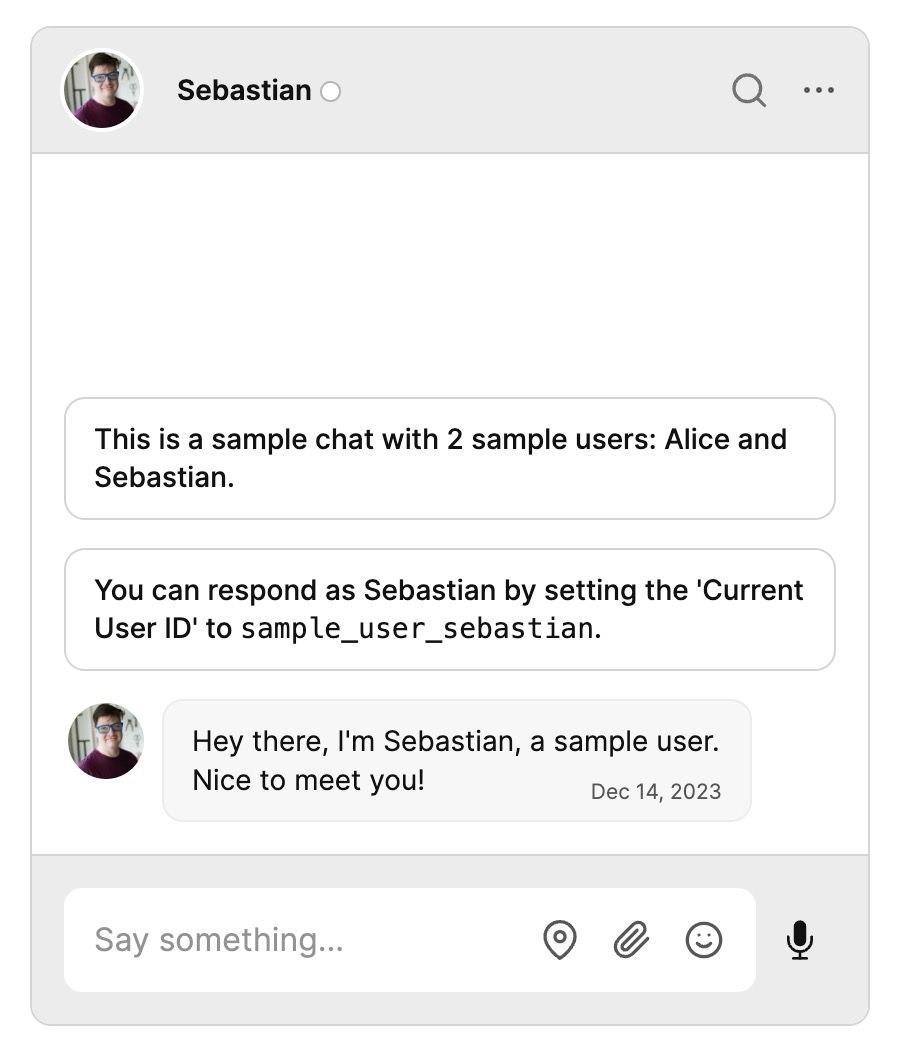
Try sending Sebastian a message! You can also try switching your userId to sample_user_sebastian and viewing the other side of the conversation.
If you don't see the chat window, make sure that you entered your App ID, replacing <APP_ID> in the code.
Create new users and conversations
So far in this guide we've used a sample user and conversation. Next, we'll create new users and a conversation between them, and sync them with the TalkJS servers.
To do this, we'll need to use TalkJS's classic JavaScript SDK. This can only run in the browser, so we will use Next.js's Client Components to render our chat component on the client only.
To mark a component as a Client Component, add the following "use client" directive at the top:
"use client";
You'll want to do this in the files where you use your Session and Chatbox components.
Note:
You may want some of the child components of your Session to run on the server. Next.js allows you to do this – for more details, see their docs on interleaving server and client components.
Now let's create a new user and add them as the current user in our session. Usually, you would create users based on the data from your database. For this getting started guide, we've hard-coded our user data instead.
We'll use the JavaScript SDK to create the user. To do this, we'll first replace the userId prop in the Session component with the syncUser prop. The syncUser prop takes a callback that creates a Talk.User object:
"use client";

import Talk from "talkjs";
import { useCallback } from "react";

function Chat() {
  const syncUser = useCallback(
    () =>
      new Talk.User({
        id: "nina",
        name: "Nina",
        email: "nina@example.com",
        photoUrl: "https://talkjs.com/new-web/avatar-7.jpg",
        welcomeMessage: "Hi!",
      }),
    []
  );

  return (
    <Session appId="<APP_ID>" syncUser={syncUser}>
      // Chatbox component goes here...
    </Session>
  );
}

export default Chat;
If you sync a User object with the same ID later, any properties that have changed will be updated. Otherwise, if nothing has changed the user stays the same.
Note:
If you prefer, you can instead create and sync users from your backend with our REST API. If you want to only sync users with the REST API, you can disable syncing in the browser and only pass in user IDs with the userId prop that we used earlier in this guide. See Browser Synchronization for more details.
Next, we'll sync a new conversation by replacing the conversationId prop in the Chatbox component with the syncConversation prop. This prop takes a callback that uses the JavaScript SDK to create a conversation with getOrCreateConversation. If the conversation ID already exists, TalkJS will load the pre-existing conversation and all previous messages. Otherwise, it creates a new conversation.
Note: As with users, you can instead choose to sync conversations from your backend with our REST API, and only pass in conversation IDs with the conversationId prop.
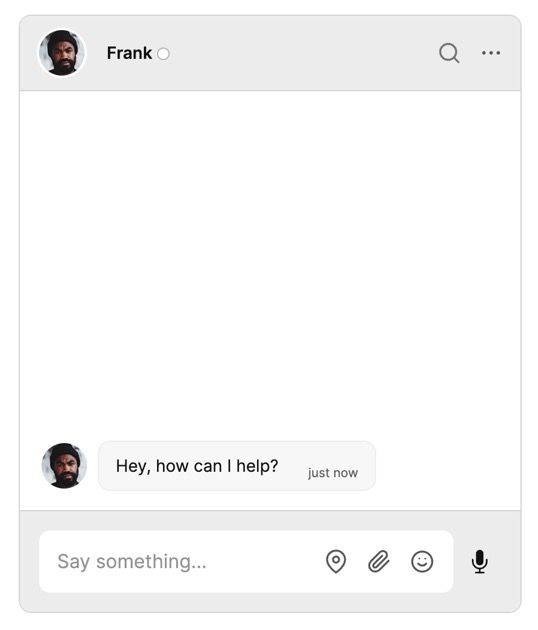
In our case, we'll create a conversation with an ID of new_conversation and add one other user:
const syncConversation = useCallback((session) => {
  // JavaScript SDK code here
  const conversation = session.getOrCreateConversation("new_conversation");

  const other = new Talk.User({
    id: "frank",
    name: "Frank",
    email: "frank@example.com",
    photoUrl: "https://talkjs.com/new-web/avatar-8.jpg",
    welcomeMessage: "Hey, how can I help?",
  });
  conversation.setParticipant(session.me);
  conversation.setParticipant(other);

  return conversation;
}, []);

// ...

<Chatbox
  syncConversation={syncConversation}
  style={{ width: "100%", height: "500px" }}
></Chatbox>;
Next steps
In this guide, you've added powerful user-to-user chat to your Next.js app. You now have a starting point to try out all the features TalkJS offers. For example, you could create a new UI theme in the Theme Editor, customize your chat with action buttons or HTML panels, or enable email notifications.
If you want to learn more about TalkJS, here are some good places to start:
- The TalkJS Docs help you get started with TalkJS.
- TalkJS tutorials provide how-to guides for many common TalkJS use cases.
- The
talkjs-examplesGithub repo has larger complete examples that demonstrate how to integrate with other libraries and frameworks. For the full example code for this tutorial, see our Next.js example.


