
This guide uses the classic JavaScript SDK. If you're starting a new project, consider using TalkJS Chat UI components, which are more customizable.
We have been pushing the boundaries of TalkJS' classic JavaScript SDK for a while now. In our previous article, we looked at how to make a Twitter DM lookalike using TalkJS and we’ve also seen another article on how to integrate Voice and Video calls in TalkJS using the Daily API. Today, we will be creating a chat similar to Upwork with TalkJS. For those of you who are not familiar with Upwork, it is the world’s largest freelancer marketplace and is even listed on NASDAQ.
Things to do
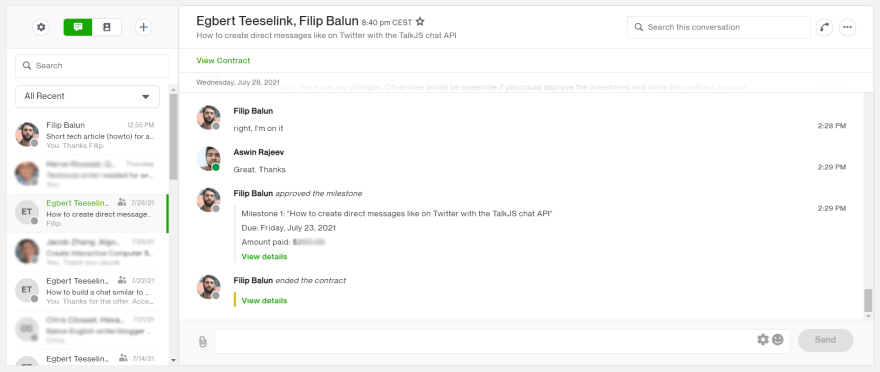
The Upwork chat looks as shown below. We have quite a few changes to be made here. Let’s review all of them first.
- Change the header background to white, correct the title and subtitle sizes
- Remove avatar from header
- Add a new section under the header to view the contract
- Change user message styling
- Add user’s name above the message
- Add timestamp to the right end of the message
- Add system messages to approve milestones, end contract, etc
- Change color scheme all over
Before going over all the changes, it is important to have a working inbox ready. You can check out our Getting Started guide to set this up in no time. Unlike the previous articles, you need to make one small change to the talkjs-container. Remove the existing styles from the HTML and add the following.
#talkjs-container{
    margin-top: 7rem;
    height: 600px;
}
You can also find this starting point in our GitHub example for this tutorial.
The end result of all these changes looks like this. As you can see, we’ve been able to achieve a near lookalike of the Upwork chat using the TalkJS Chat API and its powerful themes.
ChatHeader
Start off by deleting lines 38-40. This will remove the avatar from the header. After the <header> tag, add the following lines of code. This is to add a new section under the header to view the contract. It will be an empty link as of now but can be populated with the data once it is available.
<div class = "contract">
    <a href = "#" class = "contract-link">View Contract</a>
</div>
Change the .header class’s CSS as shown below:
.header {
    display: flex;
    align-items: center;
    height: 75px;
    background-color: #FFF;
    border-bottom: 1px solid #e0e0e0;
    flex-shrink: 0;
    font-size: 22px;
}
For the new contract div and the contract-link class, add the following styles.
.contract{
    border-bottom: 1px solid #e0e0e0;
    height: 50px;
    padding-left: 25px;
    padding-top: 15px;
    }
.contract-link{
    font-size: 14px;
    text-decoration: none;
    color: #14a800;
    font-weight: 500;
}
For the .title class remove the font-weight: bold style and add a padding-left of 15px and also add a font-size of 22px.
UserMessage
Open up the UserMessage component and replace lines 67-71 with the following:
<div t:if="{{ sender.id != previousSenderId and conversation.others.length > 0 }}"
    class="message-author"
    style="color: #000">
   {{ sender.name }}
</div>
This will ensure that the user’s name will be displayed above every message and the text color will be black. From the <MessageBody> tag remove timestamp, floatTimestamp and showStatus attributes. After the <div> on line 74, add the following bit to display the timestamp.
<div class = "timestamp {{ body.type }} {{ sender.id == previousSenderId | then: 'previous-same' }}">
    {{ timestamp |  date: "%l:%M %p"}}
 </div>
For the .message-row class add a margin-bottom of 0.5rem. For the .message-row.previous-same class change the margin-top to 0.1rem. Delete the styles from inside the .message-row.by-me class.
Now, let’s alter the message styles. Use the following styles for the .message class. This will remove all the borders and background colors from both the user’s and the other user’s messages.
.message {
    white-space: normal;
    overflow: hidden;
    word-wrap: break-word;
    position: relative;
    display: inline-block;
    max-width: calc(100% - 6rem - 0.25rem - 0.25rem);
    background-color: #FFF;
    color: #000;
    font-size: 14px;
}
.by-me .message {
    color: #000;
    /* Space between avatar and the message */
    margin-right: 0.25rem;
}
For the .by-me.previous-same class, we need to add a padding-left of 3rem instead of a padding-right. For the message-author class we need to completely replace all the existing styles. Use the following:
.message-author {
    font-size: 14px;
    font-weight: bold;
    padding-bottom: 8px;
    padding-left: 12px;
}
Add the following styles for the timestamps.
.timestamp{
    margin-left: auto;
    padding-top: 2rem;
    margin-right: 10px;
    font-size: 12px;
    font-family: "Helvetica";
    color: #000;
}
.timestamp.previous-same {
    padding-top: 2px;
}
SystemMessage
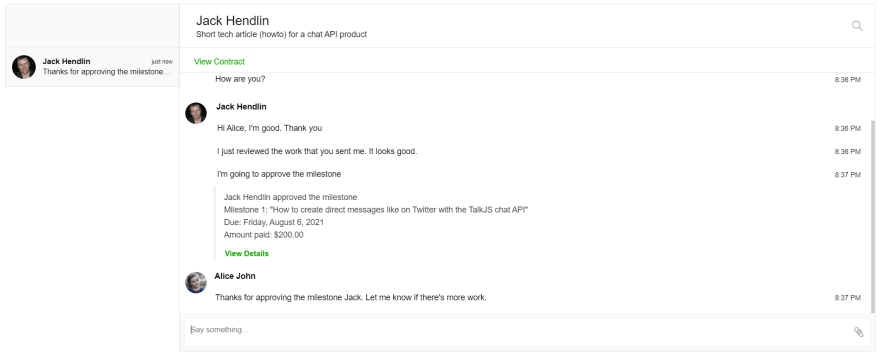
We will be using the TalkJS REST API to send system messages that show different stages of a contract on Upwork. The awesome thing with these System Messages is that they allow formatting within them and we will show you how that works in just a second.
Select the SystemMessage component from the left side menu and add the following line after the <MessageBody>. Don’t forget to delete the timestamp and floatTimestamp attributes from the <MessageBody> tag.
<span><a class = "view-details" href = "#">View Details</a></span>
Now add the following styles for the .message and the .view-details class.
.message {
    line-height: 22px;
    white-space: normal;
    margin-left: 50px;
    overflow: hidden;
    background-color: #fff;
    color: #414649;
    border-left: 5px solid #F2F2F2;
    font-size: 14px;
}
.view-details{
    margin-left: 15px;
    font-size: 13px;
    font-weight: bold;
    color: #14a800;
    text-decoration: none;
}
To send System Messages using the TalkJS REST API, we need to use the following URL:
https://api.talkjs.com/v1/{appI}/conversations/{conversationId}/messages
It is a POST request and the request body should be as follows:
[
  {
    "text": "Jack Hendlin approved the milestone\nMilestone 1: \"How to create direct messages like on Twitter with the TalkJS chat API\"\nDue: Friday, July 23, 2021\nAmount paid: $200.00",
    "type": "SystemMessage"
  }
]
In the above JSON payload, you can see that we have added newlines using the \n escape sequence within the payload and this will be rendered perfectly inside TalkJS. Based on the different stages of the contract, we can change the contents of the message and it will be rendered accordingly.
ConversationListHeader
Remove lines 15 and 16 to remove the desktop toggle as well as the heading. This will give us a plain header on the left-hand side. Change the style of the .conversation-list-header class to the following
.conversation-list-header {
    position: relative;
    padding: 15px 8px;
    border-bottom: 1px solid #e0e0e0;
    background-color: #F9F9F9;
    height: 5.6rem;
}
Layout
Global
In the global sub-section of layout, remove the Open Sans font family.
Panels
Set the borderRadius as 0px and borderColor as #e0e0e0 in the panels sub-section.
Inbox conversation list panel
Change the width, maxWidth and minWidth to 300px for the inbox conversation list panel.
Inbox chat panel
For the inbox chat panel, change the width and maxWidth to 1200px.
Panel footers
There’s only one change here and that is to change the backgroundColor to #F9F9F9.
Message field
For the message field, we need to set the borderColor to #EFEFEF and the borderRadius to 0px.
Highlights
Change the backgroundColor to #F9F9F9 and the color to #000 (black).
Wrapping Up
That’s it for this one. We hope you had a great time coding this one up. You may be already aware of the strength of the Theme Editor on TalkJS, and we’re just getting started. Whatever your application may be, TalkJS can be themed according to it with all the identical functionalities. So, until the next one, happy coding!


