

This guide uses the classic JavaScript SDK. If you're starting a new project, consider using TalkJS Chat UI components, which are more customizable.
This guide shows you how to create a poll or questionnaire in TalkJS and embed it in your chats. We'll then use TalkJS's REST API to send a System Message from our backend server with the poll question. TalkJS's HTML Panels allow you to display a HTML document in your chats, just above the message field. We’ll use a panel to display the results of a poll, where users vote using custom action buttons.
To follow along, you’ll need:
- A TalkJS account. TalkJS provides a ready-to-use chat client for your application. Your account gives you access to TalkJS's free development environment.
- An existing TalkJS project using the classic JavaScript SDK. See the associated Getting Started guide for an example of how to set this up.
- An installation of Node.js along with the npm package manager. We’ll use this to create our backend server.
We’ll build up the feature step by step in the following sections. If you would rather see the complete example code, see the GitHub repo for this tutorial.
Ask users to vote in the poll
For our poll, we need to ask a question to the users in the chat along with the option for users to vote. To accomplish this in TalkJS, we’ll make a REST API call to create a System Message containing the question we want to show to all users. We need to call the REST API from a backend web server to avoid exposing our secret key in frontend code.
In this tutorial, we’ll use Express, but feel free to use your favorite web server library instead:
Let’s examine the code that accomplishes this:
await fetch(
    `${basePath}/v1/${appId}/conversations/${conversationId}/messages`,
    {
      method: "POST",
      headers: {
        "Content-Type": "application/json",
        Authorization: `Bearer ${secretKey}`,
      },
      body: JSON.stringify([
        {
          text: "Would you use TalkJS instead of developing your own chat solution?\n" +
          "<actionbutton:yesOrNo?choice=yes|Yes><actionbutton:yesOrNo?choice=no|No>" +
          "<actionbutton:yesOrNo?choice=end|End Poll>",
          type: "SystemMessage",
        },
      ]),
    }
  );
This code first makes a call to the Messages endpoint: ${basePath}/v1/${appId}/conversations/${conversationId}/messages. This allows you to send a message on behalf of a user, or a system message. We’re sending a system message in this case.
TalkJS allows you to add action buttons directly to messages. This is the method we use to create the buttons that allow our users to vote in the poll:
text: "Would you use TalkJS instead of developing your own chat solution?\n" +
"<actionbutton:yesOrNo?choice=yes|Yes><actionbutton:yesOrNo?choice=no|No>" +
"<actionbutton:yesOrNo?choice=end|End Poll>"
Let’s take a closer look at this snippet:
yesOrNo: acts as the identifier for this group of action buttons.choice=yes: This choice is sent as an event parameter when the related action button is clicked.Yes: this is the label for the button that is shown on the user interface.type: "SystemMessage": This value fortypeis what makes this message a system message, as opposed to a user message.
We'll also style the system message to add some space between the buttons. In the TalkJS dashboard, go to the Themes tab and select to Edit your current theme. In this tutorial we'll edit the default theme as an example.
Under Built-in components, select the System message component. Add the following CSS inside the `<style scoped>` section to style the buttons:
.message button[data-action]:not(:first-child) {
margin-left: 2px;
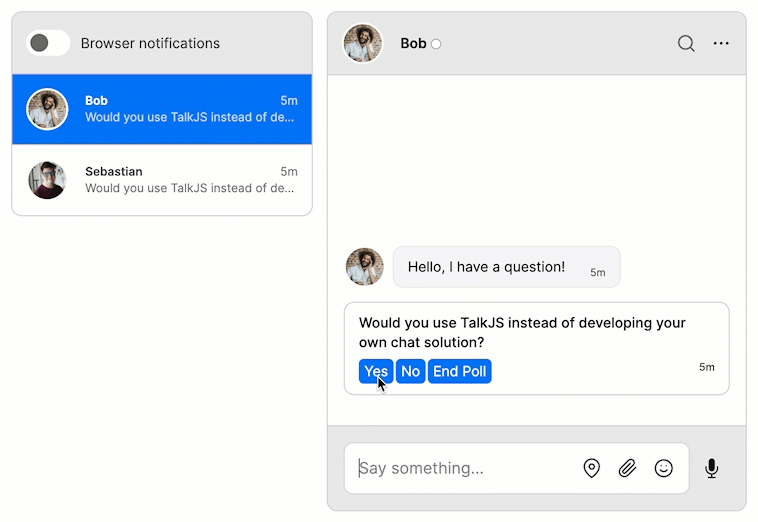
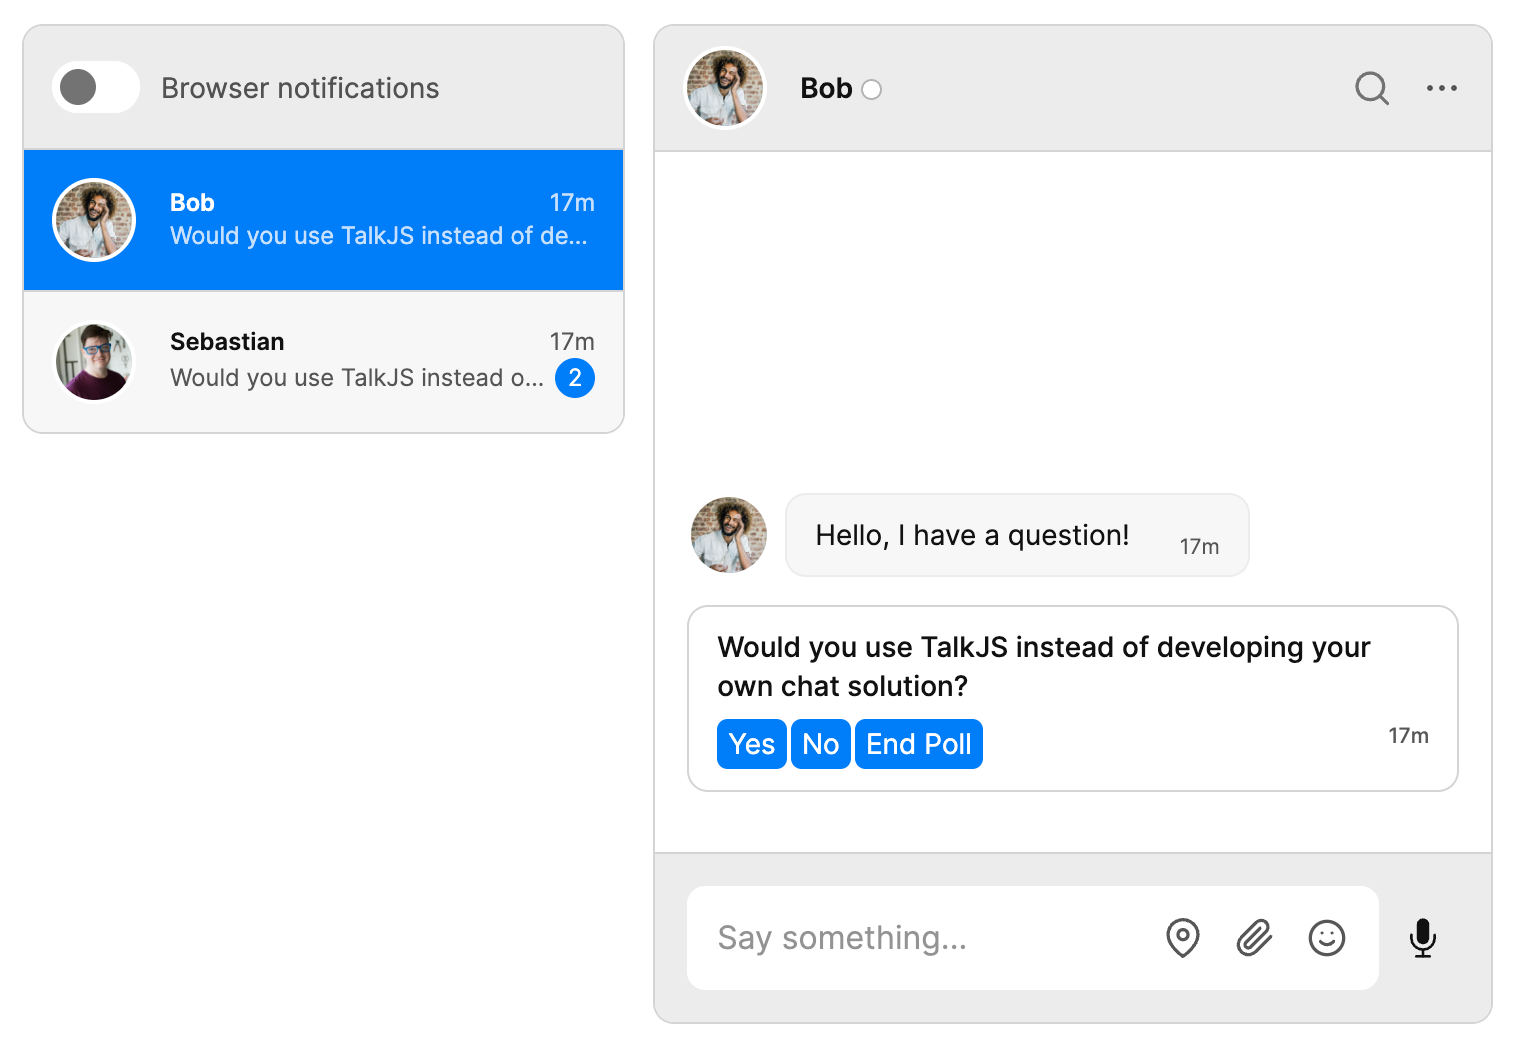
}At this stage, we have asked our users the poll question, and now they have the option to vote:
Handling poll votes
Now that users can vote in polls, we need to track those votes and display the result when the poll has ended. To set this up, we’ll add an event handler for our action buttons, and some variables to keep track of how often each button was pressed.
yesVotes = 0;
noVotes = 0;

inbox.onCustomMessageAction('yesOrNo', (event) => {
  if (event.params.choice == 'end') {
     return;
  }
  else if (event.params.choice == 'yes') {
     yesVotes++;
  }
  else if (event.params.choice == 'no') {
     noVotes++;
  }
});
Let’s break this down:
- We add two variables to keep track of votes: yesVotes and noVotes.
- Notice how our event handler uses the identifier yesAndNo that we mentioned earlier when we set up the action buttons: inbox.onCustomMessageAction('yesOrNo', (event) =>.
- In our event handler, we add a simple series of if statements to track user actions. The following occurs:
- If the user clicks the End Poll button, nothing will happen. Note, we’ll add some functionality at a later stage of this guide.
- If the user clicks the Yes button, the value of yesVotes is increased.
- If the user clicks the No button, the value of noVotes is increased.
Our votes are now being tracked! The next step is to show the result of the poll when the poll is ended.
Displaying poll results
Let’s allow users to end the poll, and display the vote count when it ends. A simple way to do this is by adding an HTML Panel that will contain the results. First, we have to add the new HTML file for our panel and related CSS files to our project. See the code repository for this example to view these files.
The HTML file contains important snippets of code that need to be highlighted:
<body onload="loadVotes()">
    <div class = "poll-div">
        <div class = "total">
            <p>Yes votes:</p><p id="yes-total">0</p>
            <p>No votes:</p><p id="no-total">0</p>
        </div>
    </div>
</body>
Note the following:
- We use <body onload="loadVotes()"> to call a function when the page is fully loaded. We’ll take a look at this function next.
- We have placeholder <p> tags in place which we can update using the id’s yes-total and no-total.
In the same file, we define the loadVotes() function:
function loadVotes() {
        const queryString = window.location.search;
        const urlParams = new URLSearchParams(queryString);

        document.getElementById("yes-total").innerText = urlParams.get('yes');
        document.getElementById("no-total").innerText = urlParams.get('no');
    }
With this code:
- We get the values of the URL parameters that we pass to the newly created HTML Panel. You can see these parameters being passed in the next example.
- We assign the values of our URL parameters to the placeholder <p> tags we set up.
Our HTML Panel is complete, but how do we show this panel at runtime when the poll is ended? Let’s get into it!
Go back to our original event handler code for the action buttons, specifically where we are listening for when the End Poll button is pressed:
if (event.params.choice == 'end') {
            return;
}
Update the code to the following:
if (event.params.choice == 'end') {
        var htmlPanelQuery= 'html-panel.html?yes=' + yesVotes + '&no=' + noVotes;
        inbox.createHtmlPanel({
              url: htmlPanelQuery,
              height: 100,
              show: true
          });
          return;
}
This code makes use of TalkJS’s HTML Panel feature. Let’s see how we deployed this feature for our use case:
- First, we define a query string to pass the value of our votes to our HTML Panel:
var htmlPanelQuery= 'html-panel.html?yes=' + yesVotes + '&no=' + noVotes; - Next, we create our panel, passing in our URL query string value, along with specifying the height, and that we want it to show immediately:
inbox.createHtmlPanel({
	url: htmlPanelQuery,
	height: 100,
	show: true
});
To see the result of this work, simply click the End Poll button on the UI. You will see the totals for the votes displayed in the chat:
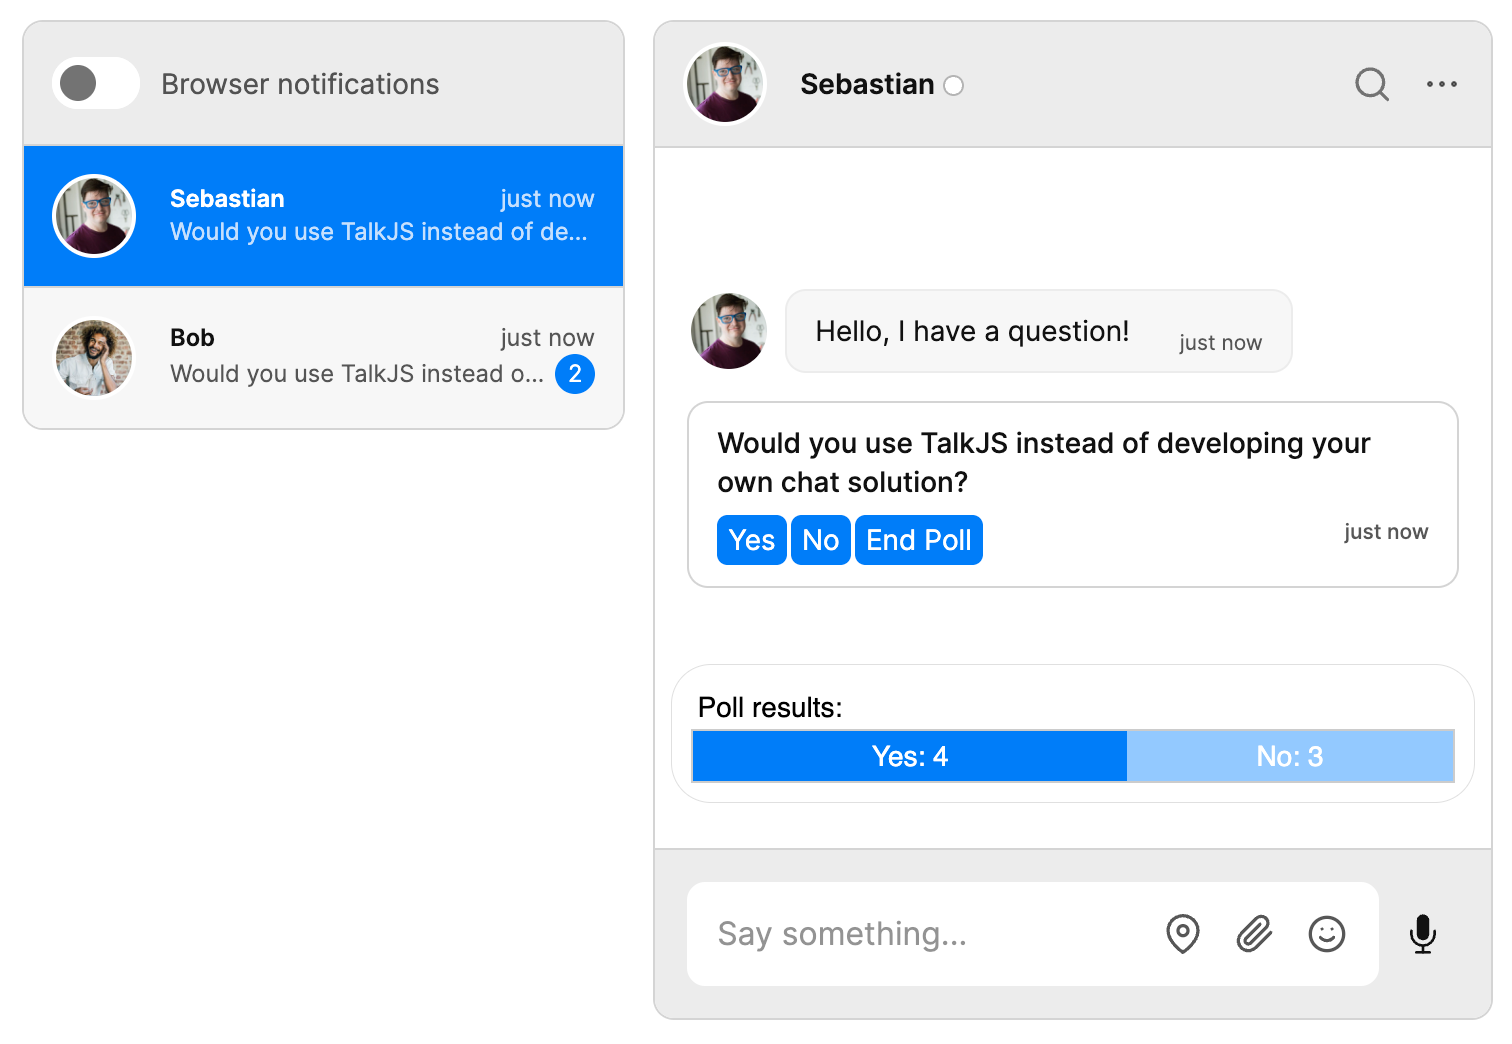
Great! We can see our poll results. However, the user should no longer be able to vote in the poll. Let’s add this functionality.
Deleting the system message
To stop our users from voting in the poll after the poll has ended, we’ll make a call to the REST API to delete the message when the End Poll button is clicked.
Add this method to your HTML file:
async function postMessageId(messageId, conversationId) {
      const data = {
        messageId: messageId,
        conversationId: conversationId
      };
      // Send system message ID and conversation ID to your backend server
      const response = await fetch("http://localhost:3000/deleteSystemMessage", {
        method: "POST",
        headers: {
          "Content-Type": "application/json",
        },
        body: JSON.stringify(data),
      });
    }
This code takes in two parameters, messageId and conversationId, and sends this data to our NodeJS backend in a POST request.
Call this new method where our End Poll button is pressed:
if (event.params.choice == 'end') {
    await postMessageId(event.message.id, event.message.conversation.id);
    var htmlPanelQuery= 'html-panel.html?yes=' + yesVotes + '&no=' + noVotes;
    inbox.createHtmlPanel({
        url: htmlPanelQuery,
        height: 100,
        show: true
    });
        return;
}
We passed in the message ID and the conversation ID using the attributes of our event handler: await postMessageId(event.message.id, event.message.conversation.id);
Our NodeJS backend code needs to be updated to handle this data that is being sent. Let’s work on that next!
First, create a method that calls the message deletion endpoint in TalkJS’s REST API:
async function deleteSystemMessage(messageId, conversationId) {
  console.log("Deleting message with id:", messageId);
  return fetch(`${basePath}/v1/${appId}/conversations/${conversationId}/messages/${messageId}`, {
    method: "DELETE",
    headers: {
      "Content-Type": "application/json",
      Authorization: `Bearer ${secretKey}`,
    },
  });
}
Now we just need to listen for the POST request from the front end. Let’s add the code to handle this:
app.post("/deleteSystemMessage", async (req, res) => {
const { messageId, conversationId } = req.body;
await deleteSystemMessage(messageId, conversationId);
res.status(200).end();
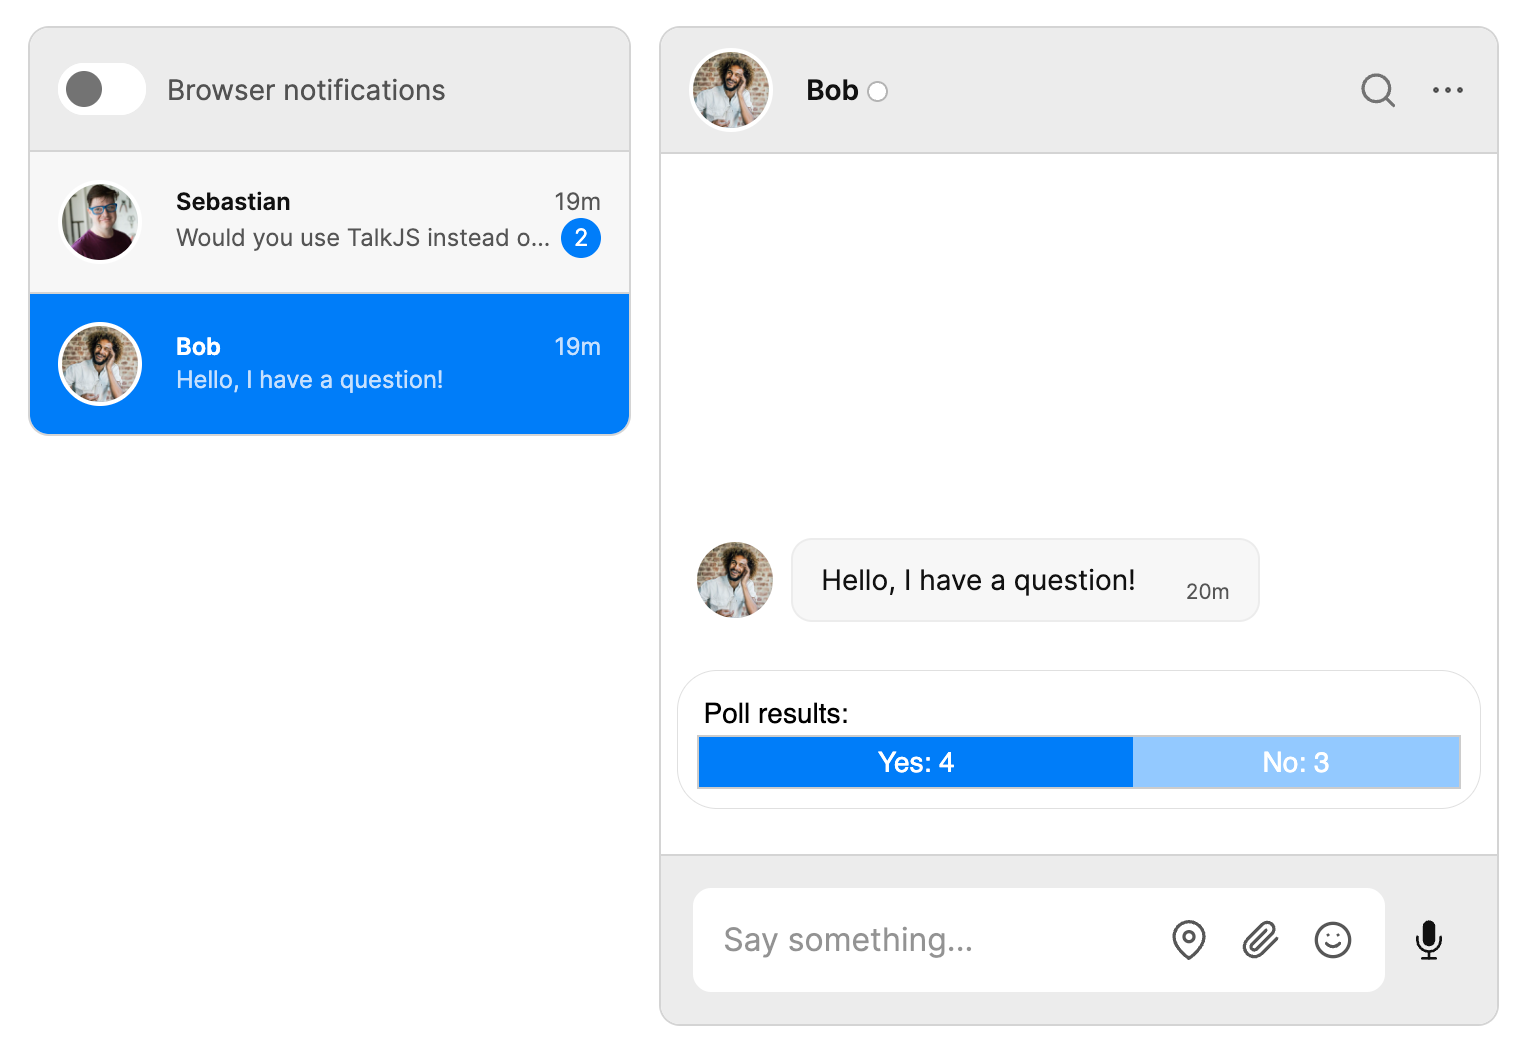
});This code reads the data that is sent from our HTML frontend when the End Poll button is clicked and calls our new deleteSystemMessage() method, which sends the request to TalkJS’s API. If your request was successful, you will see the system message is deleted:
There you have it! A simple poll interface that makes use of some smart TalkJS features. Feel free to build upon this example, we can’t wait to see what you create!
Summary
In this tutorial, we have performed the following actions:
- Created the poll: Made a REST API call to create a System Message with the poll question and action buttons for voting.
- Handled votes: Tracked user votes using event handlers and variables to count yes and no responses.
- Displayed results: Created an HTML Panel to display the poll results, updating the panel with the final vote counts.
- Ended the poll: Added functionality to stop users from voting after the poll ends by deleting the System Message through a REST API call.
The tutorial provides code snippets and explanations for each step, enabling users to implement a simple yet effective poll interface within TalkJS chats. For the full example code for this tutorial, see our GitHub repo.
If you want to learn more about TalkJS, here are some good places to start:
- The TalkJS Docs help you get started with TalkJS.
- TalkJS tutorials provide how-to guides for many common TalkJS use cases.
- The talkjs-examples GitHub repo has larger complete examples that demonstrate how to integrate with other libraries and frameworks.


