
This guide uses the classic JavaScript SDK. If you're starting a new project, consider using TalkJS Chat UI components, which are more customizable.
TalkJS offers three pre-built chat UIs: Inbox, Chatbox, and Popup. The Popup UI widget is a pop-up version of the Chatbox. In some use cases you might instead want to use the Inbox UI as a pop-up and that will be the focus of this tutorial. Let's explore how to seamlessly integrate this feature into your application.

To follow along, you’ll need:
- A TalkJS account. TalkJS provides a ready-to-use chat client for your application. Your account gives you access to TalkJS's free development environment.
- An existing TalkJS project using the classic JavaScript SDK. See the associated Getting Started guide for an example of how to set this up.
We’ll build up the feature step by step in the following sections. If you would rather see the complete example code, see the GitHub repo for this tutorial.
Add a popup container for the inbox widget
Let’s start by setting up the HTML structure. The “popup-inbox-container” div is used as a wrapper element that sets the position and size of the TalkJS Inbox, while the Inbox will be mounted inside a “talkjs-container” div.
<div id="popup-inbox-container">
  <div id="talkjs-container"></div>
</div>
TalkJS’s pre-built chat UIs are by default responsive, so understanding their responsiveness is the key ingredient here because we are rendering the Inbox element inside a parent container element with limited width and height.
#popup-inbox-container {
  height: 550px;
  width: 340px;
  position: absolute;
  bottom: 60px;
  right: 10px;
}


#talkjs-container {
  width: 98%;
  height: 90%;
}
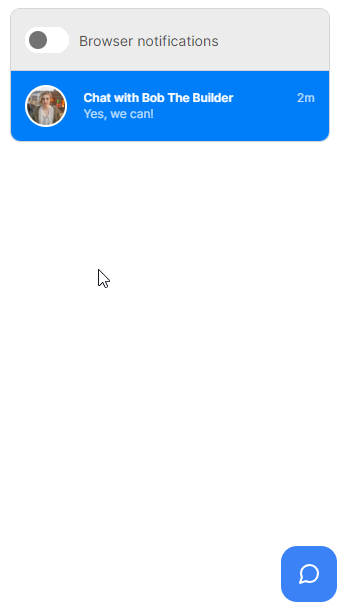
This will cause the Inbox to adapt to its mobile behavior and only display one of the two of its components at the time:
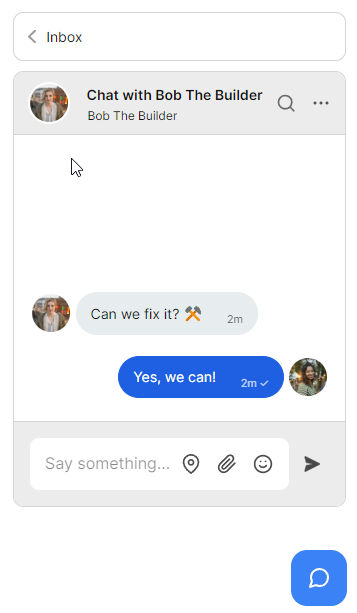
So if the conversation component is displayed at the moment, we can switch to the chat history component and vice versa.
We also need to add HTML for a button trigger for toggling the visibility of the popup. In order to get similar styling to existing TalkJS UI elements we’ll use the SVG chat icon from the TalkJS design document:
<button id="popup-trigger-btn">
  <svg xmlns="http://www.w3.org/2000/svg" width="24" height="24" viewBox="0 0 24 24" fill="none" stroke="currentColor"
stroke-width="2" stroke-linecap="round" stroke-linejoin="round">
    <path
d="M21 11.5a8.38 8.38 0 0 1-.9 3.8 8.5 8.5 0 0 1-7.6 4.7 8.38 8.38 0 0 1-3.8-.9L3 21l1.9-5.7a8.38 8.38 0 0 1-.9-3.8 8.5 8.5 0 0 1 4.7-7.6 8.38 8.38 0 0 1 3.8-.9h.5a8.48 8.48 0 0 1 8 8v.5z">
    </path>
  </svg>
</button>
As usual, let’s include TalkJS API from the CDN at the top of our script.js file:
(function (t, a, l, k, j, s) {
  s = a.createElement("script");
  s.async = 1;
  s.src = "https://cdn.talkjs.com/talk.js";
  a.head.appendChild(s);
  k = t.Promise;
  t.Talk = {
    v: 3,
    ready: {
      then: function (f) {
        if (k)
          return new k(function (r, e) {
            l.push([f, r, e]);
          });
        l.push([f]);
      },
      catch: function () {
        return k && new k();
      },
      c: l,
    },
  };
})(window, document, []);
Then we define DOM elements that we need to interact with in our JavaScript file:
const popupInboxContainer = document.getElementById("popup-inbox-container");
const talkjsContainer = document.getElementById("talkjs-container");
const popupTriggerBtn = document.getElementById("popup-trigger-btn");
In order to use the TalkJS API we have to get the app ID from the TalkJS developer account dashboard. Let’s copy it to our script.js file:
const appId = "<APP_ID>"; // replace with your app ID
Let’s define one object that represents the current user and another one to contain conversation data.
const currentUser = {
  id: "1234",
  name: "me",
  email: "me@email.com",
  photoUrl: "https://talkjs.com/images/avatar-1.jpg",
  welcomeMessage: "What`s up?",
  role: "default",
};

const currentConversation = {
  id: "conversation_0",
  subject: "Chat with Bob The Builder",
  user: {
    id: "user_0",
    name: "Bob The Builder",
    email: ["bobthebuilder@email.com"],
    photoUrl: "https://talkjs.com/images/avatar-2.jpg",
    welcomeMessage: "Can we fix it? ⚒️",
  },
};
Before using it, ensure TalkJS is fully loaded and operational. Wait for the Talk.ready promise to resolve before making any further calls to the TalkJS API.
Talk.ready.then(() => {
  let selectedConversation;
  const me = new Talk.User(currentUser);
  window.talkSession = new Talk.Session({ appId, me });
By clicking on the popup trigger button the event handler will call the initChat function, which we’ll discuss below. For the purposes of this tutorial, we’ll pass our currentConversation data:
  popupTriggerBtn.addEventListener("click", () => {
    initChat(currentConversation);
  });
As mentioned, the initChat function should receive an object that contains the conversation ID, the subject and the person we are chatting with:
   function initChat(convItem) {
    if (!popupInboxContainer.classList.contains("hidden")) {
      popupInboxContainer.classList.add("hidden");
      return;
    }
    popupInboxContainer.classList.remove("hidden");
    selectedConversation = convItem;

    const conversation = talkSession.getOrCreateConversation(
      selectedConversation.id
    );
    conversation.setParticipant(me);

    const otherUser = new Talk.User(convItem.user);
    conversation.setParticipant(otherUser);
    conversation.setAttributes({ subject: selectedConversation.subject });

    const inbox = talkSession.createInbox({
      selected: conversation,
    });
    inbox.mount(talkjsContainer);
    popupTriggerBtn.classList.remove("hidden");
  }
Inside this function we handle showing and hiding the popup container element, and create or update a TalkJS conversation based on the provided parameters. We then mount the inbox with the talkjsContainer element that we defined earlier.
Summary
You now have a working demonstration of how to create an inbox inside a popup! To recap, in this tutorial you have:
- Created a small popup element that contains the TalkJS Inbox element
- Used TalkJS's JavaScript SDK to render chat in the Inbox UI mode inside the popup element
- Displayed the mobile version of the Inbox due to the size of its parent element and the responsive nature of the Inbox element, allowing the user to participate in the current conversation while also being able to navigate the chat history
The tutorial provides code snippets and explanations for each step, enabling users to implement a simple yet effective poll interface within TalkJS chats. For the full example code for this tutorial, see our GitHub repo.
If you want to learn more about TalkJS, here are some good places to start:
- The TalkJS Docs help you get started with TalkJS.
- TalkJS tutorials provide how-to guides for many common TalkJS use cases.
- The talkjs-examples GitHub repo has larger complete examples that demonstrate how to integrate with other libraries and frameworks.


