React
Preview
Components v2 is under development, but already safe to use in production.
It currently only offers limited features. Only the chatbox chat UI is currently available, not the inbox or popup. New capabilities are added on a rolling basis.
Components v2 lets you fully customize the appearance and behavior of your chat. In this guide we'll show you how to add a chatbox component to your app and customize its theme.
To make the most of this guide, you will need:
- A TalkJS account
- Basic familiarity with React
- A React app to which you'd like to add TalkJS chat. If you don't have a React app yet, a build tool such as Vite can offer you a quick way to get started
To get started, install @talkjs/components
, along with the TalkJS theme that you'd like to use in your app. For example, to install TalkJS with the default theme package:
1npm install @talkjs/components @talkjs/theme-default
If you'd like to use a custom theme, see: Customize your theme.
With TalkJS components and a theme installed, you can now view an existing sample conversation.
To view an existing sample conversation, import the Chatbox
component, theme, and the related styling into the component where you want to have your chat UI:
1import { Chatbox } from '@talkjs/components/react';2import * as defaultTheme from '@talkjs/theme-default';3import '@talkjs/components/style.css';4import '@talkjs/theme-default/style.css';
Next, add the Chatbox
component:
1function Chat() {2 const appId = '<APP_ID>';34 return (5 <div style={{ width: '400px', height: '800px' }}>6 <Chatbox7 appId={appId}8 userId="sample_user_alice"9 conversationId="sample_conversation"10 theme={defaultTheme}11 />12 </div>13 );14}
The Chatbox
component here takes the following props:
appId
: Your TalkJS app ID. You can find your app ID on the Settings page of your TalkJS dashboard. For this guide, use the app ID for your test mode, which has built-in sample users and conversations.
userId
: An identifier for the current user to send messages as. This example uses the ID of an existing sample user,sample_user_alice
.conversationId
: An identifier of the conversation that you want to view. This example uses the ID for a built-in sample conversation,sample_conversation
.theme
: the theme you want to use. In this case we've imported the default theme.
The chatbox is wrapped in a divider that applies CSS styling to set the size of the chatbox. You can modify the size to suit your needs.
Run your app. You should get something like the following:
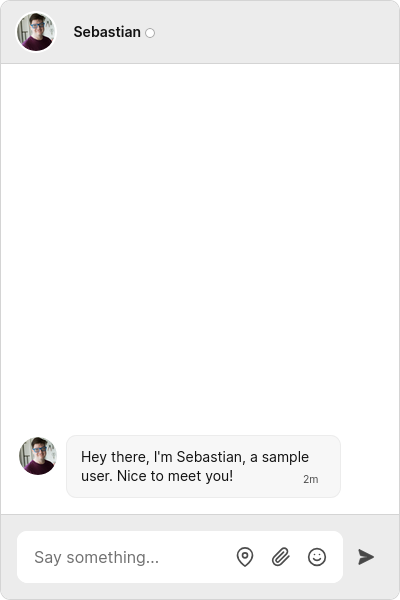
You now have a fully-featured chat window running in your app. Try sending a message!
To view the conversation as a different user, change the userId
. For example, try switching the userId
to sample_user_sebastian
to view the other side of the sample conversation.
If you don't see the chat window, make sure that you've entered your app ID correctly.
So far in this guide we've used a sample user and conversation. Next, we'll create new users and a conversation between them, and sync them with the TalkJS servers. To do this, we'll use TalkJS Core.
Install the @talkjs/core
package:
1npm install @talkjs/core
Then import the TalkSession
from the package into your component, along with React's useEffect
:
1import { Chatbox } from '@talkjs/components/react';2import * as defaultTheme from '@talkjs/theme-default';3import { TalkSession } from '@talkjs/core';4import { useEffect } from 'react';5import '@talkjs/components/style.css';6import '@talkjs/theme-default/style.css';
Add the following code to your component:
1function Chat() {2 const appId = '<APP_ID>';3 const userId = 'frank';4 const otherUserId = 'nina';5 const conversationId = 'new_conversation';67 useEffect(() => {8 const session = new TalkSession({ appId, userId });9 session.currentUser.createIfNotExists({ name: 'Frank' });10 session.user(otherUserId).createIfNotExists({ name: 'Nina' });1112 const conversation = session.conversation(conversationId);13 conversation.createIfNotExists();14 conversation.participant(otherUser).createIfNotExists();1516 return () => {17 session.destroy();18 };19 }, [appId, userId, conversationId]);2021 return (22 <div style={{ width: '400px', height: '800px' }}>23 <Chatbox24 appId={appId}25 userId={userId}26 conversationId={conversationId}27 theme={defaultTheme}28 />29 </div>30 );31}
This code creates a new TalkJS session, which provides access to a continuous, up-to-date flow of your TalkJS data. It then creates two new users and a conversation between them.
Here's a component with the code so far, so that you can see how it all fits together:
1import { Chatbox } from '@talkjs/components/react';2import * as defaultTheme from '@talkjs/theme-default';3import { TalkSession } from '@talkjs/core';4import { useEffect } from 'react';5import '@talkjs/components/style.css';6import '@talkjs/theme-default/style.css';78function Chat() {9 const appId = '<APP_ID>';10 const userId = 'frank';11 const otherUserId = 'nina';12 const conversationId = 'new_conversation';1314 useEffect(() => {15 const session = new TalkSession({ appId, userId });16 session.currentUser.createIfNotExists({ name: 'Frank' });17 session.user(otherUserId).createIfNotExists({ name: 'Nina' });1819 const conversation = session.conversation(conversationId);20 conversation.createIfNotExists();21 conversation.participant(otherUser).createIfNotExists();2223 return () => {24 session.destroy();25 };26 }, [appId, userId, conversationId]);2728 return (29 <div style={{ width: '400px', height: '800px' }}>30 <Chatbox31 appId={appId}32 userId={userId}33 conversationId={conversationId}34 theme={defaultTheme}35 />36 </div>37 );38}
With a custom theme, you can change any aspect of your chat to match your own style, giving you full control over the look and feel of your chat UI.
Download the theme files from our open source theme-default
GitHub repo. Then, extract the src
folder and add it your source code. Update your imports to point at the downloaded files:
1import { Chatbox } from '@talkjs/components/react';2import * as customTheme from './src'; // Use the path to the files you copied3import { TalkSession } from '@talkjs/core';4import { useEffect } from 'react';5import '@talkjs/components/style.css';6import './src/index.css';
Pass the custom theme to the chatbox:
1<Chatbox2 appId={appId}3 userId={userId}4 conversationId={conversationId}5 theme={customTheme}6/>
You can now customize any aspect of your theme by editing the CSS and JavaScript files of the individual components in the custom-theme
folder directly.
For styling changes, edit the CSS files. For example, to give message field a different background color, you can edit the custom-theme/components/MessageField.css
file. If you change background-color: #ececec
to background-color: lightblue
, then the message field gets a light blue background color:
For behavior changes, edit the JavaScript files. For example, to add a new message action, add the following to the MessageActionMenu.js
file:
1return html`2 <div className="t-theme-message-action-menu">3 ${permissions.canReply &&4 html`<button t-action="reply" onClick=${() => setReferencedMessage(message.id)}>${t.REPLY_TO_MESSAGE}</button>`}5 ${permissions.canDelete &&6 html`<button t-action="delete" onClick=${() => chatbox.deleteMessage(message.id)}>${t.DELETE_MESSAGE}</button>`}7 <button t-action="example" onClick=${() => console.log('This is an example message action')}>8 Example message action9 </button>10 </div>11`;
You should now see Example message action in the message action menu for your messages:
Check your browser console, and you should see "This is an example message action" logged to the console.
Once you're using TalkJS in production you'll need to enable authentication, so that only legitimate users can connect to your chat. You'll need a backend server that can generate tokens for your users to authenticate with. See our Authentication docs for more detail on how to set this up.
To pass the token to your chatbox, add the token
prop:
1<Chatbox2 appId={appId}3 userId={userId}4 conversationId={conversationId}5 theme={customTheme}6 token={token}7/>
You also need to pass the token to your session:
1useEffect(() => {2 const session = new TalkSession({ appId, userId, token });3 session.currentUser.createIfNotExists({ name: 'Frank' });4 session.user(otherUserId).createIfNotExists({ name: 'Nina' });56 const conversation = session.conversation(conversationId);7 conversation.createIfNotExists();8 conversation.participant(otherUser).createIfNotExists();910 return () => {11 session.destroy();12 };13}, [appId, userId, conversationId, token]);
The token is different each time you connect to TalkJS, so you'll need to call your backend to generate it.
Once you are happy that your chat is loading without errors when you provide a token, go the the Settings page of your dashboard and enable the Authentication (identity verification) option in the Security settings section. When authentication is enabled, only users with a valid token can connect to your chat.
For more ways to customize your chat, see our Chatbox reference docs.