This guide uses the classic JavaScript SDK. If you're starting a new project, consider using TalkJS Chat UI components, which are more customizable.
TalkJS is a chat platform that can be easily integrated into web applications. This tutorial will guide you through the process of adding TalkJS chat to a Laravel application, enabling real-time communication between users.
Prerequisites
Before you begin, make sure you have the following:
- Familiarity with the Laravel framework is essential. If you're new to Laravel, consider going through the official Laravel documentation to grasp the fundamentals.
- Understanding of basic web development concepts, including HTML, CSS, and JavaScript, will be beneficial.
- Make sure you have Composer installed on your machine. Composer is a dependency manager for PHP and is used to create and manage Laravel projects.
- Ensure you have Node.js and NPM (Node Package Manager) installed. NPM is required for managing frontend dependencies in a Laravel project.
- A TalkJS account. TalkJS provides a ready-to-use chat client for your application. Your account gives you access to TalkJS's free development environment.
- Have a code editor or integrated development environment (IDE) of your choice installed. Popular options include Visual Studio Code, Sublime Text, or PHPStorm.
Ensure that these prerequisites are met to smoothly follow along and implement TalkJS chat in your Laravel application. If you need to install any of the tools mentioned, refer to their respective documentation for installation instructions.
If you already have a Laravel project with the authentication package set up, you can skip to step 3. Otherwise, start from the beginning to set up a fresh project. For the example code for this tutorial, see our GitHub repo.
Step 1: Set up your Laravel project
Setup a new Laravel project by running the following commands in the terminal.
composer create-project --prefer-dist laravel/laravel talkjs-laravel
cd talkjs-laravel
Running these commands will create a folder named talkjs-laravel with Laravel installed in it.
Step 2: Set up authentication
Now, install the Laravel authentication package to use the login and register feature for dynamic users to chat with.
composer require laravel/ui
php artisan ui bootstrap --auth
npm install && npm run dev
Open the .env file in the root of your Laravel project and set the database connection details such as database name, username, and password. The default database option is MySQL, but you can also change the DB_CONNECTION to whatever database you want to use, such as SQLite, SQL Server, or PostgreSQL.
DB_CONNECTION=mysql
DB_HOST=127.0.0.0
DB_PORT=3306
DB_DATABASE=your_database_name
DB_USERNAME=your_database_username
DB_PASSWORD=your_database_password
Laravel provides a set of migrations for authentication. To run these migrations, use the following Artisan command. It will create all essential tables for users in the database:
php artisan migrateThis command will execute all pending migrations, including those for authentication.
By running these commands, you'll set up the necessary tables for Laravel authentication. Make sure to check the migration files in the database/migrations directory to understand what changes are being made to your database.
Step 3: Add a chat method to your controller
Navigate to the HomeController.php file within the app/Http/Controllers directory of your Laravel project. In this file, create a new function named chat without any parameters. The purpose of this function is to gather all the necessary data required by TalkJS Chat to operate. Within the chat function, fetch the required data, which may include obtaining a list of users. Ensure that the list excludes the currently logged-in user. We'll use this user data later to create our chats.
Next, pass this collected data to a Laravel Blade template, which will be created at a later stage.
public function chat()
{
   $loggedInUserId = Auth::id();
   $users = User::where('id', '!=', $loggedInUserId)->get();
   return view('chat',compact('users'));
}
The Blade template's role is to render the chat interface, incorporating elements such as the contact list. This list should consist of all users, except the one currently logged in, who can engage in the chat. By structuring the "Chat" function and passing data to a Blade template, you are effectively setting up the integration of TalkJS Chat into your Laravel application.
Step 4: Create a Laravel Blade file
In the resources/views folder of your Laravel project, create a new Laravel Blade file and name it chat.blade.php. This file will serve as the template for rendering the TalkJS Chat interface. Within this Blade file, paste the TalkJS snippet, which includes a div that will act as the container for the chat box. Assign the id talkjs-container to this div. Additionally, create another div that will display the list of users, giving it the id contacts-list. Include an h2 tag to provide a heading for the box. In the basic HTML structured chat.blade.php add the following code:
<div style="display: flex; justify-content: center; align-items: center;">

   <!-- container element in which TalkJS will display a chat UI -->
   <div id="talkjs-container" style="width: 40%; margin: 30px; height: 500px;">
       <i>Loading chat...</i>
   </div>
   <div id="contacts-list">
       <h2>Contacts</h2>
   </div>

</div>
The TalkJS container and contact list have been wrapped in a parent div which displays the chat box and contacts list side by side.
Step 5: Get users and populate the contact list
In chat.blade.php, use JavaScript to fetch and dynamically populate the contact list box with users passed to the view:
<script type="text/javascript">

   const otherUsers = @json($users);
   const contactsWrapper = document.getElementById('contacts-list');
   // Traversing through users to show the list
   for (let user of otherUsers) {
       const id = user.id;
       const username = user.name;

       const usernameDiv = document.createElement('div');
       usernameDiv.classList.add('contact-name');
       usernameDiv.innerText = username;

       const contactContainerDiv = document.createElement('div');
       contactContainerDiv.classList.add('contact-container');

       contactContainerDiv.appendChild(usernameDiv);

       contactsWrapper.appendChild(contactContainerDiv);
   }
</script>
We've also included some CSS to match the style of the TalkJS app:
<!-- Fonts -->
<link href='https://fonts.googleapis.com/css?family=Inter' rel='stylesheet'>
<style>
   #contacts-list {
       overflow-y: auto;
       width: 300px;
       height: 500px;
       background-color: #ECECEC;
       border-radius:0.75rem;
       border:1px solid #D4D4D4;
       font-family: 'Inter';

   }
   #contacts-list h2{
       padding:20px;
   }
   .contact-container {

       height: 50px;
       display: flex;
       padding: 5px 0;
       cursor: pointer;
       border-bottom:1px solid #D4D4D4;
   }

   .contact-container:hover {
       background-color: #007DF9;
       color:#fff;
       font-weight: bold;
   }

   .contact-name {
       padding: 0 20px;
       display: flex;
       flex-direction: column;
       justify-content: space-around;
   }
</style>
Step 6: Make Laravel routes
At this point you’re half way done. Let’s make a Laravel GET route to access the "chat" method. Open routes/web.php and use the following code:
Route::get('/chat', [App\Http\Controllers\HomeController::class, 'chat'])->name('chat');Now, we’re good to see the output just by running following commands in the terminal:
php artisan servenpm run dev
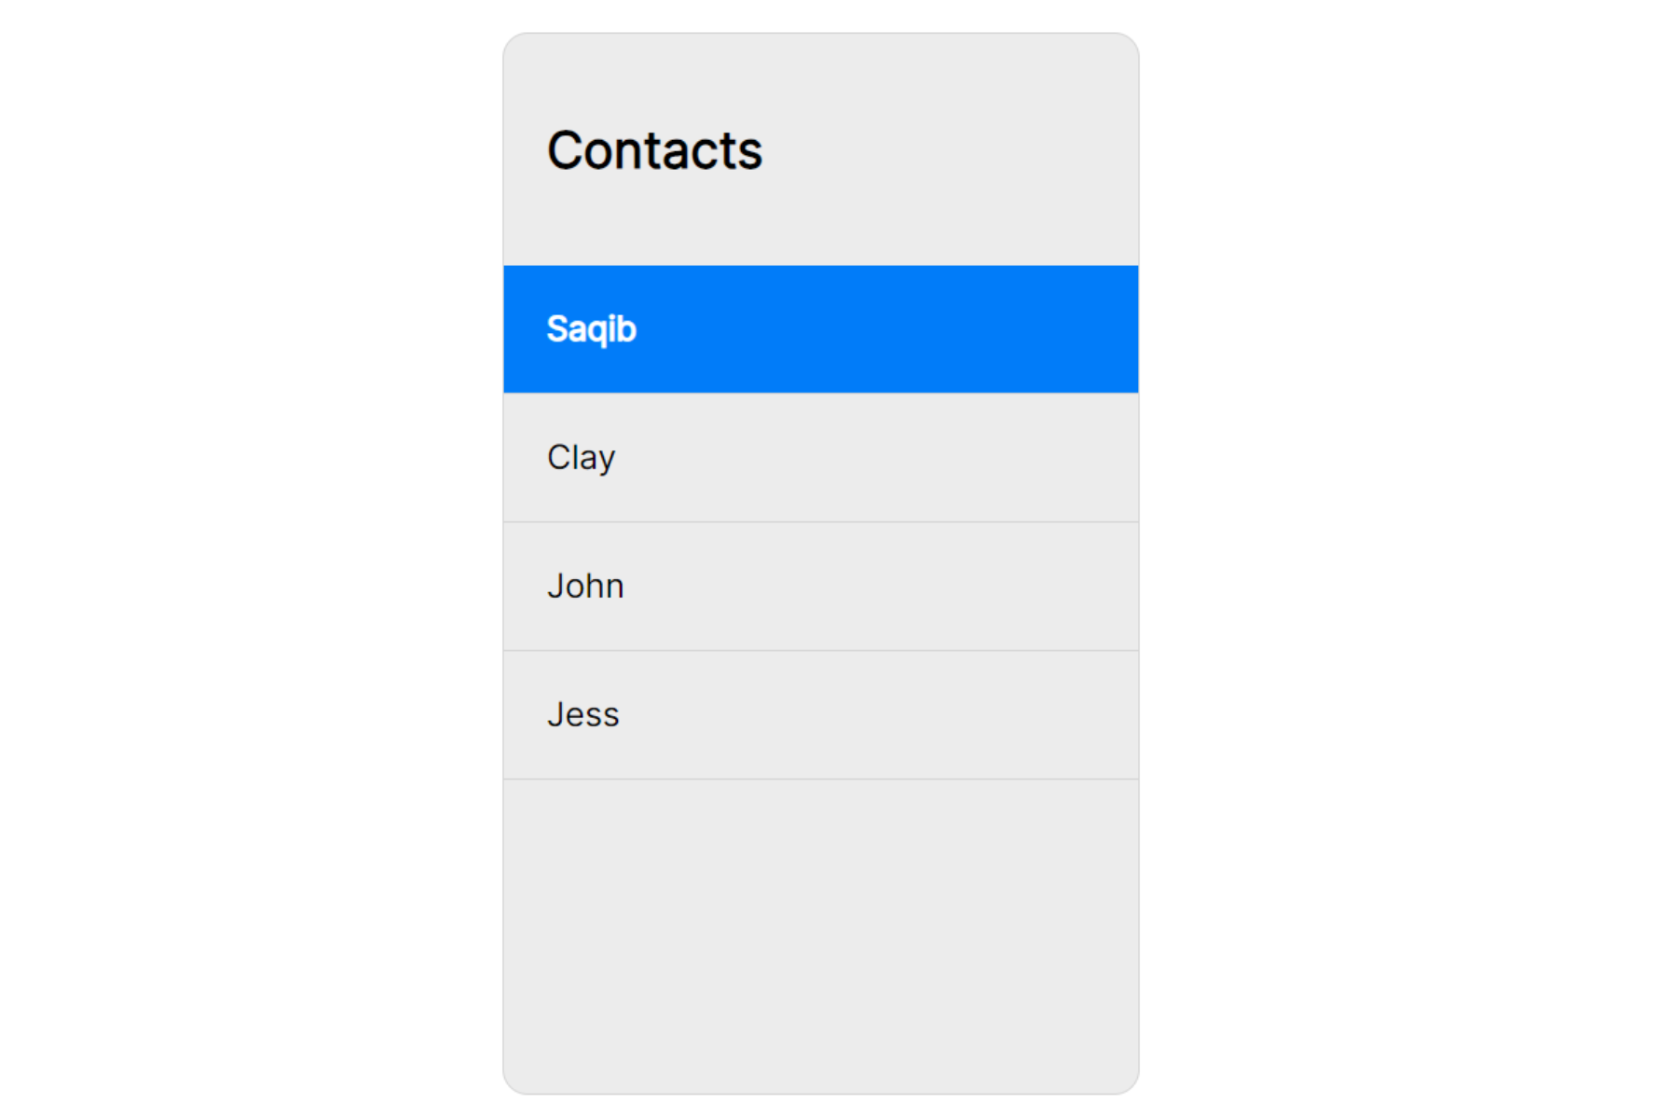
Run both these in two different terminal windows and open the link you’ll get in the terminal after running php artisan serve. In the browser, you’ll see a Laravel welcome page. Navigate to the registration page at /register, complete the form, and submit it. After successful registration, ensure multiple users are registered. Log in with any of the registered users and write /chat after the url and open it. You'll be able to see the dynamic contact list that we just made in Step 5.
Step 7: Create a TalkJS Session
Retrieve and identify the current logged-in user, establish a TalkJS session, and designate the logged-in user as "me" within the TalkJS session.
For more help regarding Talk.ready see our docs.
const currentUser = @json(auth()->user());

Talk.ready.then(function () {
   let me = new Talk.User({
       id: currentUser.id,
       name: currentUser.name,
   });

   window.talkSession = new Talk.Session({
       appId: '<APP_ID>',
       me: me,
   });
Make sure you replace <APP_ID> with your actual App ID from TalkJS dashboard by signing up.
Step 8: Create the chatbox
Instantiate a chatbox object and mount it onto the designated container:
const chatbox = talkSession.createChatbox();
chatbox.mount(document.getElementById('talkjs-container'));
Step 9: Create conversations for each user
Generate one-on-one conversations for each user in your database User table by iterating through them in a loop and mapping the details to an array. This array will store objects representing all the conversations.
   const conversations = otherUsers.map(function (user, index) {
   const otherUser = new Talk.User(user);

   conversation = talkSession.getOrCreateConversation(Talk.oneOnOneId(me, otherUser));

   conversation.setParticipant(me);
   conversation.setParticipant(otherUser);

   return conversation;

});
This way we’ll have a conversation id for each user so we can easily switch between conversations of different contacts/users.
Step 10: Add clickable links to the contacts list
In this step, retrieve all elements with the class contact-container by traversing through each of them. Assign a click event to enable users to seamlessly switch between different chats by clicking on the respective contact names.
let contactsListDivs = document.getElementsByClassName('contact-container');
conversations.forEach(function (conversation, index) {
   contactsListDivs[index].addEventListener('click', function () {
       chatbox.select(conversation);
   });
});
Refresh your browser page to see the latest changes that we just made.
If you haven’t executed your project before, refer to Step 6.
You can add this endpoint to your navigation bar as a link just like this:
<a href="{{route('chat')}}">TalkJS Chat</a>
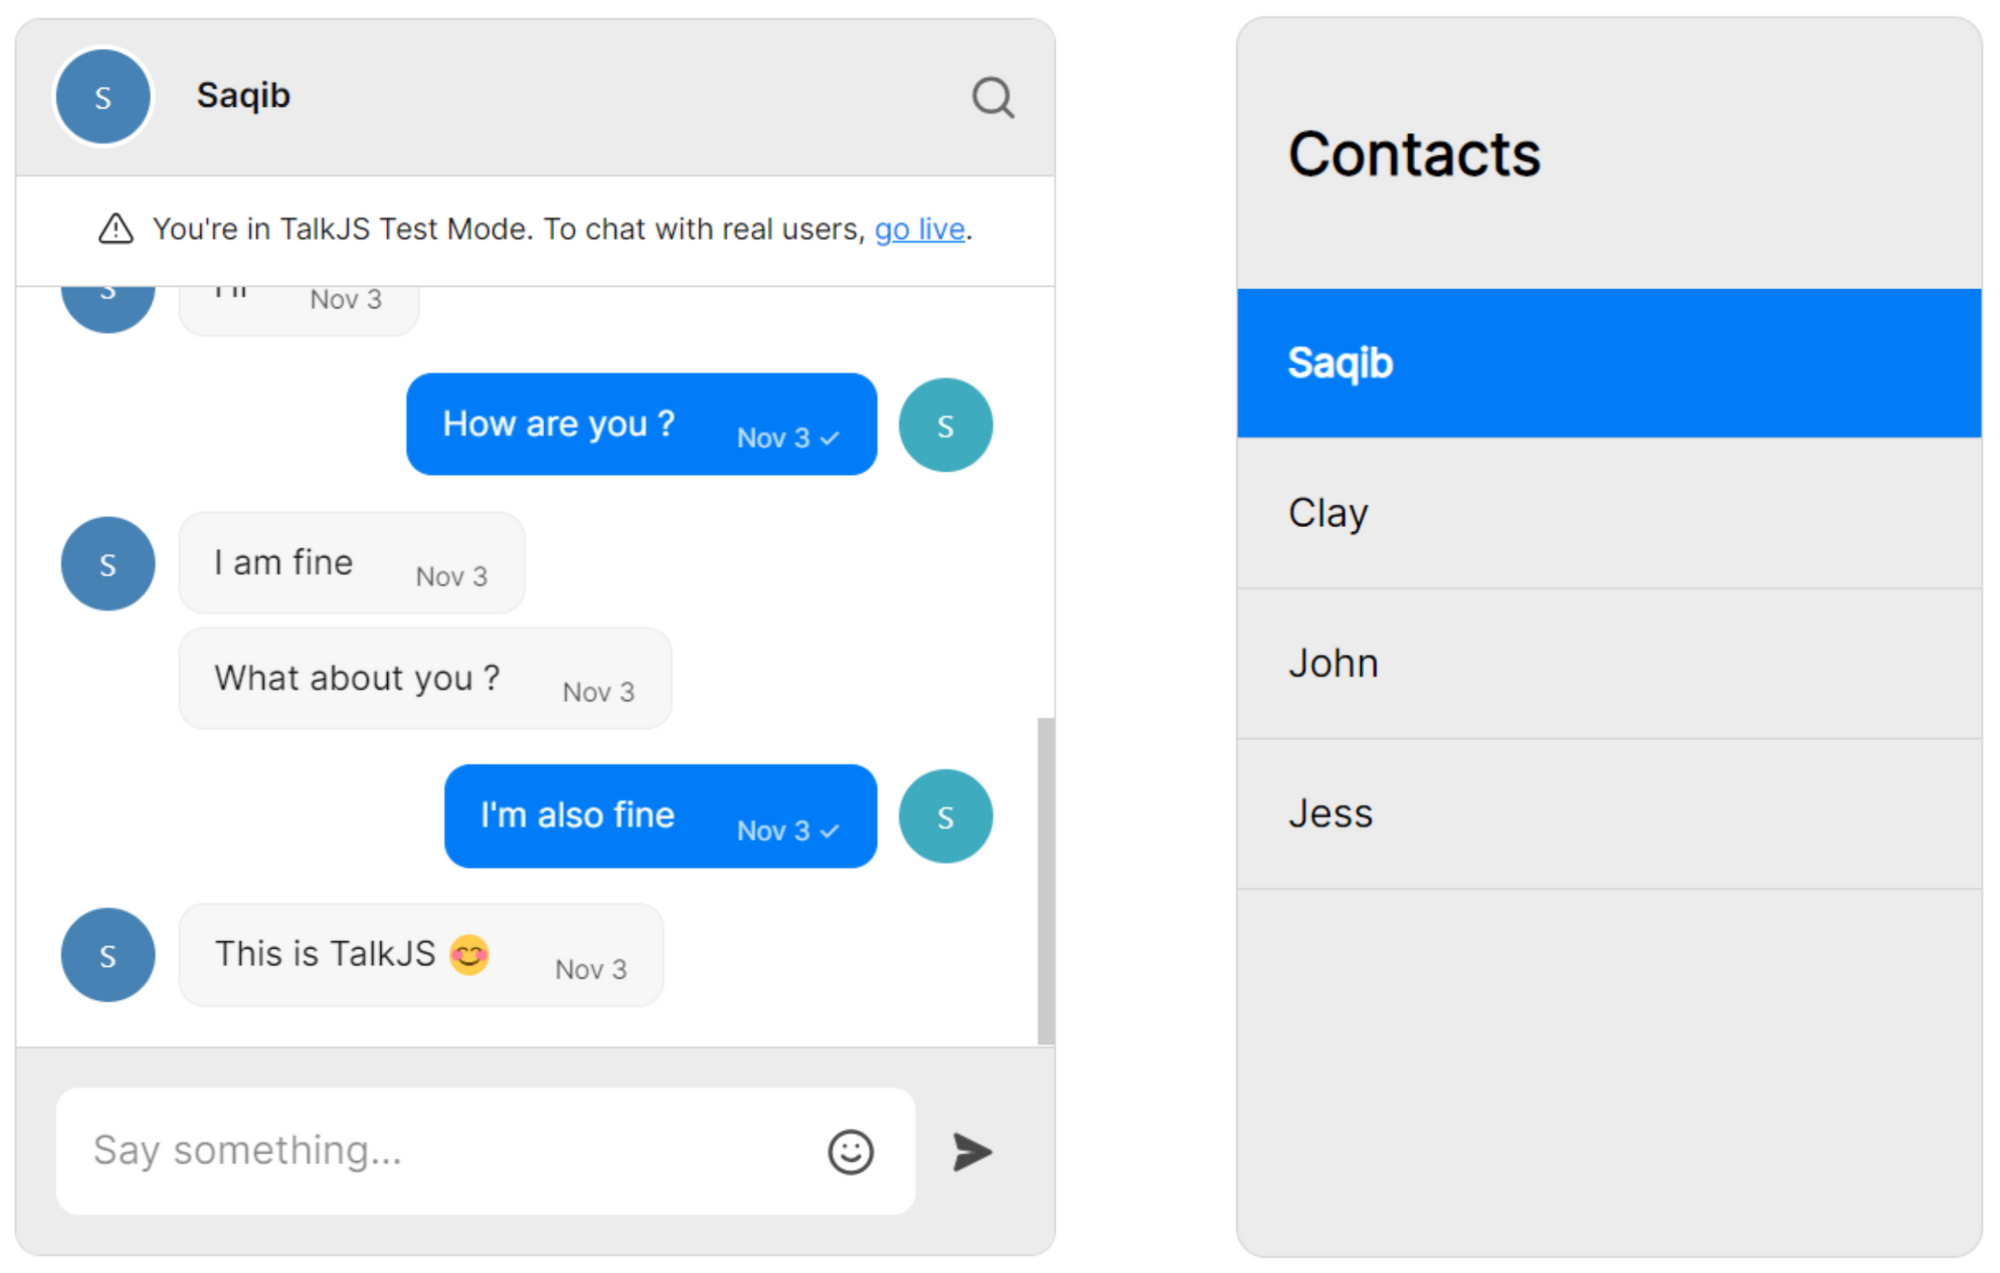
Log in with any of the registered users to access the chat box. This allows you to engage in conversations with other users registered on the same application.
Conclusion
Congratulations on successfully integrating TalkJS chat into your Laravel application! This enhancement brings real-time communication capabilities to your users. For the full example code, check out our GitHub repo.
In summary, you've achieved the following:
- Set up a new Laravel project with authentication in it.
- Created a Blade template.
- Fetched users and passed the data to your Blade template to make a dynamic contact list.
- Added a TalkJS chatbox to your template.
Explore additional TalkJS features in our docs and tutorials. For more examples, visit the talkjs-examples GitHub repo. Happy coding!