

This guide uses the classic JavaScript SDK. If you're starting a new project, consider using TalkJS Chat UI components, which are more customizable.
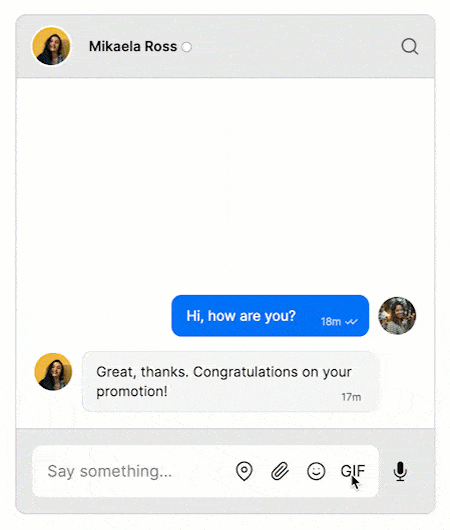
With TalkJS’s Conversation Actions and Themes, you can easily add custom options to your conversations. In this tutorial, we’ll demonstrate how to add a GIF picker that lets you search for a GIF and send it to your chat. The custom action uses the Giphy API to fetch the GIFs. Once the user picks a GIF, it is sent to the TalkJS conversation.
To follow along, you’ll need:
- A TalkJS account. TalkJS provides a ready-to-use chat client for your application. Your account gives you access to TalkJS's free development environment.
- An existing TalkJS project using the classic JavaScript SDK. See the associated Getting Started guide for an example of how to set this up.
- An installation of a build tool like Parcel. This is to compile your JavaScript so that it runs on your browser. You can also use other tools like Browserify or Webpack.
- An installation of Node.js along with the npm package manager.
- A basic Giphy Developer account and an API key. To get an API key, create an app on Giphy. Giphy then generates an API key for you.
We’ll build up the feature step by step in the following sections. If you would rather see the complete example code, see the GitHub repo for this tutorial.
Add a new theme with a GIF action button
You can add a custom action without adding a new theme, but it is better to make changes to a new theme while keeping the default one intact. Go to your TalkJS dashboard and navigate to the Themes tab. Click on Create new theme and name it “gif_picker”. You can select the default theme to be the preset theme.
After creating the new theme, go to the MessageField section. Find the <EmojiButton> tag and add the following code below it to add a new button:
<ActionButton action="pickGIF" class="gif-action-button"><span class="gif-button-label">GIF</span></ActionButton>This defines an action button with the action “pickGIF”. Scroll down to the CSS section and add the following styles:
sdf.gif-button-label {
  width: 20px;
  height: 20px;
}

.gif-action-button {
  background-color: #FFFFFF;
  height: 36px;
  width: 36px;
  border: 0px;
}

.gif-action-button:hover {
  color: #007DF9;
  background-color: #F4F4F4;
  border-radius: 50%;
}
We've styled it with the same hover effect as the other two buttons.
Next, go to the UserMessage section, and find the <MessageBody> tag. Add custom="{{ custom }}" before the closing tag so that it looks as shown below:
<MessageBody
  body="{{ body }}"
  timestamp="{{ timestamp }}"
  floatTimestamp="auto"
  showStatus="{{ sender.isMe }}"
  isLongEmailMessage="{{isLongEmailMessage}}"
  darkenMenuArea="{{ darkenMenuArea }}"
  hasReferencedMessage="{{ hasReferencedMessage }}"
  custom="{{ custom }}"
/>
This allows the MessageBody to access the custom key-value pairs that we pass (for more information, see: Passing Data to Themes).
The next step is to use the custom field and render the output differently based on whether it is a GIF image or a normal text message. Go to the MessageBody section and find the code for displaying link previews, which should look something like this:
<span t:if="{{ body.type == 'text' }}" class="message-text">
  {{ body.formattedText }}
  <LinkPreviews links="{{ body.links }}" />
</span>
Now, change it as shown below:
<span t:if="{{ body.type == 'text'}}" class="message-text">
  <span t:if="{{ custom.gifAttachment != 'true'}}">
    {{ body.formattedText }}
    <LinkPreviews links="{{ body.links }}" />
  </span>
  <span t:if="{{ custom.gifAttachment == 'true'}}">
    <LinkPreviews links="{{ body.links }}" />
  </span>
</span>
This uses conditional rendering in the template to ensure that we only display a link preview when the gifAttachment field in the custom object is set to true.
Lastly, go to the Roles tab, select the “default” role and go down to the UI Theme section. Select the “gif_picker” theme and click on Save all roles.
Set up the GIF search box
After following the Getting Started guide, you should have a chat up and running. Since we’re adding a GIF picker to the message field, we need to add an overlay form that opens up every time the user clicks on the button. Inside this div, we’ll include a search bar to search for GIFs and enough space to load the 30 most popular GIFs based on the search term.
Add a container to load the GIF overlay form
In your index.html file, add the following set of divs inside the body tag:
    <div class="container">
      <div id="stacking-wrapper">
           <div id="talkjs-container" style="height: 500px; width: 420px">
          <i>Loading chat...</i>
        </div>
      </div>
Above the “talkjs-container” div, add the following code for the GIF overlay:
<form id="gif-overlay" class="hidden">
    <div style="display: flex; align-items: center">
        <input
               id="gif-search-input"
               type="text"
               autocomplete="off"
               placeholder="Search for GIFs"
               />
        <button id="close-button">
            <svg
                 xmlns="http://www.w3.org/2000/svg"
                 width="24"
                 height="24"
                 fill="none"
                 stroke="currentColor"
                 stroke-width="2"
                 stroke-linecap="round"
                 stroke-linejoin="round"
                 viewBox="0 0 24 24"
                 class="Icon icon-close"
                 aria-hidden="true"
                 >
                <line x1="18" y1="6" x2="6" y2="18" fill="none"></line>
                <line fill="none" x1="6" y1="6" x2="18" y2="18"></line>
            </svg>
        </button>
    </div>

    <div id="gif-search-results"></div>
</form>
Toggle the overlay form
In your index.js code, find where you mount the chatbox inside the talkjs-container div. Right above it, add the following handler for a custom conversation action:
chatbox.onCustomConversationAction("pickGIF", () => toggleOverlay());We'll use this handler to toggle the overlay form when the "GIF" action button is pressed. Add the following variables and functions to your index.js code outside of your existing TalkJS code:
const gifOverlay = document.getElementById("gif-overlay");
const gifSearchInput = document.getElementById("gif-search-input");

let showingOverlay = false;
function showOverlay() {
  if (showingOverlay) {
    return;
  }

  showingOverlay = true;
  gifOverlay.classList.remove("hidden");
  gifSearchInput.focus();
}

function hideOverlay() {
  if (!showingOverlay) {
    return;
  }

  showingOverlay = false;
  gifOverlay.classList.add("hidden");
  gifSearchInput.blur();
  updateResults([]);
  gifSearchInput.value = "";
}

function toggleOverlay() {
  if (showingOverlay) {
    hideOverlay();
  } else {
    showOverlay();
  }
}
These functions help in hiding/showing the overlay. When showing the overlay, we focus on the input box and remove the “hidden” CSS class so that it becomes visible. When hiding the overlay, we clear the input box, blur it and empty the results.
Add the Giphy dependency
To use Giphy, we must add the dependency with the following command:
npm i @giphy/js-fetch-apiThen, in your index.js file, add the following lines at the top:
import { GiphyFetch } from "@giphy/js-fetch-api";
const gf = new GiphyFetch("<YOUR_GIPHY_API_KEY>");
Replace YOUR_GIPHY_API_KEY with the API key from your Giphy developer account.
Add search to the GIF container
When the user clicks on the GIF button, we want to open a new form where you can search for GIFs. Once you enter the search term, it should automatically display the results. To do this, add the following code to your index.js file:
const gifResults = document.getElementById("gif-search-results");
const closeButton = document.getElementById("close-button");

gifSearchInput.addEventListener("keydown", (event) => {
  if (event.key === "Escape") {
    hideOverlay();
  }
});

closeButton.addEventListener("click", (event) => {
  event.preventDefault();
  hideOverlay();
});

gifSearchInput.addEventListener("input", async () => {
  if (!showingOverlay) {
    return;
  }

  debounce(async () => {
    const response = await giphy.search(gifSearchInput.value, {
      sort: "popular",
      limit: 30,
    });
    updateResults(response.data);
  });
});
Here we've added a few event listeners. The first one is to close the overlay when we press escape, the second one is to close the overlay when pressing the close button, and the third one is to display results when the user enters a search term.
The search function is a standard one from the Giphy Github repository. Check out the code sandbox for live examples. Inside our search function implementation, we retrieve the gifSearchResults div and check if it already contains GIFs. If it does, we clear it before adding the new results. We search for GIFs using the search term and sort it by popularity. In this tutorial we only return 30 GIFs at a time, but you can extend this further by retrieving more results and paginating them. After retrieving the GIFs, we invoke the updateResults method, passing the retrieved response as an argument.
Add a handler that sends the GIF to your chat
To add the GIFs inside the search results, use the following code. We have also added a “click” event listener on each image so that the user can click on any GIF and add them to the chat:
function updateResults(gifs) {
  const newGifElements = gifs.map((gif) => {
    const cardImage = window.document.createElement("img");
    cardImage.src = gif.images.fixed_width.url;
    cardImage.addEventListener("click", () => {
      conversation.sendMessage(gif.images.original.mp4, {
        custom: { gifAttachment: "true" },
      });
      hideOverlay();
    });
    return cardImage;
  });
  gifResults.replaceChildren(...newGifElements);
}
We use a variable called cardImage and create HTML img elements inside it for each of the retrieved GIFs. For every click on the GIF, we hide the overlay and call the sendMessage() method on the conversation object to send the GIF URL to our TalkJS chat. We also have a custom field called gifAttachment set to true. We used this earlier in the theme configuration to style the GIF differently in comparison to normal text messages.
Lastly, we add a debounce timer so that the Giphy API isn’t spammed with multiple requests one after the other:
let timer = null;
function debounce(callback) {
  if (timer !== null) {
    clearTimeout(timer);
  }

  timer = setTimeout(() => {
    callback();
    timer = null;
  }, 500);
}
Style the search box
For styling the search box, you can use the following styles:
.container {
  display: flex;
  flex-direction: row;
  justify-content: center;
  margin: 30px;
}

#stacking-wrapper {
  position: relative;
}

#gif-overlay {
  display: flex;
  flex-direction: column;
  position: absolute;
  top: 4rem;
  left: 0;
  right: 0;
  bottom: 5rem;
  padding: 1rem;
  background-color: rgba(230, 230, 230, 0.9);
}

#gif-overlay.hidden {
  display: none;
}

#gif-search-input {
  width: 100%;
  padding: 0.5rem 0.75rem;
  border-radius: 0.5rem;
  border: 1px solid #d4d4d4;
  color: #111;
  font-size: 1rem;
  line-height: 1.5;
}

#gif-search-input:focus {
  outline-width: 0;
  border-color: #a3a3a3;
}

#gif-search-input::placeholder {
  color: #a3a3a3;
  opacity: 1;
}

#close-button {
  font-size: 1.5rem;
  outline: none;
  border: none;
  background: none;
  cursor: pointer;
  padding: 0;
  width: 3rem;
  display: flex;
  align-items: center;
  justify-content: center;
  height: 2.5rem;
}

#gif-search-results {
  display: grid;
  grid-template-columns: 1fr 1fr;
  column-gap: 0.5rem;
  row-gap: 0.5rem;
  align-items: center;
  justify-content: center;
  overflow: auto;
  margin-top: 0.5rem;
}

#gif-search-results img {
  cursor: pointer;
  min-width: 0;
  max-width: 100%;
}
Conclusion
With that, you now have a GIF picker directly integrated with Giphy in your TalkJS chat. To summarize, you have:
- Added a new GIF picker action button.
- Created a modal to view and search for GIFs in your chat.
- Sent the user selected GIF to the conversation
For the full example code for this tutorial, see our GitHub repo.
If you want to learn more about TalkJS, here are some good places to start:
- The TalkJS Docs help you get started with TalkJS.
- TalkJS tutorials provide how-to guides for many common TalkJS use cases.
- The talkjs-examples Github repo has larger complete examples that demonstrate how to integrate with other libraries and frameworks.


