This guide uses the classic JavaScript SDK. If you're starting a new project, consider using TalkJS Chat UI components, which are more customizable.
If you've used comment systems like YouTube video comments, you're probably used to viewing or replying in comment threads. Reply threads help organize conversations by grouping related messages together, making it easier to follow specific topics.
TalkJS's core use case is pre-built chat messaging that's easy to integrate into your website. We support replying to messages within a conversation, in a similar style to replies in a messaging app like WhatsApp, but we do not yet support reply threads natively. However, TalkJS is flexible enough to let you build reply threads as a feature yourself.
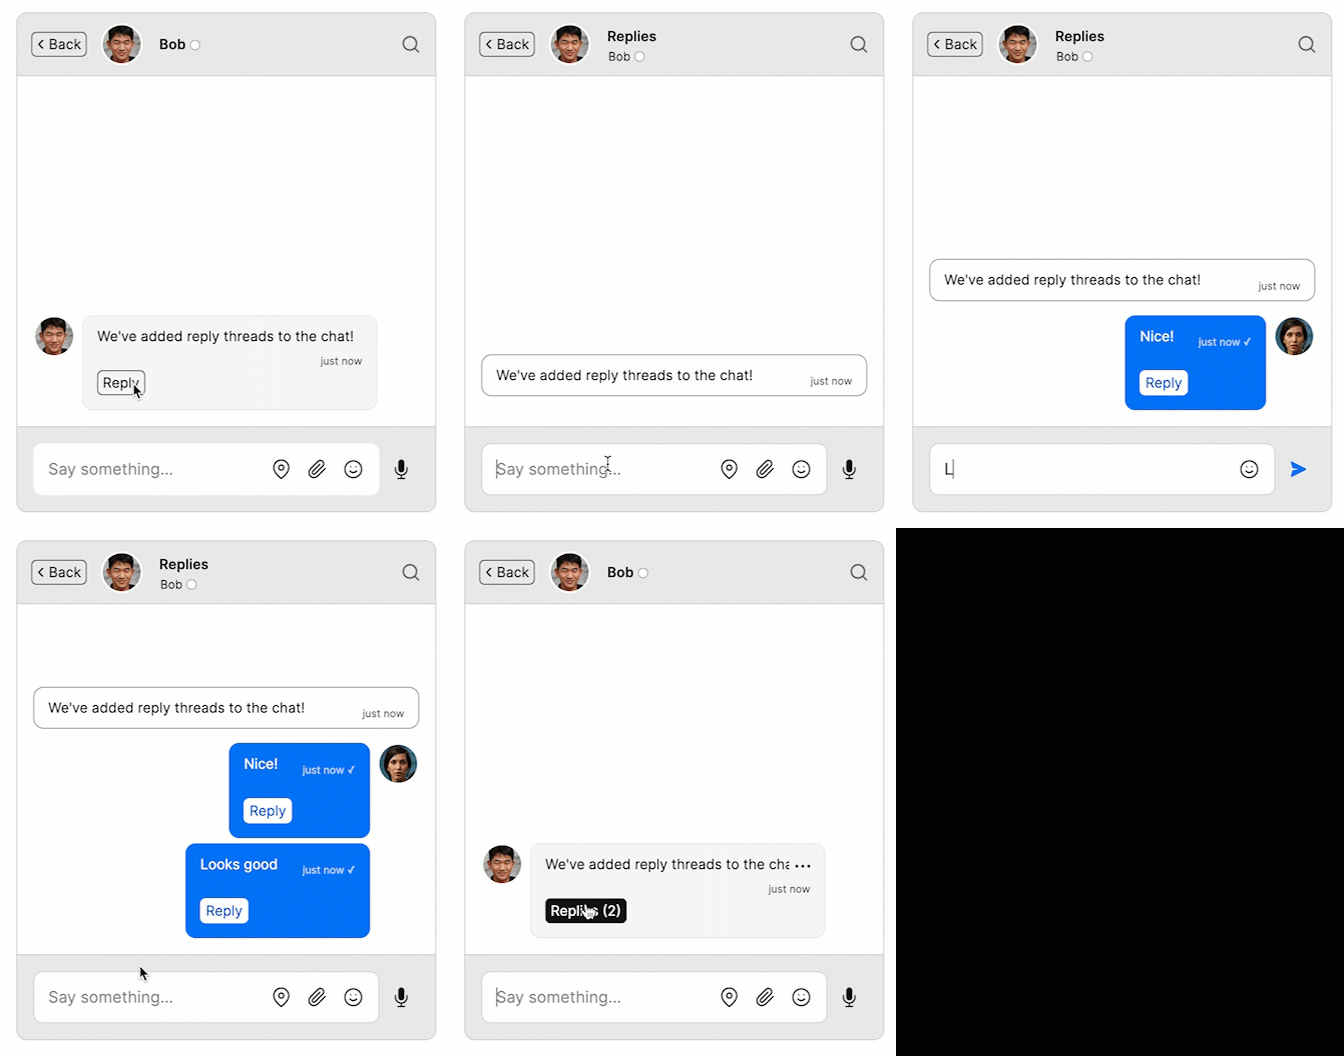
This will be one of our longer tutorials! We'll take you through the following steps:
- Adding a Reply button
- Adding a Back button
- Adding a reply count
In the process you'll get a tour of most of TalkJS's extensive customization options, including custom themes, action buttons, custom data, webhooks and the REST API.
To follow along with this tutorial, you'll need:
- A TalkJS account. TalkJS provides a ready-to-use chat client for your application. Your account gives you access to TalkJS's free development environment.
- An existing TalkJS project using the classic JavaScript SDK. See the accompanying Getting Started guide for an example of how to set this up.
- An installation of Node.js along with the npm package manager. We’ll use this to create our backend server.
We’ll build up the feature step by step in the following sections. If you would rather see the complete example code, see the GitHub repo for this tutorial.
Set up your project
First, you'll need to make some small tweaks to your existing TalkJS project.
We’ll base our threaded chat on the Chatbox UI, as we won't need the chat history section of the Inbox. To navigate back from threads, we'll instead add a Back button later in the tutorial. In your TalkJS code, make sure you use the createChatbox() method on your session:
const chatbox = session.createChatbox();
We'll also remove the standard Reply message action, as we'll be creating threads for replies instead. To do this:
- Go to the Roles tab of the TalkJS dashboard.
- Select the "default" role.
- In Actions and permissions > Built-in message actions, set Reply to None.
Add a "Reply" action button
In this section, you'll add a Reply action button to each message in your chat and use it to open a new conversation. This conversation will act as the reply thread for that message.
Add the "Reply" button to your theme
First, you'll need to edit your theme to include the button:
- Go to the Themes tab of the TalkJS dashboard.
- Select to Edit the active theme for your "default" role. (You can find the active theme in the settings for the "default" role in the Roles tab of the dashboard.)
- In the list of Built-in Components, select UserMessage.
- Add the following line below the
<MessageBody />component:
This adds a button marked Reply which sends a<ActionButton action="replyInThread">Reply</ActionButton>replyInThreadaction when you click it. - Style your button by updating the
marginproperty in the.by-me button[data-action], .by-other button[data-action]selector:.by-me button[data-action], .by-other button[data-action] { /* ... other properties ... */ margin: 1rem; /* ... other properties ... */ } - If you are in Live mode, select Copy to live.
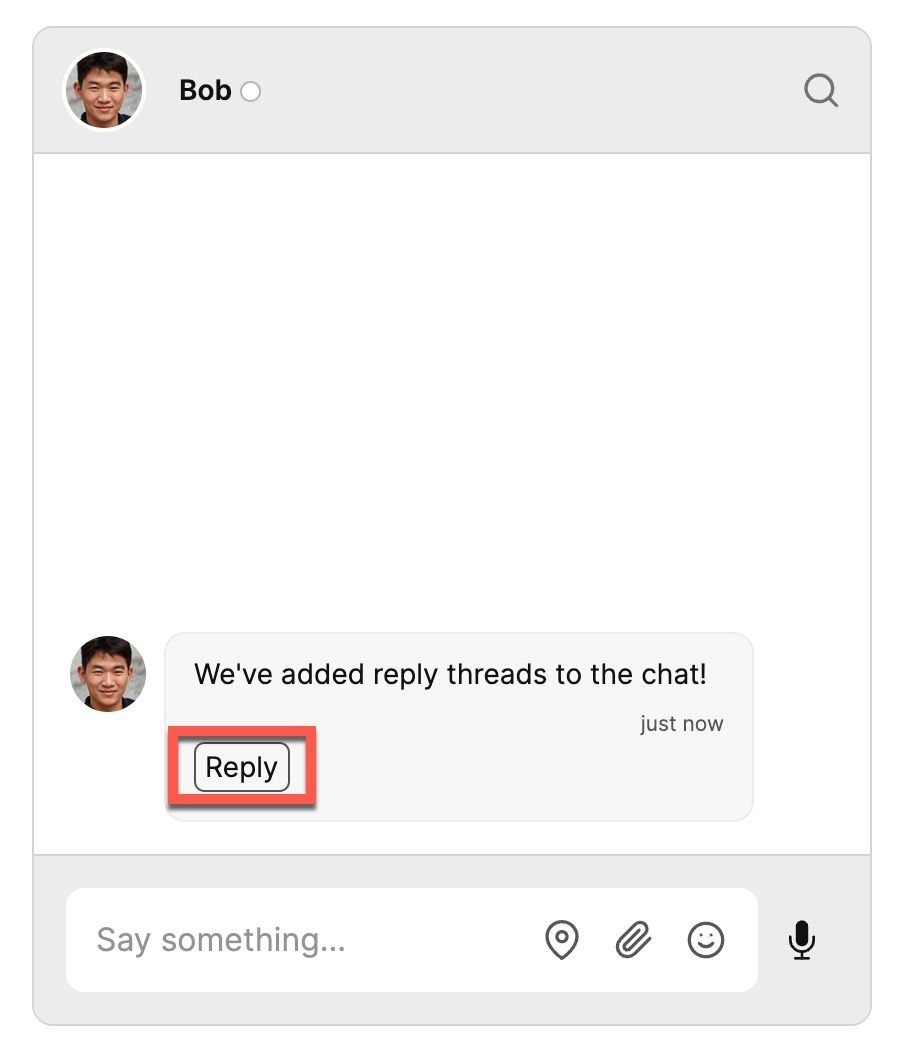
You should now see a Reply button at the bottom of each chat message:
Add an event handler
To listen for the new replyInThread event in your frontend code, use the onCustomMessageAction method. As a test, add the following to your TalkJS code:
chatbox.onCustomMessageAction("replyInThread", async (event) => {
  console.log(event);
});
You should now see the event data logged to your browser console when you click the Reply action button.
Post the data to your server
To create our reply thread, we'll call TalkJS's REST API. You'll need to call the API from a backend web server rather than in your existing frontend code to avoid exposing your secret API key, which has full admin access to your TalkJS account. In this section we'll create the backend server and send it data from the replyInThread event handler.
We’ll use Express in this tutorial, but feel free to use your favorite web server library instead. You'll also need to set up CORS support on your server. In this case we'll use the cors package:
import express from "express";
import cors from "cors";

const app = express();
app.use(cors());
app.use(express.json());

app.listen(3000, () => console.log("Server is up"));
In your server code, create a /newThread endpoint to receive the message ID, conversation ID, message text and participant IDs from the browser. For now we'll just log them to the server console:
app.post("/newThread", async (req, res) => {
  // Get details of the message we'll reply to
  const parentMessageId = req.body.messageId;
  const parentConvId = req.body.conversationId;
  const parentMessageText = req.body.messageText;
  const parentParticipants = req.body.participants;

  console.log("Parent message id: " + parentMessageId);
  console.log("Parent conversation id: " + parentConvId);
  console.log("Parent message text: " + parentMessageText);
  console.log("Parent message participants: " + parentParticipants);

  res.status(200).end();
});
Then update your onCustomMessageAction call to post the message ID to the server endpoint:
      chatbox.onCustomMessageAction("replyInThread", (event) => {
        async function postMessageData(
          messageId,
          conversationId,
          messageText,
          participants
        ) {
          // Send message data to your backend server
          const response = await fetch("http://localhost:3000/newThread", {
            method: "POST",
            headers: {
              "Content-Type": "application/json",
            },
            body: JSON.stringify({
              messageId,
              conversationId,
              messageText,
              participants,
            }),
          });
        }

        postMessageData(
          event.message.id,
          event.message.conversation.id,
          event.message.body,
          Object.keys(event.message.conversation.participants)
        );
You should see the message data logged to your server console when you click the Reply action button.
Create a new thread
Now that we've passed the message data to the server, we can use it to call the TalkJS REST API. Replace your app.post call from the previous section with the following, filling in the TalkJS App ID and secret key with your own values from the Settings section of the TalkJS dashboard:
const appId = "<APP_ID>";
const secretKey = "<SECRET_KEY>";

const basePath = "https://api.talkjs.com";

function getMessages(messageId) {
  return fetch(
    `${basePath}/v1/${appId}/conversations/replyto_${messageId}/messages`,
    {
      method: "GET",
      headers: {
        "Content-Type": "application/json",
        Authorization: `Bearer ${secretKey}`,
      },
    }
  );
}

// Create a thread as a new conversation
async function createThread(parentMessageId, parentConvId, participants) {
  return fetch(
    `${basePath}/v1/${appId}/conversations/replyto_${parentMessageId}`,
    {
      method: "PUT",
      headers: {
        "Content-Type": "application/json",
        Authorization: `Bearer ${secretKey}`,
      },
      body: JSON.stringify({
        participants: participants,
        subject: "Replies",
        custom: {
          parentConvId: parentConvId,
          parentMessageId: parentMessageId,
        },
      }),
    }
  );
}

async function duplicateParentMessageText(parentMessageId, messageText) {
  return fetch(
    `${basePath}/v1/${appId}/conversations/replyto_${parentMessageId}/messages`,
    {
      method: "POST",
      headers: {
        "Content-Type": "application/json",
        Authorization: `Bearer ${secretKey}`,
      },
      body: JSON.stringify([
        {
          text: messageText,
          type: "SystemMessage",
        },
      ]),
    }
  );
}

app.post("/newThread", async (req, res) => {
  // Get details of the message we'll reply to
  const parentMessageId = req.body.messageId;
  const parentConvId = req.body.conversationId;
  const parentMessageText = req.body.messageText;
  const parentParticipants = req.body.participants;

  const response = await getMessages(parentMessageId);
  const messages = await response.json();

  // Create a message with the text of the parent message if one doesn't already exist
  if (!messages.data?.length) {
    await createThread(parentMessageId, parentConvId, parentParticipants);
    await duplicateParentMessageText(parentMessageId, parentMessageText);
  }

  res.status(200).end();
});
In this code, we're creating a new thread by making a new conversation for it. We'll give the new conversation an ID of replyto_<MESSAGE_ID>, where <MESSAGE_ID> is the ID of the message we're replying to.
We only need to create a thread if it doesn't exist already, so we start by checking if a conversation with this ID already exists and has messages. To do this, the getMessages function calls the REST API to list all messages in a conversation.
If the conversation doesn't exist or have messages, we call the createThread function, which calls the REST API to create or update it. We also duplicate the text of the original message in the new thread, so that users can see the message they're replying to. We do this with another call to the REST API to send a new message.
We'll also switch to viewing the new conversation. To do this, call the select method on the chatbox in your frontend code:
let thread = talkSession.getOrCreateConversation("replyto_" + event.message.id);
chatbox.select(thread);
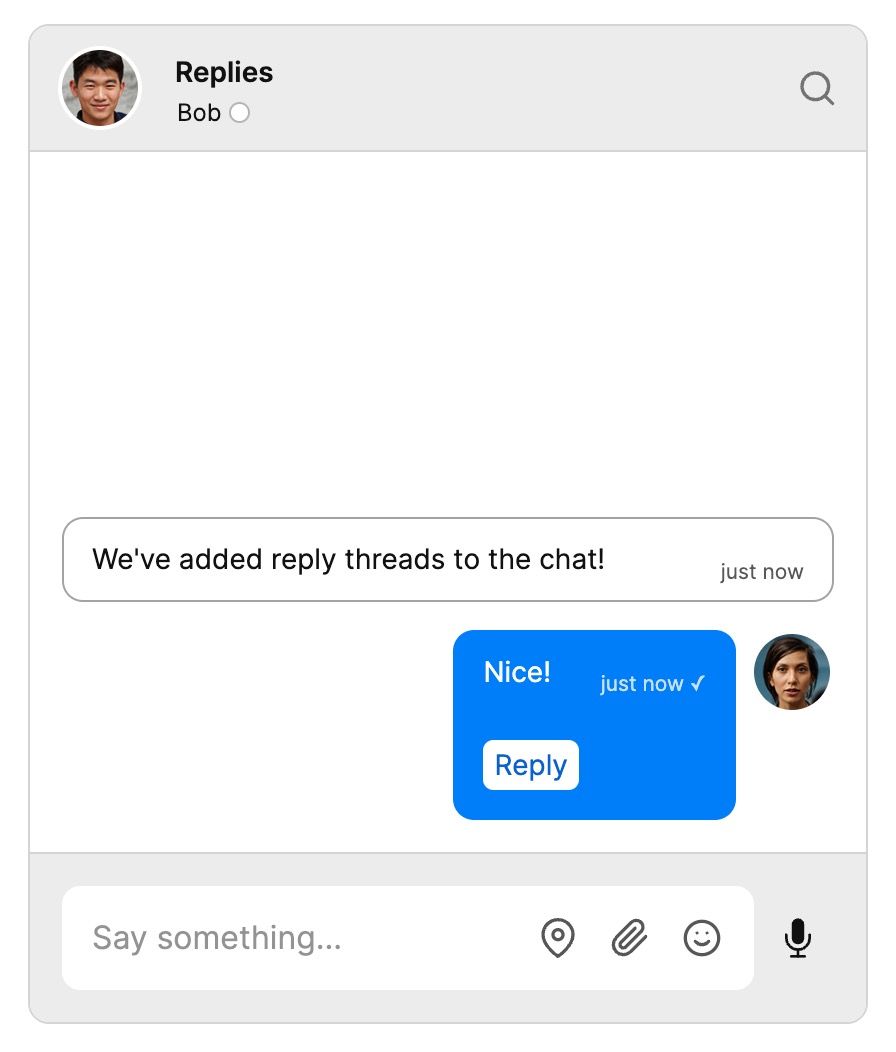
You now have a working Reply button in your chat!
Add a "Back" action button
Currently, there's no way of getting back to the message that the user replied to. In this section, we'll fix this by adding a Back action button. Some steps are similar to the steps for setting up the Reply button in the last section, so we'll move more quickly through these this time.
Add the "Back" button to your theme
As before, you'll need to edit your theme to include the new button:
-
Go to the Themes tab of the TalkJS dashboard.
-
Select to Edit the theme you use for your "default" role.
-
In the list of Built-in Components, select ChatHeader.
-
Find the code for displaying the conversation image in the header (something like
<ConversationImage conversation="{{conversation }}" />) and add the following above it:<ActionButton action="back"> <svg xmlns="http://www.w3.org/2000/svg" width="16" height="16" viewBox="0 0 24 24" fill="none" stroke="currentColor" stroke-linecap="round" stroke-linejoin="round" stroke-width="2" > <path d="m15 18-6-6 6-6" fill="none" /> </svg> Back </ActionButton> -
Style your button by replacing the CSS for the
.header button[data-action]selector and adding styling for the.header button[data-action] svgselector:.header button[data-action] { border-radius: 0.375rem; font-size: inherit; margin: 0 1rem 0 0; padding: 0.25rem 0.325rem; cursor: pointer; transition: color 200ms ease-in-out, background-color 200ms ease-in-out, border 200ms ease-in-out; color: #111; background-color: transparent; border: 1px solid #525252; display: flex; align-items: center; } .header button[data-action] svg { margin-left: -4px; } -
If you are in Live mode, select Copy to live.
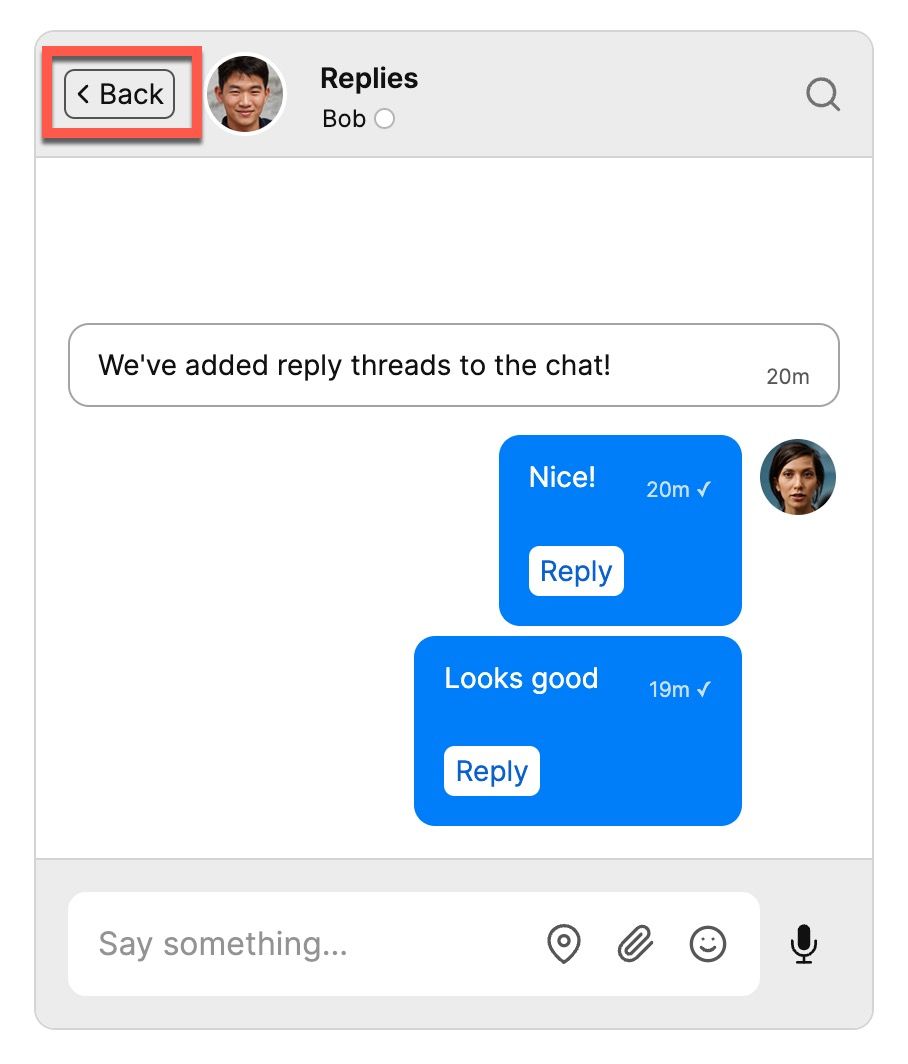
You should now see a Back button in your chat header:
Add custom fields to the conversation
At the moment, the Back button doesn't do anything when you click it. We want to use it to go back to the conversation that the user replied to (which we'll call the "parent conversation"). To do this, you'll need the ID of the parent conversation. We'll add this ID to the current conversation as custom data when we create the thread. We'll also add the ID of the parent message at the same time – we don't need this yet, but it will be useful later.
Update the createThread method in your backend code to include these custom fields:
async function createThread(parentMessageId, parentConvId, participants) {
  const conversationId = "replyto_" + parentMessageId;
  return fetch(`${basePath}/v1/${appId}/conversations/${conversationId}`, {
    method: "PUT",
    headers: {
      "Content-Type": "application/json",
      Authorization: `Bearer ${secretKey}`,
    },
    body: JSON.stringify({
      participants: participants,
      subject: "Replies",
      custom: {
        parentConvId: parentConvId,
        parentMessageId: parentMessageId,
      },
    }),
  });
}
Select the chatbox
Now we'll listen for the "back" event in our frontend code with the onCustomConversationAction method. When we receive the message, we'll use the select method on the chatbox to view the parent conversation:
chatbox.onCustomConversationAction("back", async (event) => {
  const parentConvId = event.conversation.custom.parentConvId;

  if (parentConvId != undefined) {
    let thread = talkSession.getOrCreateConversation(parentConvId);
    chatbox.select(thread);
  }
});
You should now switch back to the parent conversation when you select the Back button.
Add a reply count
We can now create threads and navigate through them. The final feature we need is a way to tell whether messages have replies without clicking through. To complete our threaded chat demo, we'll add a reply count feature, so that the action button is labelled, say, Replies (3) if there are three replies. If there are no replies yet we'll leave it as Reply.
Enable a webhook for new message events
We'll want to update the reply count when users add new messages to threads. To do this, we’ll first enable TalkJS webhooks, which allow the TalkJS server to notify your server when it sends a new message. Webhooks let you use an event-driven architecture, where you get told about events when they happen rather than having to constantly check for new messages.
Webhooks are server-side only, so you'll need to add a new /updateReplyCount endpoint to your existing server code to monitor incoming events from the TalkJS server:
app.post("/updateReplyCount", (req, res) => {
  console.log(req.body);
  res.status(200).end();
});
Currently this endpoint just logs the event data when it receives a new message sent event.
For TalkJS to communicate with your server, you must expose it to the internet. To make this easy, we’ll use ngrok to create a secure tunnel to your local server. See our tutorial on How to integrate ngrok with TalkJS for instructions on how to install ngrok.
Once you have installed ngrok, run the following command:
ngrok http 3000
This command starts a secure tunnel to your local port 3000. The output should include the URL that ngrok exposes:
Forwarding https://<YOUR_SITE>.ngrok.io -> http://localhost:3000
Then enable the webhook with the following steps:
- Go to the Settings tab of the TalkJS dashboard.
- Enable the
message.sentoption in the Webhooks section of the TalkJS dashboard. - Start ngrok with
ngrok http 3000. - Add the ngrok URL to Webhook URLs in the TalkJS dashboard, including the
updateReplyCountpath:https://<YOUR-URL>.ngrok.io/updateReplyCount
TalkJS will now send a web request to your server when a message is sent. To test this, write another message in your chat UI. You should see the event logged to your server's console.
Add a custom reply count property to messages
Next, we'll check whether incoming messages are replies in a thread, and if so we'll update the reply count for the parent message.
We'll keep track of the number of replies by adding custom data to messages. This will be similar to how we added custom data to conversations in the previous section.
Update your /updateReplyCount endpoint with the following code:
async function updateReplyCount(messageId, conversationId, count) {
  return fetch(
    `${basePath}/v1/${appId}/conversations/${conversationId}/messages/${messageId}`,
    {
      method: "PUT",
      headers: {
        "Content-Type": "application/json",
        Authorization: `Bearer ${secretKey}`,
      },
      body: JSON.stringify({
        custom: { replyCount: count.toString() },
      }),
    }
  );
}

// Endpoint for message.sent webhook
app.post("/updateReplyCount", async (req, res) => {
  const data = req.body.data;
  const conversationId = data.conversation.id;
  const messageType = data.message.type;

  if (
    conversationId.slice(0, 8) === "replyto_" &&
    messageType === "UserMessage"
  ) {
    const parentMessageId = data.conversation.custom.parentMessageId;
    const parentConvId = data.conversation.custom.parentConvId;

    let response = await getMessages(parentMessageId);
    let messages = await response.json();

    const messageCount = messages.data.length;

    // Ignore the first message in thread (it's a repeat of the parent message)
    if (messageCount > 1) {
      await updateReplyCount(parentMessageId, parentConvId, messageCount - 1);
    }
  }

  res.status(200).end();
});
This code looks for incoming user message events where the conversation ID begins with "replyto_" (this is how we're labelling reply threads). It then gets the current number of messages in that thread with a call to the getMessages function we introduced in Create a new thread. Finally, it calls the new updateReplyCount method to update a custom replyCount property with the current number of replies, ignoring the duplicated parent message at the top of the thread.
Update logic in theme
The final step is to display the reply count in the chat UI. TalkJS allows you to use conditionals and access custom properties in your templates. Combining these ideas, we'll update the button text to say, for example, Replies (3) if the replyCount custom property has a value of 3. If there are no replies yet we'll leave the text as Reply.
In the TalkJS dashboard, update the Reply button in the UserMessages settings of your default theme:
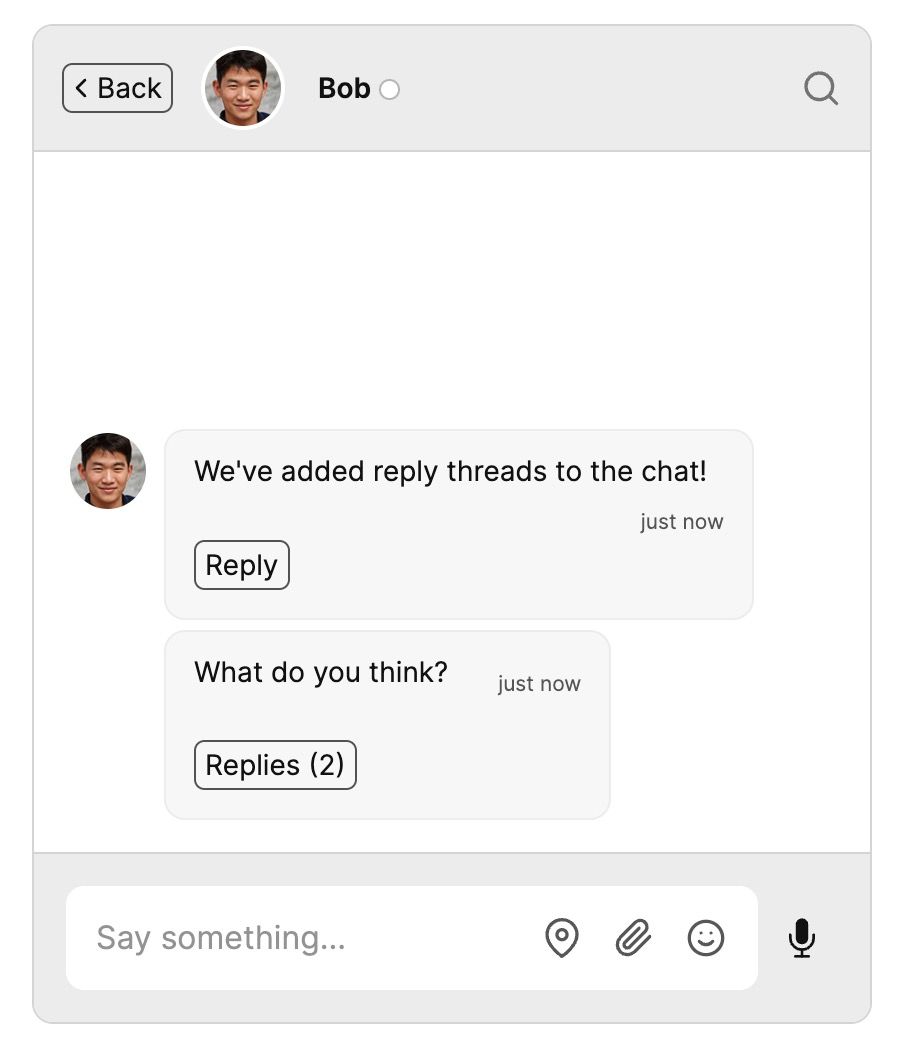
<ActionButton t:if="{{ custom.replyCount > 0 }}" action="replyInThread">Replies ({{ custom.replyCount }})</ActionButton>
<ActionButton t:else action="replyInThread">Reply</ActionButton>
Restart your server, and try adding comments again. You should now see a reply count on the parent comment's action button:
Conclusion
It's been a long tutorial, but you now have a working demonstration of how to create a threaded chat!
To recap, in this tutorial we have:
- customized the theme to add new Reply and Back action buttons
- used the REST API to create threads as new conversations
- used custom data to add navigation back to the previous thread
- used webhooks and custom data to add a reply count
For the full example code for this tutorial, see our GitHub repo.
If you want to learn more about TalkJS, here are some good places to start:
- The TalkJS Docs help you get started with TalkJS.
- TalkJS tutorials provide how-to guides for many common TalkJS use cases.
- The talkjs-examples Github repo has larger complete examples that demonstrate how to integrate with other libraries and frameworks.


