
This guide uses the classic React SDK. If you're starting a new project, consider using TalkJS Chat UI components for React, which are more customizable.
Framer is a website-building platform that allows you to design and publish stunning sites. With TalkJS, you can add conversations, messaging, comments or an AI chatbot directly into your Framer website.
This guide will help you integrate TalkJS chat into your Framer website. By the end of this guide you will have a working example of TalkJS chat in Framer.
Note: Framer is primarily meant for building websites, and doesn’t support membership or user authentication out of the box. Hence this guide shows you how to build a visitor chat that functions without user registration, and points to additional resources for adding membership and authentication to Framer.
Prerequisites
To integrate TalkJS chat into Framer, you’ll need:
- A TalkJS account. You can try TalkJS for free.
- A Framer project to which you would like to add TalkJS chat.
Step 1: Create a code component for your chat
Begin by creating a code component to load TalkJS chat into your Framer site.
Because Framer uses React to build sites, this guide uses React to integrate TalkJS chat into Framer. For some more background information, you can check out TalkJS' classic React SDK guide.
- Login to Framer and go to your workspace.
- From the Projects overview, select the project to which you’d like to add TalkJS chat.
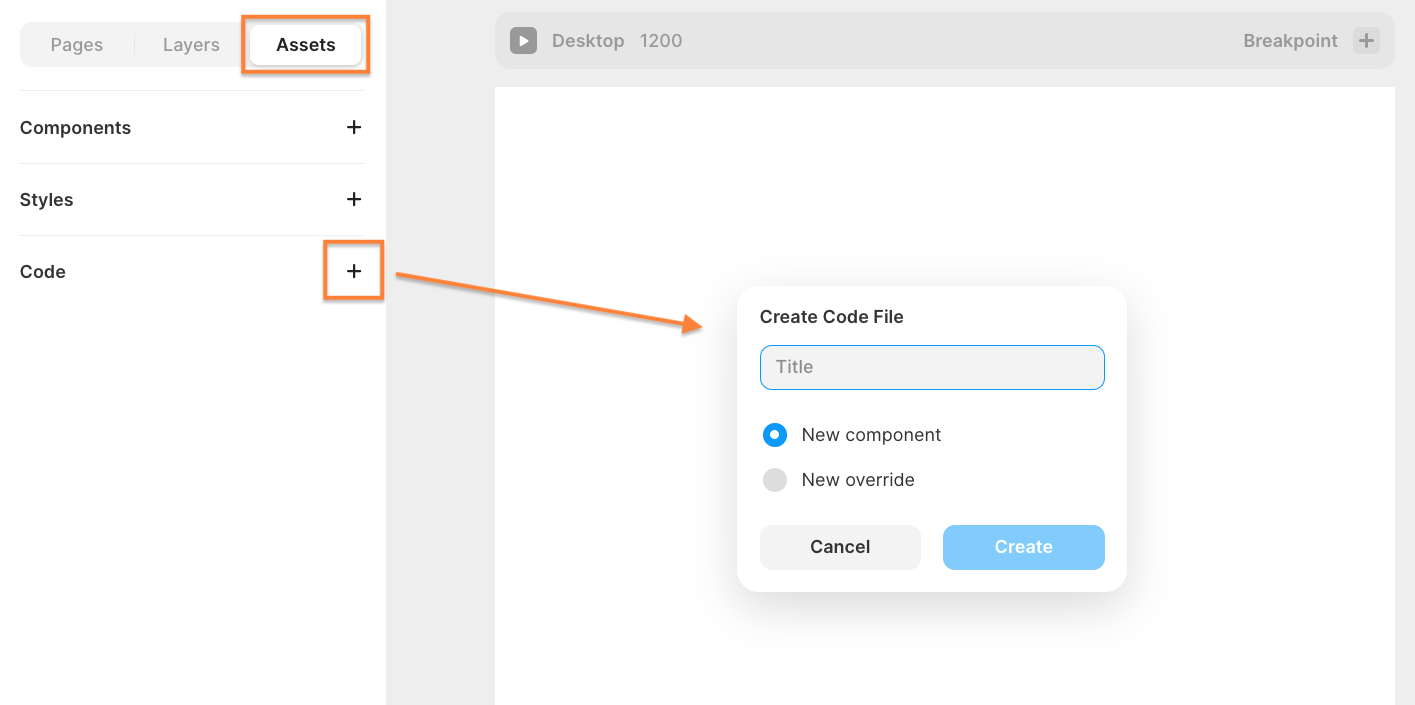
- From the Assets tab, in the Code section, select the plus (+) sign to add code.
- From the pop-up menu that appears, fill out a title for your component. This guide uses the title ‘Chat’, but you can use any other title you prefer. Keep the toggle on New component, and select Create to create your component.
Framer now creates your code component file, and automatically adds in a placeholder example code component with a blue box that rotates on hover.
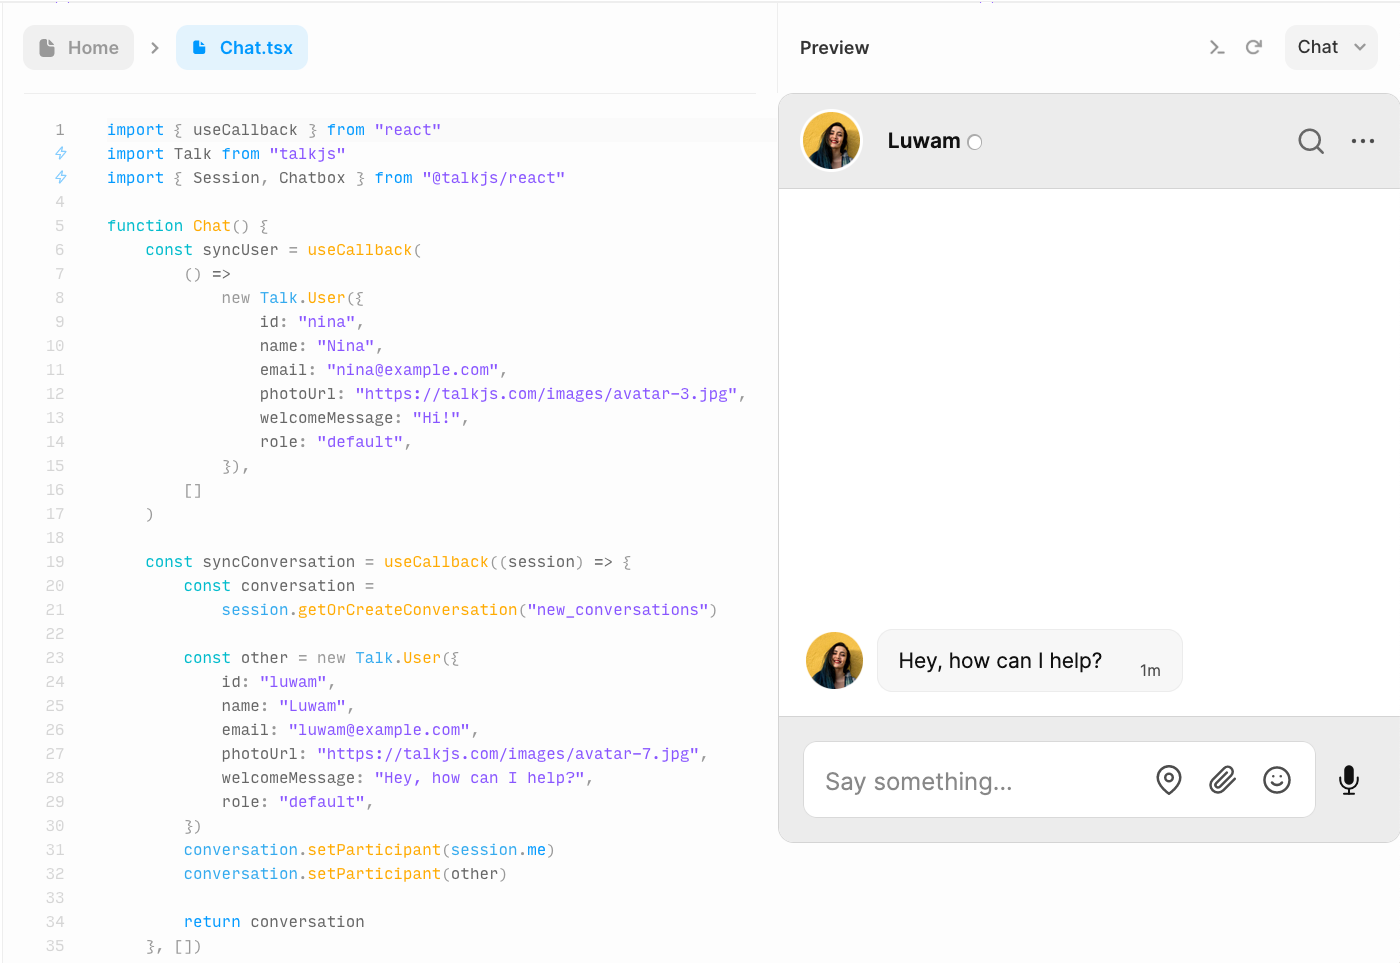
- Remove Framer’s placeholder example code, and replace it with the following code snippet:
import { useCallback } from "react"
import Talk from "talkjs"
import { Session, Chatbox } from "@talkjs/react"


function Chat() {
   const syncUser = useCallback(
       () =>
           new Talk.User({
               id: "nina",
               name: "Nina",
               email: "nina@example.com",
               photoUrl: "https://talkjs.com/images/avatar-3.jpg",
               welcomeMessage: "Hi!",
		  role: "default",
           }),
       []
   )


   const syncConversation = useCallback((session) => {
   const conversation = session.getOrCreateConversation("new_conversation")


   const other = new Talk.User({
           id: "luwam",
           name: "Luwam",
           email: "luwam@example.com",
           photoUrl: "https://talkjs.com/images/avatar-7.jpg",
           welcomeMessage: "Hey, how can I help?",
	    role: "default",
       })
       conversation.setParticipant(session.me)
       conversation.setParticipant(other)


       return conversation
   }, [])


   return (
       <Session appId="APP_ID" syncUser={syncUser}>
           <Chatbox
               syncConversation={syncConversation}
               style={{ width: "100%", height: "500px" }}
           ></Chatbox>
       </Session>
   )
}


export default Chat
Replace APP_ID with your own app ID. You can find your app ID on the Settings page of your TalkJS dashboard.
What does this code snippet do?
- First, the code snippet makes a couple of imports. It imports TalkJS into your project, takes the built-in Session and Chatbox components from the TalkJS React SDK (to be able to connect to the TalkJS servers and use the Chatbox pre-built UI, respectively), and imports the
useCallbackhook from React, which lets you cache a function definition between re-renders. - Next, the code uses the TalkJS classic JavaScript SDK to create new users, create a conversation between the users, and sync these with the TalkJS servers.
Note that this guide uses hard-coded user data. It specifies the current user as ‘Nina’, and the other user as ‘Luwam’, but you can of course specify any other user details you prefer. For building an anonymous visitor chat or using Framer with registered members, see: Step 3: Enable a visitor or member chat.
- Select Preview (the blue ‘play’ button) from the right of the top navigation bar. A separate split window opens next to your code editor with a preview of your code component.
Step 2: Add the chat code component to your page
Once you have created the code component for your chat, place the code component on the page of your Framer project to which you would like to add chat.
- In the Pages tab of your project, go to the page to which you would like to add chat. The page opens to display your workspace.
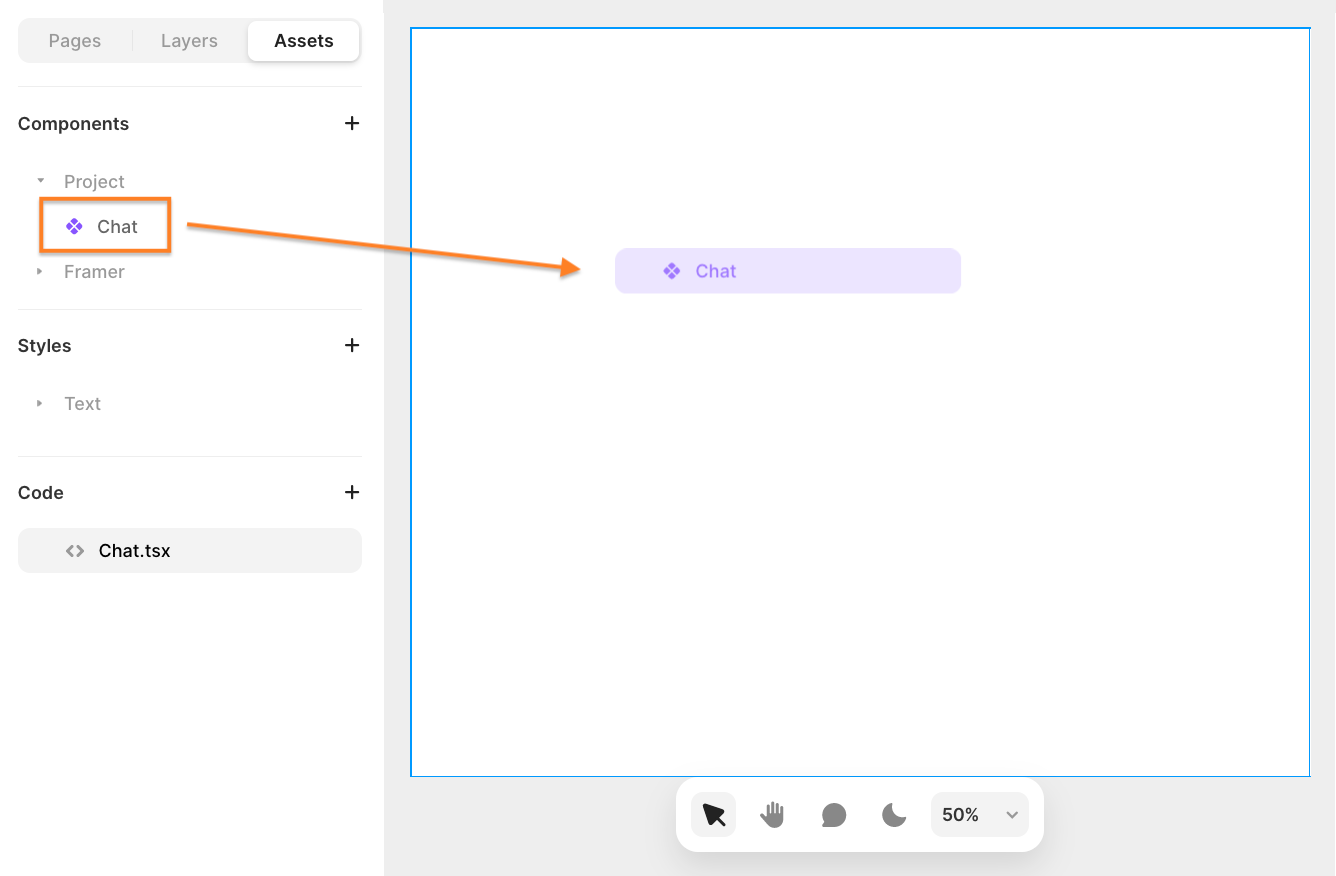
- Navigate back to your Assets tab. Without opening your Chat code component itself, drag the Chat code component from your list of assets onto the opened page in your workspace.
- To preview your live working chat on your page, select Preview from the top navigation.
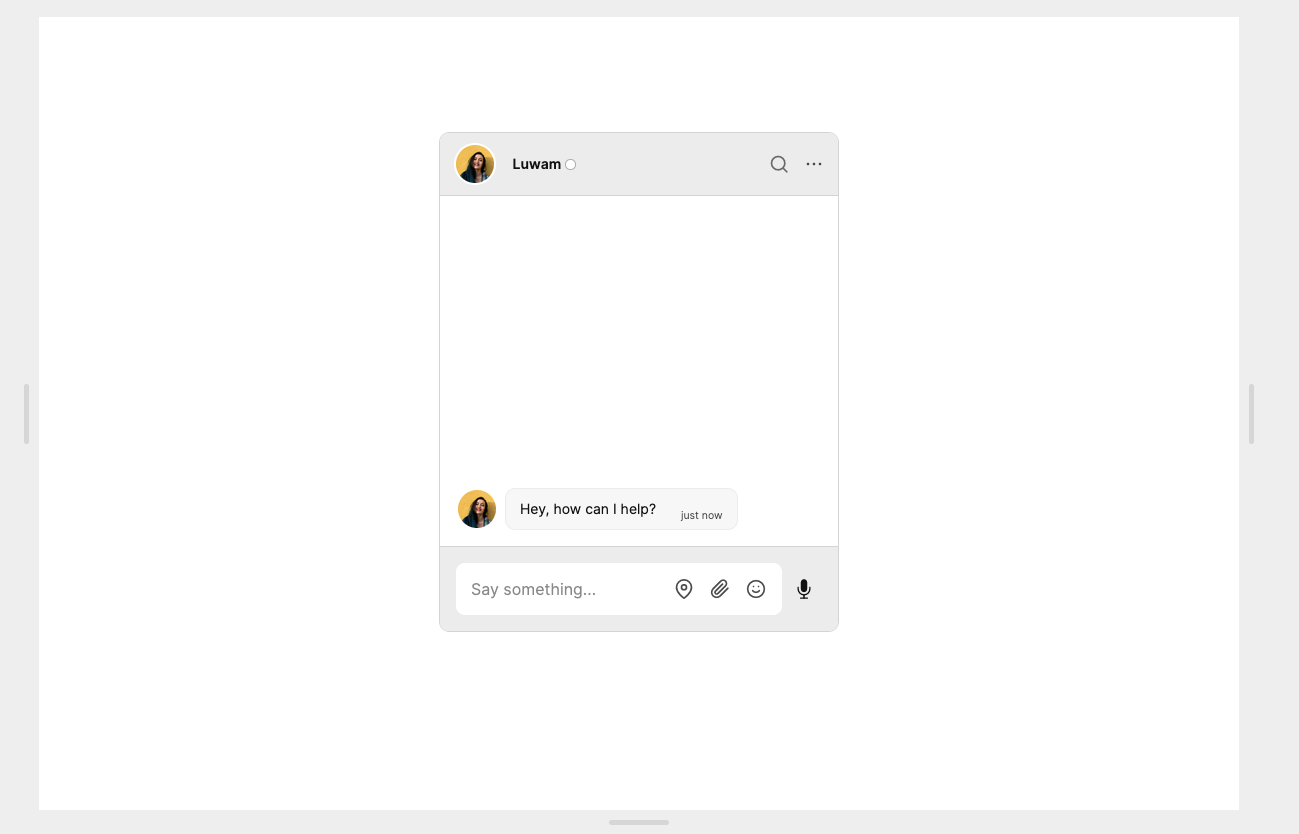
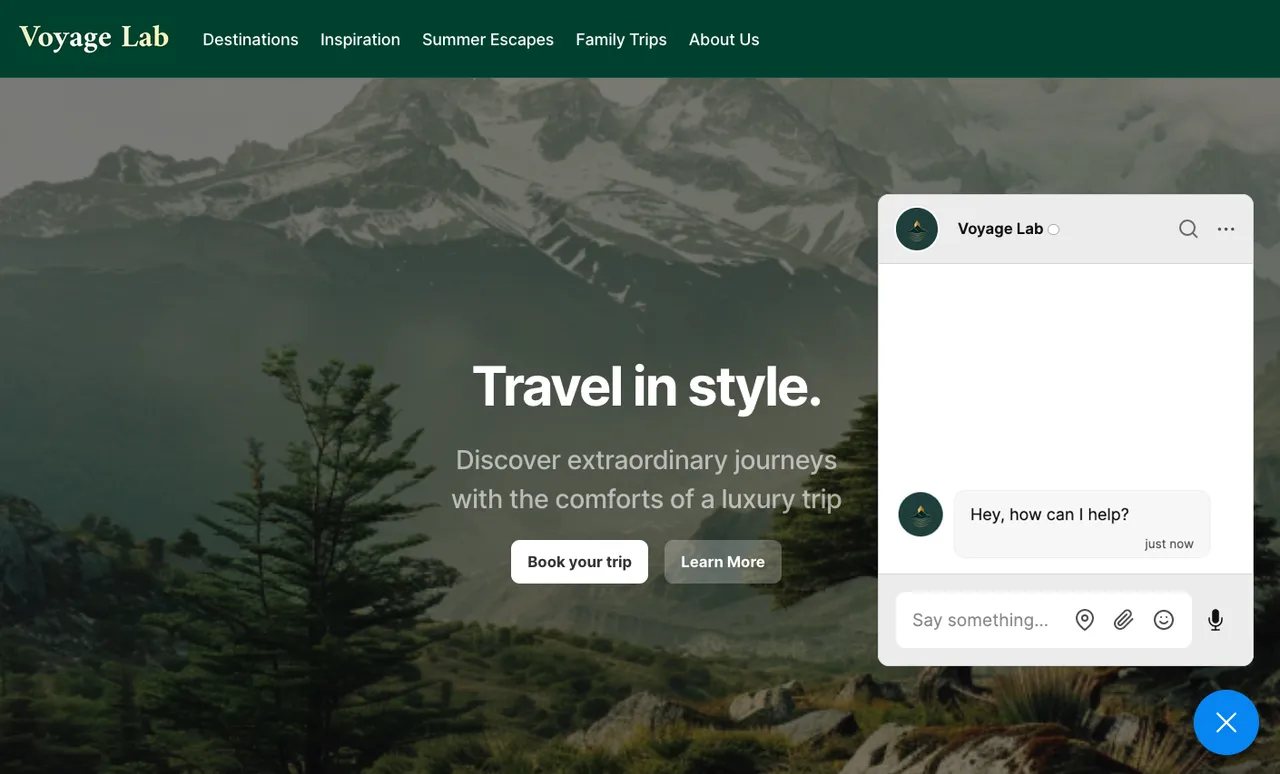
You now have a working example of TalkJS chat in Framer. The chat actually works! Try sending Luwam a message.
The current code uses the Chatbox pre-built UI. If you’d like to have a different UI, you can choose from a range of pre-built chat UIs, including an Inbox with a list of conversations, and a Popup widget.
The current example of a TalkJS chat in your Framer website works with hard-coded dummy data for both users and the conversation. Framer itself is meant for designing and building websites, and doesn’t support user logins, authentication or membership. However, there are various steps you can take to offer chat to actual users of your site. The following section discusses two such options.
Step 3: Enable visitor or member chat
Framer is primarily a tool for designing and building websites. Currently, Framer doesn't support user registration, authentication or memberships out of the box. That said, if you’d like to have real users to chat on your website, you have various options available. For example:
- You can create a visitor chat which users can join without having to register on your site.
- You can use a third-party service that supports turning your website into a membership site with registered users.
This guide will describe these two ways of working with real users on your Framer site in turn.
Visitor chat for non-registered users
If you would like users to be able to chat on your site without having to be logged-in, then one option would be to offer them an anonymous visitor chat. Any person who arrives on your page will be identified as a ‘Visitor’, with each getting offered their own dedicated chat. Depending on your requirements, you can set up separate visitor chats for different pages.
For TalkJS to work, it needs to be able to distinguish who is chatting with who in a conversation, which requires the basic user details of id and name. For an anonymous visitor chat you don’t standardly have this information available. However, you could meet these requirements, for example by:
- Assigning every visitor a unique user ID
- Giving visitors a fixed name, such as ‘Visitor’
You can then make sure that each visitor is assigned a separate conversation based on their user ID.
To achieve this, you could replace the chat code component you created in Step 1 with for example the following code snippet:
import { useEffect, useState, useCallback } from "react"
import Talk from "talkjs"
import { Session, Chatbox } from "@talkjs/react"
import { v4 as uuidv4 } from "uuid"


function Chat() {
   const [userId, setUserId] = useState(null)


   useEffect(() => {
       let storedId = localStorage.getItem("user_id")


       if (!storedId) {
           storedId = `user-id-${uuidv4()}`
           localStorage.setItem("user_id", storedId)
       }


       setUserId(storedId)
   }, [])


   const me = useCallback(() => {
       if (!userId) return null
       return new Talk.User({
           id: userId,
           name: "Visitor",
	    role: "default",
       })
   }, [userId])


   const syncConversation = useCallback((session) => {


       const other = new Talk.User({
           id: "luwam",
           name: "Luwam",
           email: "luwam@example.com",
           photoUrl: "https://talkjs.com/images/avatar-7.jpg",
           welcomeMessage: "Hey, how can I help?",
	    role: "default",
       })


       const conversation = session.getOrCreateConversation(
           Talk.oneOnOneId(me.id, other.id)
       )


       conversation.setParticipant(session.me)
       conversation.setParticipant(other)


       return conversation
   }, [])


   if (!userId) {
       return null
   }


   return (
       <Session appId="APP_ID" syncUser={me()}>
           <Chatbox
               syncConversation={syncConversation}
               style={{ width: "100%", height: "500px" }}
           ></Chatbox>
       </Session>
   )
}


export default Chat;
Replace APP_ID with your own app ID, which you can find in the Settings page of your TalkJS dashboard.
This code resembles the code snippet used in Step 1, yet there are some main differences:
- Instead of a fixed user ID for the website visitor, it uses the uuid library, in combination with the useEffect and useState React hooks, to generate and locally store a unique user ID for each visitor.
- To ensure that each visitor has their own conversation with Luwam—rather than all visitors joining a single large conversation—this code snippet doesn’t set a fixed conversation ID, but instead uses the oneOnOneId to generate an ID for the conversation between the visitor and Luwam.
Add the code component to your page, if you haven’t already. Select Preview from the top navigation to preview a working version of the visitor chat in action.
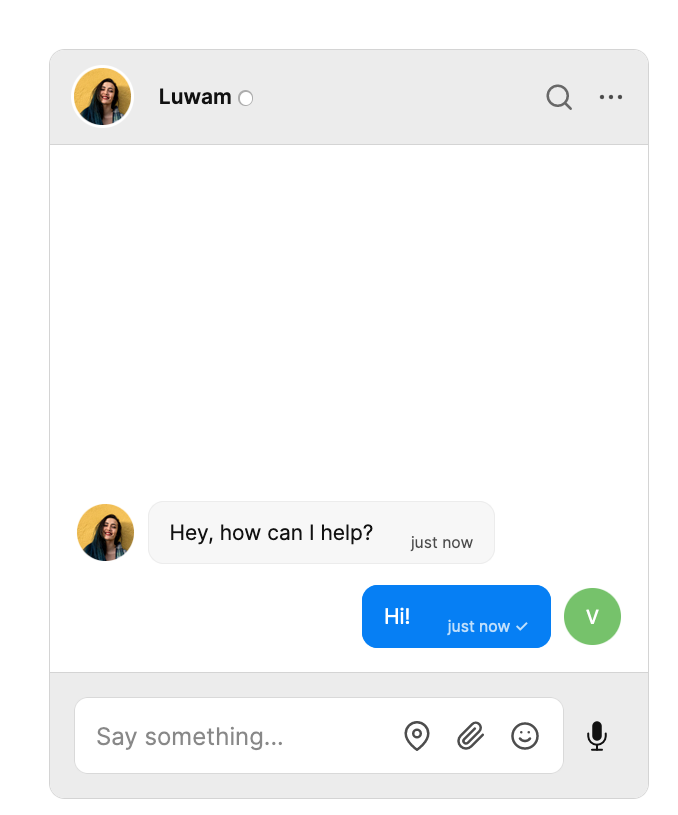
You now have a working chat where any visitor to your site can have a conversation, without having to register. The chat works, so feel free to try and send Luwam a message.
Would you like to collect basic user data from your website visitors? To do so, you could create an in-chat form with HTML panels to collect any data you like. For a tutorial with an example of how to do this, see:
Add user authentication and membership with third-party integrations
There are several third-party services available that offer support for user authentication and memberships in Framer. The following is an overview of three such services you can use to this end:
FramerAuth
FramerAuth is a no-code solution for membership functionality in Framer. For support on using FramerAuth with your Framer site, check out the tutorial:
Memberspace
Memberspace is a service that allows you to convert any website into a membership website. For support on integrating Memberspace with your Framer site, follow the Memberspace integration guide:
Outseta
Outseta allows you to add memberships to your Framer site, an includes support for processing payments, authentication, and email. For support on adding Outseta to your Framer site, use the following guide:
These are three examples of third-party services that will allow you to add user registration, authentication and memberships to your Frame site. You can then use these user data as a basis for a members-only or registered user chat on your site.
Next steps
In following this guide, you’ve integrated a powerful chat into your Framer website with TalkJS. Here are some of the next steps you might like to take.
Add an inbox
As a website owner, you’ll likely want to add a space where you can respond to the different conversations started on your site. The most straightforward way to do so would be to create a separate page that is only accessible to you, that lists all conversations that you’re part of. To create such a dedicated page with restricted access, you can protect your page with a password. For a guide on how to add password protection to a page on your Framer site, see: Framer Academy: Password Protection. To get an overview of all conversations of a single user, use the Inbox pre-built chat UI. The TalkJS React SDK has a built-in Inbox, which you can directly use in a code component in Framer. This way, you can add a separate protected page from which you can engage with all conversations on your site.
Style your chat
You have full control over the look and feel of your chat user interface–from its colors and layout to its structure and components. You can choose from a range of default themes, or fully tailor your own custom theme with HTML and CSS using the theme editor. Find the theme editor on the Themes pages of your TalkJS dashboard.
Resources
Do you have questions about integrating TalkJS into Framer? We’re happy to help. Get in touch.


