
This guide uses the classic JavaScript SDK. If you're starting a new project, consider using TalkJS Chat UI components, which are more customizable.
Your users might want to start a private conversation by selecting a specific user or have a group discussion by selecting many users. To create this feature in TalkJS, you can use an action button to enable users to start conversations from the TalkJS conversation list header, allowing them to choose one or more participants and an optional subject for the chat. Let's start.
To follow along, you’ll need:
- A TalkJS account. TalkJS provides a ready-to-use chat client for your application. Your account gives you access to TalkJS's free development environment.
- An existing TalkJS project using the classic JavaScript SDK. See the associated Getting Started guide for an example of how to set this up.
We’ll build up the feature step by step in the following sections. If you would rather see the complete example code, see the GitHub repo for this tutorial.
Note: We use plain JavaScript with the classic JavaScript SDK in this tutorial, but you can adapt the implementation to work with any modern front-end framework that supports JavaScript.
Add a “Create new chat” button to the Conversation List Header
TalkJS has a powerful theme editor that lets you customize the TalkJS user interface. Our first step is to use the TalkJS theme editor to add a new action button to the conversation list header.
As a good practice, create a new theme from the TalkJS dashboard to host your customizations. You should also create a new custom component in the newly created theme to store the button HTML.
Here, we’ve named the new theme Create-New-Chat-From-Conv-Header and the custom component inside it CreateNewChatButton.
Add the following code to the newly created component. The HTML defines an action button named “Create New Chat” with a custom createNewChat action identifier and some styling for the button.
<template>
   <ActionButton action="createNewChat" class="create-chat-button">Create new chat</ActionButton>
</template>
<style scoped>
   /* Your component's styles go here */
   .create-chat-button {
       margin-left: 2rem;
       padding: 0.5rem;
       padding-bottom: 0.5rem;
       padding-left: 1rem;
       padding-right: 1rem;
       border-radius: 0.5rem;
       color: #ffffff;
       background-color: #3B82F6;
       cursor: pointer;
       border: none
   }
</style>
Include this custom component at the end of the template section of the ConversationListHeader component. This code will add our custom component to the Conversation List Header in the TalkJS UI.
<template>
 <div class="conversation-list-header">
   ...
   <CreateNewChatButton/>
 </div>
</template>
Next, pass the theme name to the createInbox() method when creating an inbox widget in your JavaScript application. This ensures that our application uses the new theme for all TalkJS users.
talkSession.createInbox({theme: 'Create-New-Chat-From-Conv-Header'});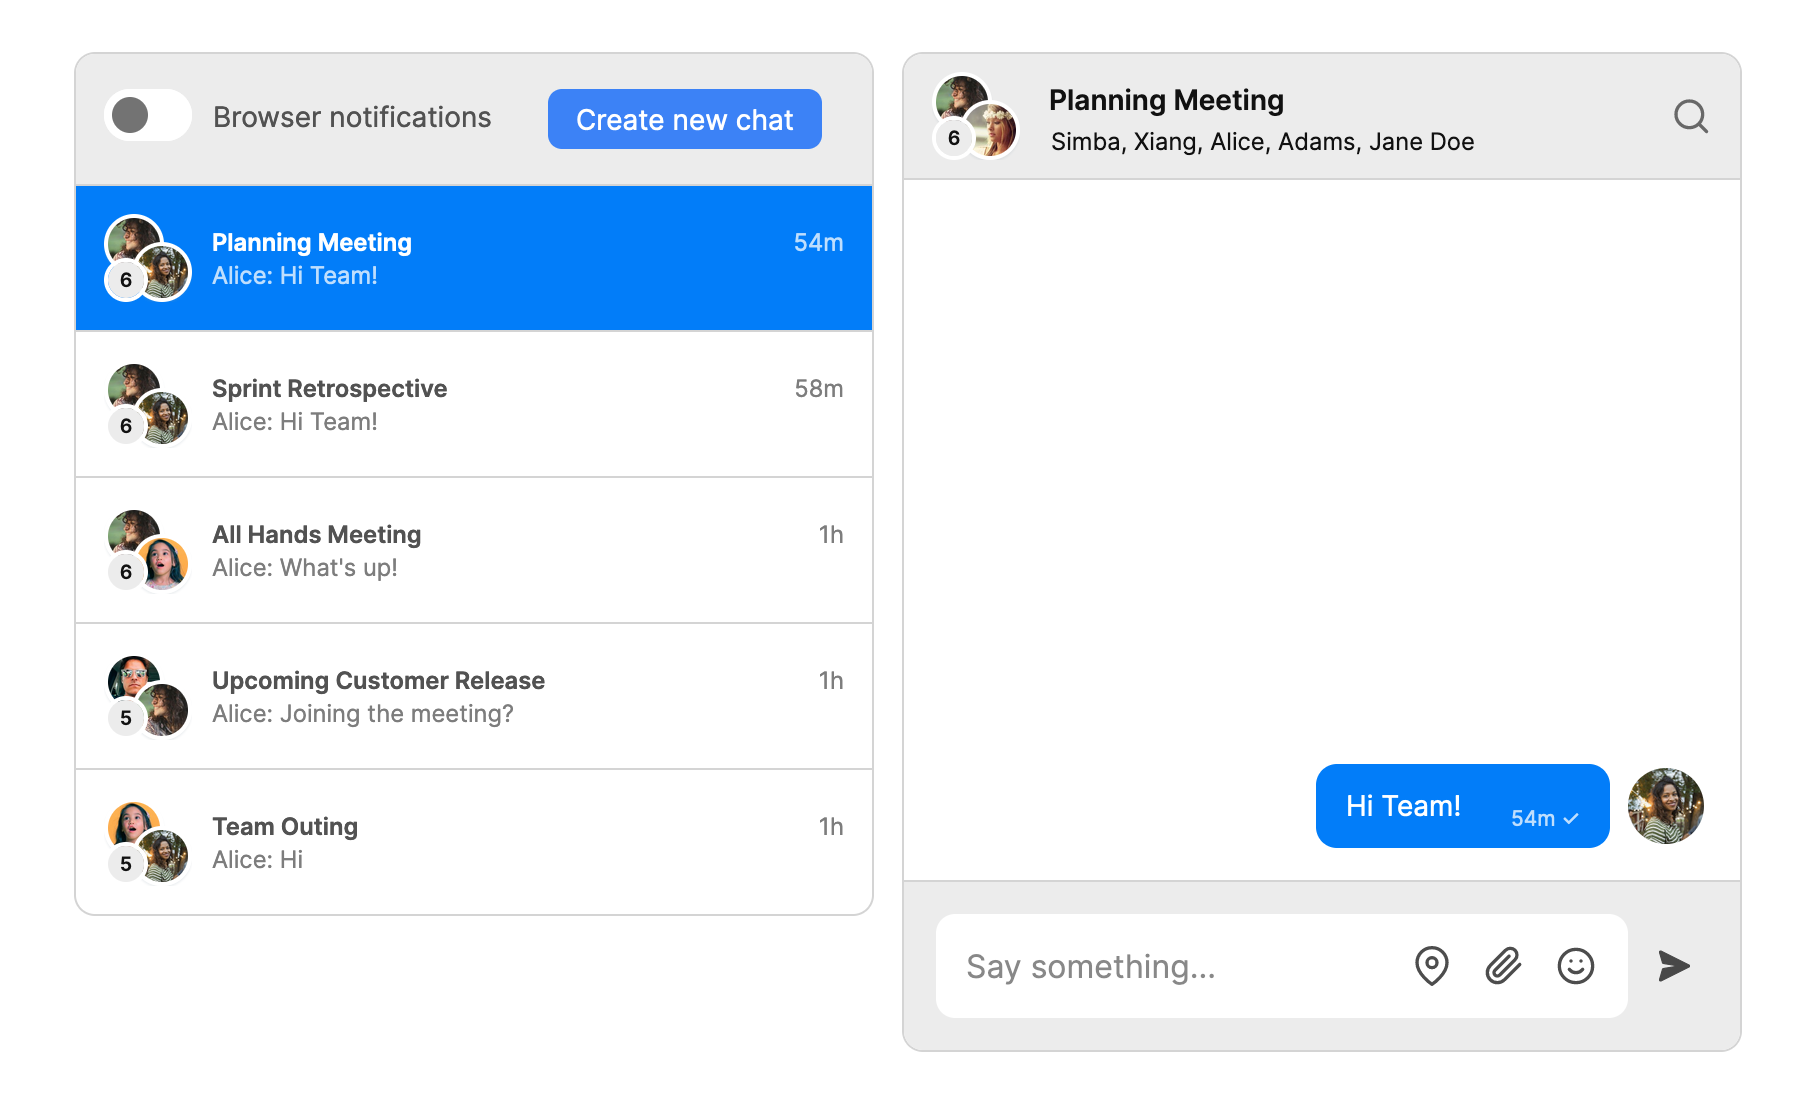
Tip: Adjust the Inbox: conversation list panel width from the theme layout settings page to ensure the newly added button has enough room in the header.

Note: Make sure to publish the theme to live if you’re trying out this example in a production environment with a Live App ID.
Create a new HTML form for selecting chat participants
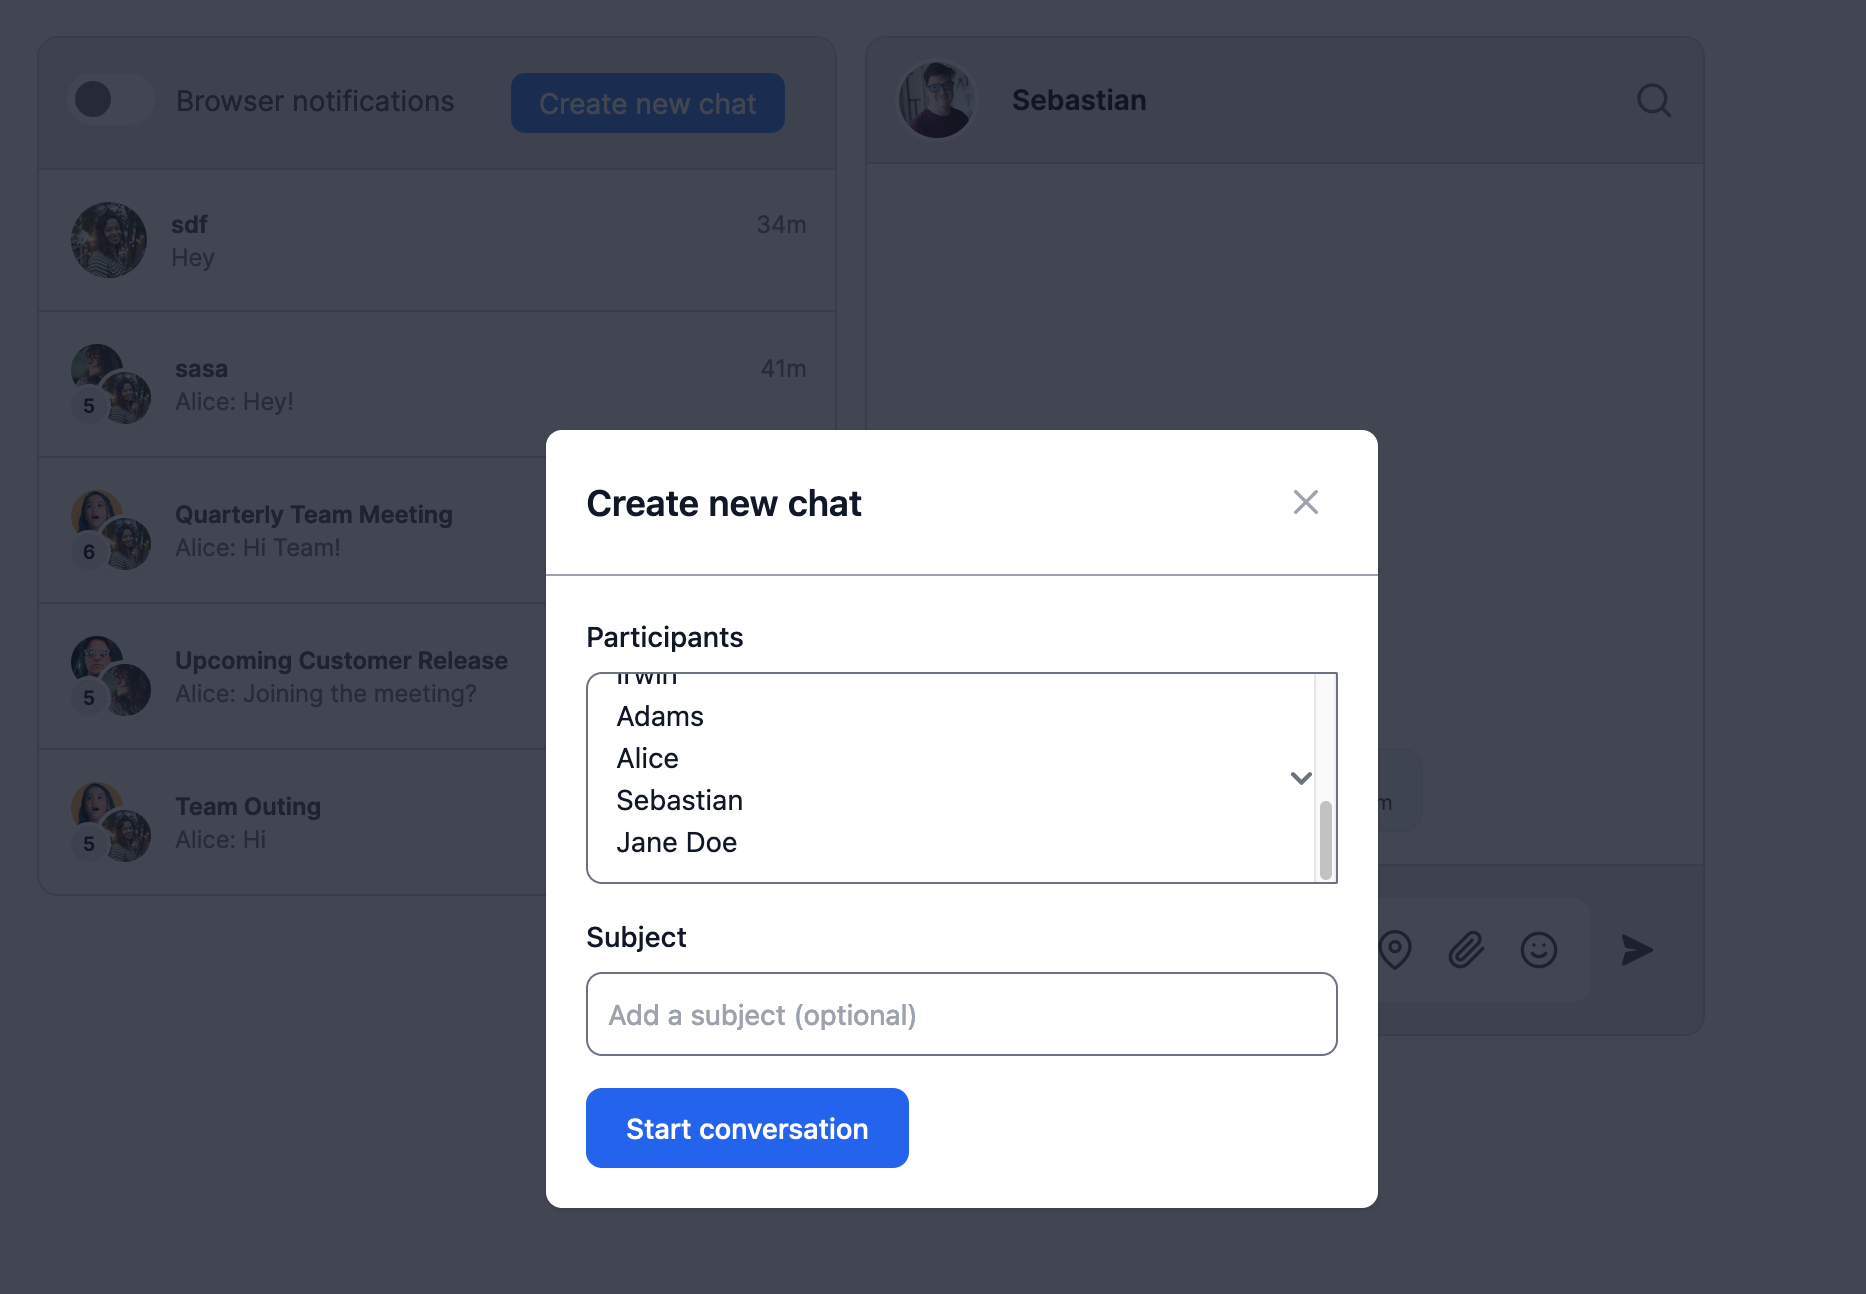
Let’s create an HTML form to display when users click the “Create new chat” button. Users must fill this form to create new conversations with one or more participants.
The HTML form will have:
- A multi-select dropdown input to select one or more participants for the new conversation. We can populate the participant list dynamically from JavaScript.
- An optional input to define the subject for the new conversation.
- A submit button that calls the createNewChat() method to create a new conversation based on the form inputs.
We’ll wrap the form inside a modal to display the form as a popup when users click the action button. The modal is hidden by default.
Note: This HTML form is just an example. Feel free to define your own as per your requirements. For simplicity, we’re also using the CDN version of TailwindCSS for styling in our index.html, which is not recommended for production environments. See TailwindCSS Installation for more information.
Here is a simplified version of the HTML form we’re using to demonstrate the structure. See index.html in the GitHub repo for a complete version of the HTML form.
<div id="crud-modal" class="hidden ...">
   <!-- Modal header -->
   ...
   <!-- Modal body -->
   <form onsubmit="createNewChat(event)">
       <div>
           <div>
               <label for="participants">Participants</label>
               <select name="participants" id="participants" multiple required="true">
              </select>
           </div>
           <div>
               <label for="subject">Subject</label>
               <input type="text" name="subject" placeholder="Add a subject">
           </div>
       </div>
       <button type="submit">
           Start conversation
       </button>
   </form>
</div>
You may notice the <select> element in the HTML form has no <option> elements for participants. This is because we dynamically populate the participant list with JavaScript.
Next, let’s define a showNewConversationModal() method that:
- Fetches the TalkJS users list dynamically
- Populates the users list to the <select> input of the HTML form
- Displays the modal that contains the HTML form
function showNewConversationModal() {
   let talkJsUsers = getTalkJSUsers();

   participantsSelect = document.getElementById('participants');

   for (let i = 0; i < talkJsUsers.length; i++) {
       participantsSelect.options[i] = new Option(talkJsUsers[i].name, talkJsUsers[i].id);
   }

   modal.show();
}

function getTalkJSUsers() {
   return [
       {
           id: "New_Zafar",
           name: "Zafar",
           role: "default",
           email: "sapnesh+Zafar_talkjs@test.com",
           photoUrl: "https://i.pravatar.cc/150?u=sapnesh+Zafar_talkjs@test.com",
       },
       {
           id: "New_Simba",
           name: "Simba",
           role: "default",
           email: "sapnesh+Simba_talkjs@test.com",
           photoUrl: "https://i.pravatar.cc/150?u=sapnesh+Simba_talkjs@test.com",
       }
       {
           id: "New_Sapnesh",
           name: "Sapnesh",
           role: "default",
           email: "sapnesh+Sapnesh_talkjs@test.com",
           photoUrl: "https://i.pravatar.cc/150?u=sapnesh+Sapnesh_talkjs@test.com",
       }
   ];
}
Note: To keep things simple, the getTalkJSUsers() method uses a static list of users already present in our TalkJS account. However, practically, you may wish to query your backend API to get your TalkJS users, which can then query the TalkJS Users API. Do not call the TalkJS REST API directly from your front-end code, as it exposes your REST API key to external users.
We use the showNewConversationModal() method in the next section, where we handle the click event for the “Create new chat” button.
Show the HTML form when user clicks the “Create new chat” button
We can use the inbox.onCustomConversationAction() method to register an event handler for the “Create new chat” button we created earlier in this tutorial.
The onCustomConversationAction method takes two parameters:
- The custom action identifier to the action button. In our case, we have it set as createNewChat.
- The method to call when the action button is clicked (showNewConversationModal).
inbox.onCustomConversationAction('createNewChat', showNewConversationModal);
Create a new conversation when user submits the form
Finally, let’s handle the submit event on the HTML form. This is where we read the user input on form submission and create new conversations.
Our HTML form has an onsubmit action that calls a createNewChat() method.
<form onsubmit="createNewChat(event)">Let’s define this method to handle the form submit event. The method will:
- Create a new conversation using the session.getOrCreateConversation() method.
- Add the current user and the selected participants to the newly created conversation using the conversation.setParticipant() method.
- Add an optional subject to the conversation using the conversation.setAttributes() method.
- Create a new inbox using the session.createInbox() method while specifying it to use our custom theme.
- Mount the newly created conversation to the TalkJS UI and hide the modal.
- Re-register the inbox.onCustomConversationAction() handler on the newly mounted inbox.
function createNewChat(event) {
   event.preventDefault();
   const conv_id = "" + Date.now();
   const conversation = talkSession.getOrCreateConversation(conv_id);
   const me = new Talk.User(talkSession.me.id);
   conversation.setParticipant(me);

   // Get the selected values from the multi-select dropdown
   let selectElement = document.getElementById('participants');
   for (let i = 0; i < selectElement.options.length; i++) {
       if (selectElement.options[i].selected) {
           let user = new Talk.User(selectElement.options[i].value);
           conversation.setParticipant(user);
       }
   }

   if (event.target.elements.subject.value) {
       conversation.setAttributes({
           subject: event.target.elements.subject.value
       });
   }
   let inbox = talkSession.createInbox({ theme: 'Create-New-Chat-From-Conv-Header' });
   inbox.select(conversation);
   inbox.mount(document.getElementById('talkjs-container'));
   inbox.onCustomConversationAction('createNewChat', showNewConversationModal);

   modal.hide();

   return false
}
Note: We’re using the current timestamp to create a unique conversation ID for getOrCreateConversation only as an example. This may not be ideal for production environments. See TalkJS recommendations on generating secure conversation IDs for more information.
Tip: You can also add a welcome message or set a custom image to the conversation. See ConversationBuilder for more information.
Summary
You now have a working demonstration of how to add a “Create new chat” button in TalkJS that allows users to create new conversations from the conversation list header.
To recap, in this tutorial, we have:
- Used TalkJS’ theming capabilities to add a “Create new chat” button to the conversation list header
- Setup an HTML form where users can select participants and add an optional subject
- Displayed the HTML form in a modal when the user clicks the “Create new chat” button
- Created a new conversation with the selected participants and the provided subject when the user submits the form
For the full example code for this tutorial, see our GitHub repo.
If you want to learn more about TalkJS, here are some good places to start:
- The TalkJS Docs help you get started with TalkJS.
- TalkJS tutorials provide how-to guides for many common TalkJS use cases.
- The talkjs-examples GitHub repo has more extensive, complete examples demonstrating how to integrate with other libraries and frameworks.


