
This guide uses the classic JavaScript SDK. If you're starting a new project, consider using TalkJS Chat UI components, which are more customizable.
Sharding is conventionally used in distributed systems to spread users across services to ensure consistent availability. Sharding involves distributing users between available services so that no one service experiences unnecessary loads at any given time. Using TalkJS, you can have group chats with up to 1250 users, depending on your plan. But, if you require more users, you can shard a conversation and assign users to the sharded conversations.
Conversation sharding is useful in scenarios like livestreams and social chats where there are a large number of users adding short messages in the chat and it is not so important that every user can see all messages.
In our demo, we assign each user to a specific shard based on their id, so that they're able to retrieve their messages across devices. The following sections highlight the main topics that we'll cover in this tutorial:
- Adding a modal for the user to enter their details to enter a group chat
- Creating a TalkJS user based on the details entered
- Using the generated user's id to assign them to a predetermined conversation shard
To follow along, you’ll need:
- A TalkJS account. TalkJS provides a ready-to-use chat client for your application. Your account gives you access to TalkJS's free development environment.
- An existing TalkJS project using the classic JavaScript SDK. See the associated Getting Started guide for an example of how to set this up.
This project uses a script to add three example conversations with 2 users each. This is not required in a production scenario where you already have users and conversations set up.
We’ll build up the feature step by step in the following sections. If you would rather see the complete example code, see the GitHub repo for this tutorial.
Executing the script to add users and conversations
The sample script contains four functions. The setupUsers() method creates six users. The other three methods, setupConversation1(), setupConversation2(), and setupConversation3(), creates three conversations with two users each. Ensure that you enter your app ID in the appId field and your secret key in the secretKey field. You can find them both on your TalkJS dashboard. The request() helper method executes all the API calls.
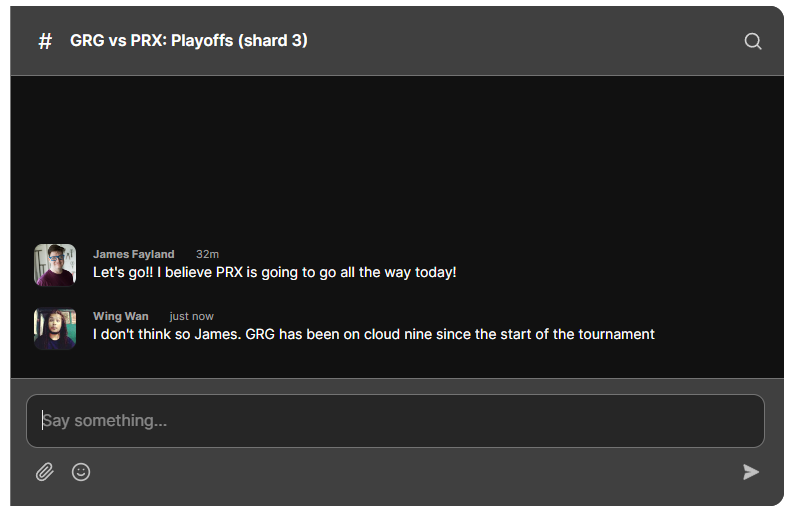
Each conversation shard has the same subject, with the shard number in brackets afterwards, as in the screenshot above. The shard number is shown only for the purpose of this demo, to make it easy to see what shard you are currently viewing.
Setting the theme for your chat
Go to your TalkJS dashboard, and navigate to the Chat UI tab. Then, select the default role and select the team_chat theme. Click Publish to live to apply this theme to your default role.
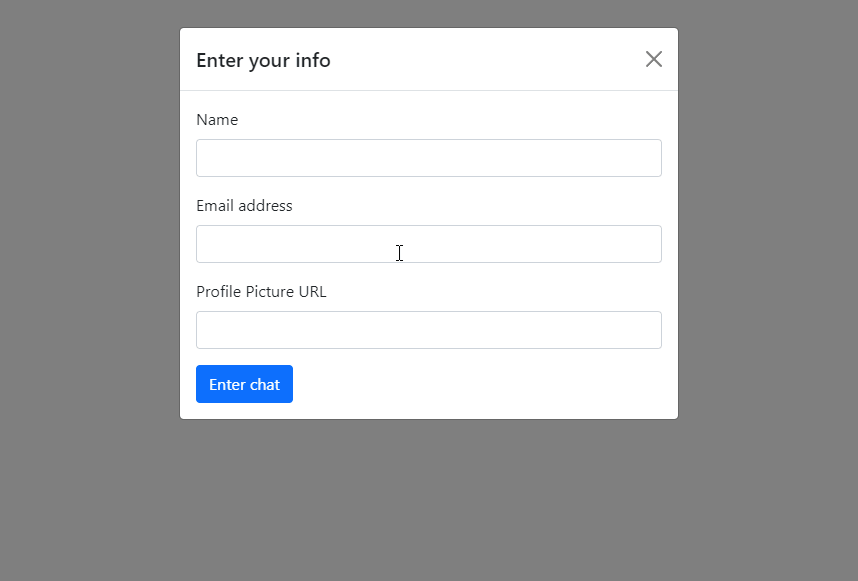
Adding a modal for users to enter the chat
After following the getting started guide, you should have a working chat. We must make some changes to it to allow users to enter their information to enter a group chat. Edit the index.html file to add a modal that appears when the page loads. We are using Bootstrap here, but you can use any library or framework you prefer. Below the talkjs-container div, add the following code:
<div
  class="modal fade"
  id="userEntryFormModal"
  tabindex="-1"
  data-bs-backdrop="static"
>
  <div class="modal-dialog">
    <div class="modal-content">
      <div class="modal-header">
        <h5 class="modal-title" id="userEntryFormModalLabel">
          Enter your info
        </h5>
        <button
          type="button"
          class="btn-close"
          data-bs-dismiss="modal"
          aria-label="Close"
        ></button>
      </div>
      <form onsubmit="modalSubmitted(event)">
        <div class="modal-body">
          <div class="mb-3">
            <label for="userName" class="form-label">Name</label>
            <input id="userName" type="text" class="form-control" />
          </div>
          <div class="mb-3">
            <label for="userEmailAddress" class="form-label"
              >Email address</label
            >
            <input
              id="userEmailAddress"
              type="email"
              class="form-control"
            />
          </div>
          <div class="mb-3">
            <label for="userProfilePicture" class="form-label"
              >Profile Picture URL</label
            >
            <input
              id="userProfilePicture"
              type="text"
              class="form-control"
            />
          </div>
          <button class="btn btn-primary" type="submit">Enter chat</button>
        </div>
      </form>
    </div>
  </div>
</div>
This modal contains three fields to accept the user's name, email address, and a URL to a profile picture. Once the user submits this information, the modalSubmitted() method retrieves the values from the form, creates a TalkJS user, and permits them to enter the group chat.
Adding a new user to a chat
After entering their details and clicking Enter Chat, they are added to one of conversation shards. Let's see how this works behind the scenes. If you are using the index.js file from the getting started guide, you must clear its contents to replace it with the following code explained below.
const appId = "<YOUR_APP_ID>";

const userEntryFormModal = new bootstrap.Modal(
  document.getElementById("userEntryFormModal"),
  {}
);
const talkJSContainer = document.getElementById("talkjs-container");
Inside the index.js file, we have several functions. The first line stores your TalkJS app ID. Then, we create another const called userEntryFormModal to store the Bootstrap modal. Lastly, we create another const called talkJSContainer to retrieve the div to mount our chatbox to.
const savedUserId = sessionStorage.getItem("currentUser");
if (savedUserId) {
  Talk.ready.then(() => {
    const user = new Talk.User(savedUserId);
    showChat(user);
  });
} else {
  userEntryFormModal.show();
  talkJSContainer.style.display = "none";
}
The next few lines checks if the sessionStorage contains a key called currentUser. If it is available, it means that the user has already entered a group chat. Otherwise, we must hide the talkJSContainer and display the modal for the user to enter their information.
Once the user enters their information and clicks Submit, we retrieve the values from the form and do the following:
- Create a TalkJS user and set them to the
sessionStorage - Retrieve a conversation shard
- Assign the user to the conversation shard
After setting the current user to the sessionStorage and displaying the chat, we hide the modal.
Creating a TalkJS User
Once the user enters their details and submits it, we create a TalkJS user using that information. The modalSubmitted() method retrieves the values from the form and invokes methods to create a user and display the chat.
async function modalSubmitted(event) {
  event.preventDefault();

  const name = document.getElementById("userName").value;
  const email = document.getElementById("userEmailAddress").value;
  const profilePictureURL = document.getElementById("userProfilePicture").value;
  await Talk.ready;
  const user = createUser(name, email, profilePictureURL);
  await showChat(user);
}
Inside the index.js file, there's an asynchronous function called createUser() that accepts the name, email address, and URL of the profile picture. The id field is assigned a random UUID using the crypto package in JavaScript. Before creating the user, we set this id as the currentUser in the sessionStorage. After creating the user, we return the user to the calling function.
function createUser(name, email, profilePictureURL) {
  const userId = crypto.randomUUID();
  sessionStorage.setItem("currentUser", userId);
  return new Talk.User({
    id: userId,
    name: name,
    email: email,
    photoUrl: profilePictureURL,
    role: "default",
  });
}
Retrieve a conversation shard
After creating the TalkJS user, we invoke the showChat() method. This method creates a new Talk session using your appId and the created user. Then, it invokes the getShard() method to retrieve a conversation shard. We then add the user to the conversation. Using the session created earlier, we create a chatbox and select the retrieved conversation. Finally, we set the display property of the talkJSContainer to block, mount the chatbox inside it, and hide the modal.
async function showChat(user) {
  console.log("show chat");
  const session = new Talk.Session({ appId, me: user });

  const shard = getShard(user.id);
  const conversation = session.getOrCreateConversation(
    `sharded-conversation-${shard}`
  );
  conversation.setParticipant(user);

  const chatbox = session.createChatbox();
  chatbox.select(conversation);
  await chatbox.mount(talkJSContainer);

  talkJSContainer.style.display = "block";
  userEntryFormModal.hide();
}
Assigning the user to a conversation shard
The getShard() method retrieves a pre-determined shard ID for a given user ID. Since this examples contains 3 shards, we have set the shardCount to 3.
function getShard(userId) {
  const shardCount = 3;

  // UUID is like 88710ed2-4121-4c60-90c5-506be6bcd664, take just the last section, 506be6bcd664
  const lastIdSection = userId.substring(userId.lastIndexOf("-") + 1);

  // Convert that from hexadecimal to decimal number, 88424362858084
  const lastIdNumeric = parseInt(lastIdSection, 16);

  // Assign to one of N shards using modulo, in this case 88424362858084 % 3 = 1
  return (lastIdNumeric % shardCount) + 1;
}
Using the last block of the user's ID, we first convert it from hexadecimal to decimal, and then do a modulo operation by the shardCount and add 1 to retrieve a value in [1,2,3]. This ensures that the same user is always assigned to the same shard even when accessing from different devices.
Conclusion
You now have a working demonstration of how to shard a conversation! To recap, in this tutorial you have:
- Added a modal for the user to enter their details
- Create a TalkJS user based on the information entered
- Assign the user to one of the conversation shards
For the full example code for this tutorial, see our GitHub repo.
If you want to learn more about TalkJS, here are some good places to start:
- The TalkJS Docs help you get started with TalkJS.
- TalkJS tutorials provide how-to guides for many common TalkJS use cases.
- The talkjs-examples Github repo has larger complete examples that demonstrate how to integrate with other libraries and frameworks.!!


