
This guide uses the classic JavaScript SDK. If you're starting a new project, consider using TalkJS Chat UI components, which are more customizable.
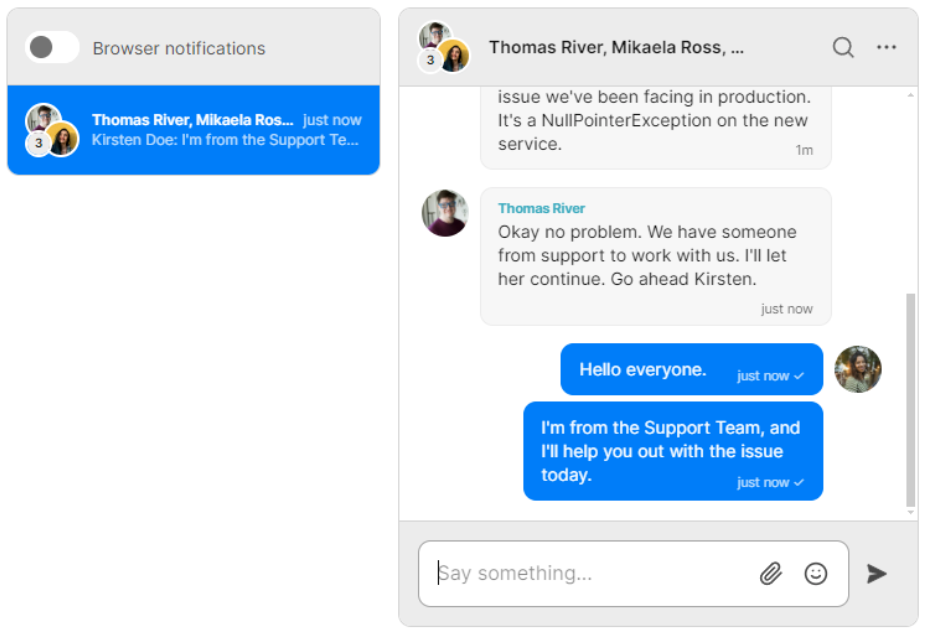
With TalkJS’s advanced theming capabilities, you can have a hidden user in your conversations who doesn’t appear in your conversation list or chat header. This is especially useful when you require a support agent who monitors the chat but only jumps in if required. In this tutorial, we’ll demonstrate how to add a hidden user to a TalkJS conversation. The majority of changes take place within a TalkJS theme to hide a user from a group conversation.
To follow along, you’ll need:
- A TalkJS account. TalkJS provides a ready-to-use chat client for your application. Your account gives you access to TalkJS's free development environment.
- An existing TalkJS project using the classic JavaScript SDK. See the associated Getting Started guide for an example of how to set this up.
Before going further, if your application uses a one-on-one chat you should tweak it a bit to change it to a group chat. This is because you wouldn’t need to hide a user in a one-on-one conversation. See TalkJS docs to learn how to set up a group chat.
We’ll build up the feature step by step in the following sections. If you would rather see the complete example code, see the GitHub repo for this tutorial.
Edit your group chat to add a custom property and role
First, you must make some minor changes to your group chat. We’ll add the default role to each user because that’s what we’ll set our theme to. We’ll also add a custom property to each user to differentiate between the user that must be hidden and the rest of them. We’ll show the configuration for a single user, but you can apply that to all your users. Read about the User object to learn more about creating custom fields.
const other1 = new Talk.User({
  id: "0001",
  name: "Kirsten Doe",
  email: "kirsten.doe@example.com",
  photoUrl: "https://talkjs.com/images/avatar-1.jpg",
  custom: {
    "hidden":"true"
  },
  role: "default"
});
As you can see, we’ve added a new attribute called “custom” that contains a JSON structured object with a key-value pair. The key represents the name of the custom attribute and the value represents the value of the custom attribute. For the remaining users in your chat, you must set the “hidden” property to “false”. We’ve also set the role as default since the “hidden_user” theme is applied to that role.
Add a new theme in TalkJS
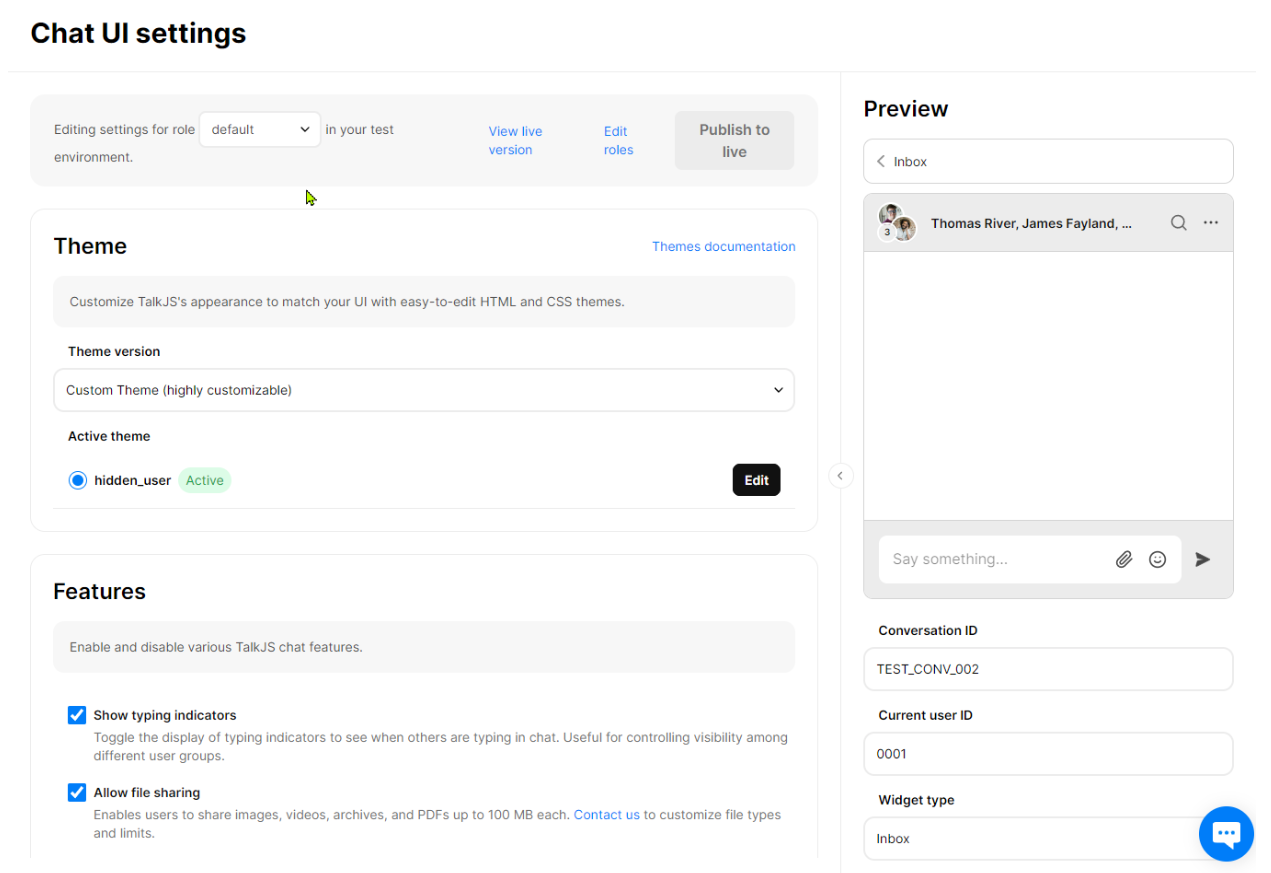
Go to your TalkJS dashboard and navigate to the Themes tab. Click “Create new theme” and enter “hidden_user” as the theme name. Keep the “Based on preset theme” to “default”. This adds a new theme to the list of already existing themes. We’ll set this theme to the default role as shown in the previous section for each user’s configuration.
Go to the Chat UI tab and select the default role from the dropdown. Select the radio button next to the newly created “hidden_user” theme. You get a live preview of the chat UI and can even enter the conversation ID, user ID, and widget type to know exactly what your chat looks like:
Edit the theme to hide a user
The only thing left to do is to edit your theme so that it hides all users with the custom attribute. Go to your TalkJS dashboard and navigate to the Themes tab. Find the “hidden_user” theme and click on Edit” to start making changes. There are three components to which we must make changes.
- ConversationListItem
- ChatHeader
- GroupChatImage
Edit the ConversationListItem Component
Select the “ConversationListItem” component from the left menu. The change we must make here is to remove the hidden user so that they don’t come up in the list of names. To do this, change the code on the line where we set the “names” variable from this:
<t:set names="{{ conversation.otherParticipants | map: 'name' | join: ', ' | default: conversation.me.name }}" />To this:
<t:set names="{{ conversation.otherParticipants | where:'custom.hidden', 'false' | map: 'name' | join: ', ' | default: conversation.me.name }}" />We’ve just added a where clause to check for users that have a custom property called hidden set to false. Only those names get added to the “names” variable. This variable is then iterated over to display each name in the ConversationListItem component.
Edit the ChatHeader Component
Select the “ChatHeader” component from the left menu. The change we must make here is the same as that in the previous section which is to remove a particular user. To do this, change the code on the line where we set the “headerParticipants” variable from this:
<t:set headerParticipants="{{ conversation.otherParticipants.length == 0 | then: conversation.participants | else: conversation.otherParticipants }}" />To this:
<t:set headerParticipants="{{ conversation.otherParticipants.length == 0 | then: conversation.participants | else: conversation.otherParticipants | where:'custom.hidden', 'false' }}" />
As before, we’ve just added a where clause to check for users that have a custom property called hidden set to false. Only those names get added to the “headerParticipants” variable. This variable is then iterated over to display each name in the ChatHeader component.
Edit the GroupChatImage Component
Select the “GroupChatImage” component from the left menu. This is where things get a little tricky. You must remove the image of the hidden user from the group chat image so that it only displays the remaining participants. You must also reduce the count of participants that gets displayed next to the image.
To do this, we’ll add a new variable called “nonHiddenParticipants” and set all participants that have the custom “hidden” property set to “false”. The remaining step is to replace all instances of the “participants” variable with that of the “nonHiddenParticipants” variable.
Add the following line before the first div (“<div class="GroupChatImage">)
<t:set nonHiddenParticipants="{{ participants | where:'custom.hidden', 'false' | ... }}"/>
Then, change the “participants” variable to “nonHiddenParticipants”:
<div class="GroupChatImage">
  <div t:for="{{participant in nonHiddenParticipants }}" t:key="{{participant.id}}" class="avatar"
    style="background-image: url('{{ participant.photoUrl }}')" t:if="{{ forloop.index < 2 }}" />
  <svg t:if="{{nonHiddenParticipants.length > 2 }}" class="counter" viewBox="0 0 22 22"
    xmlns="http://www.w3.org/2000/svg">
    <g class="group">
      <rect class="bg" x="0" y="0" width="{{counterSize}}" height="{{counterSize}}" fill="currentColor" />
    </g>
    <text textAnchor="middle" x="{{counterSize | divided_by:2}}" y="{{counterSize | times:0.666 | round}}"
      width="{{counterSize}}" height="{{counterSize}}" fontSize="{{fontSize}}" fill="currentColor">
      {{overflowingParticipants | then: "99+" | else: nonHiddenParticipants.length }}
    </text>
  </svg>
</div>
Conclusion
With that, you now have a hidden user in your conversation. To summarize, you have:
- Added a new theme
- Added a custom property to a user
- Edited the theme to remove a user with a custom property
For the full example code for this tutorial, see our GitHub repo.
If you want to learn more about TalkJS, here are some good places to start:
- The TalkJS Docs help you get started with TalkJS.
- TalkJS tutorials provide how-to guides for many common TalkJS use cases.
- The talkjs-examples Github repo has larger complete examples that demonstrate how to integrate with other libraries and frameworks.


