

This guide uses the classic JavaScript SDK. If you're starting a new project, consider using TalkJS Chat UI components, which are more customizable.
Video calling with Zoom has skyrocketed in popularity in recent years, for everything from work meetings to courses and lectures. This tutorial explains how to integrate Zoom with TalkJS so that you can schedule meetings directly from your chat:
This drastically reduces the time taken to create meetings and saves users needing to move between applications.
Here’s what we’ll be doing in this tutorial:
- Adding an action button to your TalkJS chat header
- Running a NodeJS server that exposes an API to create meetings
- Using Zoom's APIs to create a meeting programmatically by clicking a button from your TalkJS chat
We’ll build up the feature step by step in the following sections. If you would rather see the complete example code, see the GitHub repo for this tutorial.
Prerequisites
There are a few prerequisites that you need to satisfy before going further in this tutorial:
- A TalkJS account. TalkJS provides a ready-to-use chat client for your application. Your account gives you access to TalkJS's free development environment.
- a Zoom account.
- An installation of Node.js. We will use Node as the backend server to call our Zoom API.
If you satisfy all these requirements, jump ahead to the next section.
Create a TalkJS application
With the help of the Getting Started guide for the classic JavaScript SDK, you can easily set up a TalkJS application within minutes. The sample project contains three files for the TalkJS app: an index.html file, a styles.css file, which we’ll look at later, and a script.js file that contains most of our TalkJS code.
Our script.js file looks like this:
const APP_ID = "YOUR_APP_ID";
const conversation = createTalkJSConversation();


async function createTalkJSConversation() {
  await Talk.ready;
  const me = new Talk.User({
    id: "00002",
    name: "Kirsten Doe",
    email: "kirsten.doe@example.com",
    photoUrl: "https://talkjs.com/images/avatar-1.jpg",
    role: "default",
  });
  window.talkSession = new Talk.Session({
    appId: APP_ID,
    me: me,
  });
  const other = new Talk.User({
    id: "00001",
    name: "Mikaela Ross",
    email: "mikaela.ross@example.com",
    photoUrl: "https://talkjs.com/images/avatar-7.jpg",
  });


  const conversation = talkSession.getOrCreateConversation(
    Talk.oneOnOneId(me, other)
  );
  conversation.setParticipant(me);
  conversation.setParticipant(other);


  const chatbox = talkSession.createChatbox();
  chatbox.select(conversation);
  chatbox.mount(document.getElementById("talkjs-container"));
  return conversation;
}
Our index.html file looks like this:
<!DOCTYPE html>
<html lang="en">
<head>
  <meta charset="UTF-8">
  <title>TalkJS Zoom Integration</title>
  <link rel="stylesheet" href="styles.css">
</head>
<body>
<script>
  (function(t,a,l,k,j,s){
  s=a.createElement('script');s.async=1;s.src="https://cdn.talkjs.com/talk.js";a.head.appendChild(s)
  ;k=t.Promise;t.Talk={v:3,ready:{then:function(f){if(k)return new k(function(r,e){l.push([f,r,e])});l
  .push([f])},catch:function(){return k&&new k()},c:l}};})(window,document,[]);
  </script>
  <script src="script.js"></script>
  <div id="talkjs-container" style="width: 90%; margin: 30px; height: 500px">
    <i>Loading chat...</i>
  </div>
</body>
</html>
Add an action button to the chat header
We'll use an action button to start the Zoom meeting. In the Theme Editor, edit the ChatHeader component to include the following below the CloseButton component:
<ActionButton action="goToZoom" class="zoom-button">
    <svg class="chatbox-header-button-icon" xmlns="http://www.w3.org/2000/svg" width="36" height="36"
         viewBox="0 0 24 24" fill="currentColor" stroke-width="2" class="ai ai-ZoomFill">
        <g clip-path="url(#clip0_822_311)">
            <path fill-rule="evenodd" clip-rule="evenodd"
                  d="M24 12c0 6.627-5.373 12-12 12S0 18.627 0 12 5.373 0 12 0s12 5.373 12 12zM6 16.2h9V9.6a1.8 1.8 0 0 0-1.8-1.8h-9v6.6A1.8 1.8 0 0 0 6 16.2zm10.2-2.4l3.6 2.4V7.8l-3.6 2.4v3.6z" />
        </g>
        <defs>
            <clipPath id="clip0_822_311">
                <rect width="24" height="24" />
            </clipPath>
        </defs>
    </svg>
</ActionButton>
This adds an action button with a conversation action of goToZoom to the chat header, with a video camera logo inside it. We'll also need to style the button by editing the existing action button styling in the <style> section of the ChatHeader theme component:
.header button[data-action] {
  /* ... */
  border: none;
}

.header button[data-action]:hover {
  color: #737373;
  background-color: none;
  border: none;
}

.header button[data-action]:active {
  color: #A3A3A3;
  background-color: none;
  border: none;
}
You should now have a button like this in the header of your chat:

Listen for the conversation action
Next, we'll listen for the goToZoom conversation action in the frontend by calling onCustomConversationAction on the chatbox:
chatbox.onCustomConversationAction("goToZoom", () => console.log("Pressed the button!"));As a first test, we're printing a message to the console. You should see a message logged to your browser console when you press the button.
Add a handler for creating a Zoom meeting
Next, we need to create a handler that calls our backend server when we click the button, which in turn calls the Zoom API. We’ll set up the backend server in the next section.
Add the following function to your script.js file:
async function createZoomMeeting() {
  const conversationObject = await conversation;
  const serverURL = `http://127.0.0.1:3000/meeting`;
  try {
    const response = await fetch(serverURL, {
      method: "GET",
    });
    const data = await response.json();
    conversationObject.sendMessage("Please join the Zoom meeting " + data.join_url)
  } catch (error) {
    console.log(error);
  }
}
We have the conversation object available globally in the file. We’ll be using this to send the meeting link to our conversation. When you click on the button, this handler gets activated and it calls the backend server’s createZoomMeeting endpoint, which we'll create in a later section. Once we retrieve the response from the server, we send a message to the conversation with the meeting URL.
Now, update the handler for the conversation action you added in the previous section to call the frontend's createZoomMeeting function:
chatbox.onCustomConversationAction("goToZoom", () => createZoomMeeting());Access the Zoom APIs
To access the Zoom APIs, you first need a Zoom account. After signing up, visit their App Marketplace to build an application. On the top right hand corner, next to the profile icon, is a dropdown menu labeled Develop. Click on it, and select Build Server-to-Server App. In the next page, click Create for the Server-to-Server OAuth application. Enter a name for the app and click Create.
In the next few steps you’ll need to enter some basic information and select the scopes for your app.

Click Continue from the above screen and enter your Company Name, Developer Name and Email Address. WIthout this, you cannot activate the app. Leave the defaults for the Feature section and in the Scopes section, select the following three scopes:
- View and manage sub account's user meetings
- View all user meetings
- View and manage all user meetings
Once you’ve set the scope, you can click on Activate your app. With that you’re all set to call the Zoom APIs from the backend server.

Create a backend server to call the Zoom API
Zoom doesn’t support CORS, so you’ll need to have a backend server to call the APIs. We’ll create a NodeJS Express server to do this.
First of all, create a .env file in the server folder to store your Zoom credentials. Retrieve your credentials from the Zoom dashboard and paste it in their respective fields.
ACCOUNT_ID="<YOUR_ACCOUNT_ID>"
CLIENT_ID="<YOUR_CLIENT_ID>"
CLIENT_SECRET="<YOUR_CLIENT_SECRET>"
Now create an npm project from within a folder using the command npm init -y and then install the following dependencies:
npm install cors dotenv express node-fetchWe’ll use cors to handle cross origin resource sharing, express as the middleware and dotenv to use the environment variables from our .env file in our server code. Create a file called server.js and add the following:
import dotenv from 'dotenv';
import express from 'express';
import cors from 'cors';


dotenv.config();


const app = express();
app.use(cors())


app.listen(3000, () => console.log("Server is up"));
Next, add a single endpoint that generates an access token for Zoom and then creates a meeting using that access token:
app.get('/meeting', async function (req, res) {
   try {
     // Generate Access Token
     const tokenResponse = await fetch(`https://zoom.us/oauth/token?grant_type=account_credentials&account_id=${process.env.ACCOUNT_ID}&client_id=${process.env.CLIENT_ID}&client_secret=${process.env.CLIENT_SECRET}`, {
       method: 'POST'
     });


     const tokenData = await tokenResponse.json();

     // Zoom Meeting Data
     const meetingData = JSON.stringify({
       "topic": "Zoom Meeting Created from TalkJS",
       "type": 2,
       "start_time": new Date().toString(),
       "agenda": "Zoom Meeting Created from TalkJS",
       "settings": {
         "join_before_host": true
       }
     });

     const createMeetingResponse = await fetch('https://api.zoom.us/v2/users/me/meetings', {
       method: 'POST',
       headers: {
         'Authorization': 'Bearer ' + tokenData.access_token,
         'Content-Type': 'application/json'
       },
       body: meetingData
     });
     const createMeetingData = await createMeetingResponse.json();


     res.send(createMeetingData);
   } catch (error) {
     console.log(error);
   }
 });
We are nesting two API calls within this function. The first API call retrieves the access token using our account ID, client ID and client secret. Once we receive that, we create a data object with the necessary information to create a meeting. Next, we make the second API call to create the meeting, using our access token for authorization. Finally, we send our response back to the frontend.
To start the server, add "start": "node server.js" to the scripts section of your package.json file, and then run npm start.
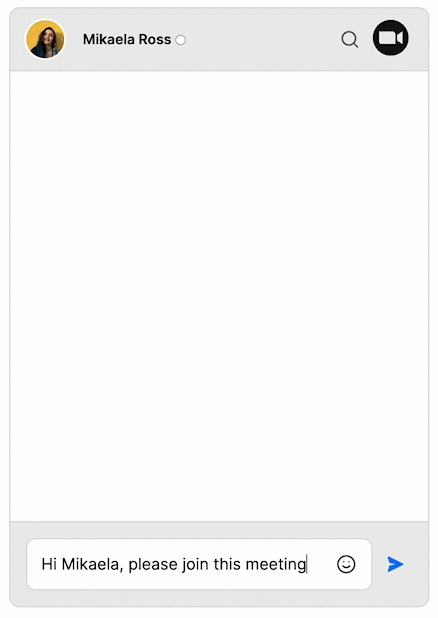
You should now have a working Zoom link button integrated with your chat app! Clicking the button creates a Zoom meeting and returns its link. Anyone on the chat at that point can click on the link to join the meeting.
For the full example code for this tutorial, see our GitHub repo.
If you want to learn more about TalkJS, here are some good places to start:
- The TalkJS Documentation helps you get started with TalkJS
- TalkJS tutorials provide how-to guides for many common TalkJS use cases
- The talkjs-examples Github repo has larger complete examples that demonstrate how to integrate with other libraries and frameworks


