

This guide uses the classic JavaScript SDK. If you're starting a new project, consider using TalkJS Chat UI components, which are more customizable.
If your users have profile pages in your app, you may want to link to them directly from your TalkJS chat.
TalkJS provides two options for how to do this, depending on how navigation works in your app:
- For links to pages hosted at a different URL, you can add direct links to the pages to your chat header in the Theme Editor.
- For single page apps, you can use TalkJS’s action buttons feature to add custom buttons to your chat header in the Theme Editor that emit a custom conversation action event when you click them. You can then listen for the event and route to the profile page.
In this tutorial we'll walk you through both options. In both cases we'll show you how to add buttons that redirect you to a user’s profile page when you click on their name or profile picture:
To follow along with the tutorial, you'll need:
- A TalkJS account. TalkJS provides a ready-to-use chat client for your application. Your account gives you access to TalkJS's free development environment.
- An existing application that uses TalkJS's classic JavaScript SDK. See the accompanying getting started guide for an example of how to set this up.
- An installation of Node.js along with the npm package manager. We’ll use this to create our backend server.
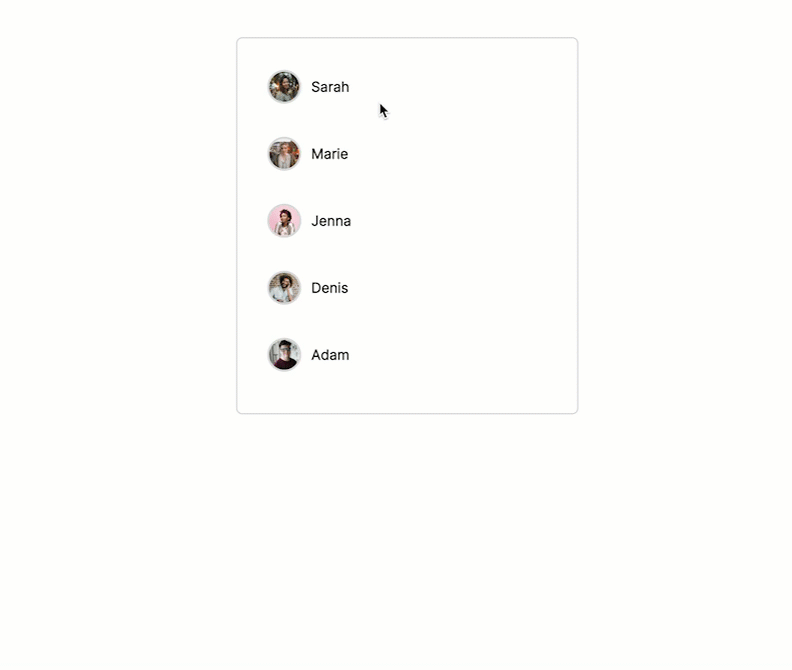
Ideally, you'll also have some existing user profiles in your application to link to. If you don't yet have any user profiles, or just want to test the feature out, the GitHub repository for this tutorial has an example Node.js application that serves an index page with a list of test users, and a profile page for each user. Clicking on a test user in the list displays a TalkJS conversation with that user.
In the following sections, we’ll demonstrate how to add an action button to the chat header of each conversation that links to the user’s profile page. We’ll first add an action button to the chat header of our theme, and then add an event handler to our frontend code that navigates to the profile page.
Option 1: Add direct links to your theme
If your profile pages have their own URL identified by TalkJS user ids, you can use direct links to the pages.
To add direct links to your theme, go to the Themes tab of the TalkJS dashboard, and select to Edit the active theme for your "default" role. (You can find the active theme in the settings for the "default" role in the Roles tab of the dashboard.)
In the list of Built-in Components, select ChatHeader.
We'll add direct links to each user's name in the chat header, and also to the conversation image in the case when there's only one other participant in the chat.
Make the user's name into a link
Find the template code for displaying the user name in the chat header (something like <span>{{user.name}}</span>) and replace it with the following:
<span>
  <button>
    <a href="http://localhost:3000/user-profile/{{user.id}}" target="_top">{{user.name}}</a>
  </button>
</span>
Here we're linking to a profile page hosted locally at /user-profile/{{user-id}}, where {{user.id}} is the user's TalkJS user id. We've added target="_top" to open the profile page at the top-level tab or window, rather than in the TalkJS iframe.
Note that the <span>{{user.name}}</span> might be in two branches of a t:if conditional block, one for if there is a conversation subject and one without – you'll want to replace it in both cases.
In the <style> section at the bottom of the template file, add the following CSS to style the user name:
.user a {
text-decoration: none;
color: #111;
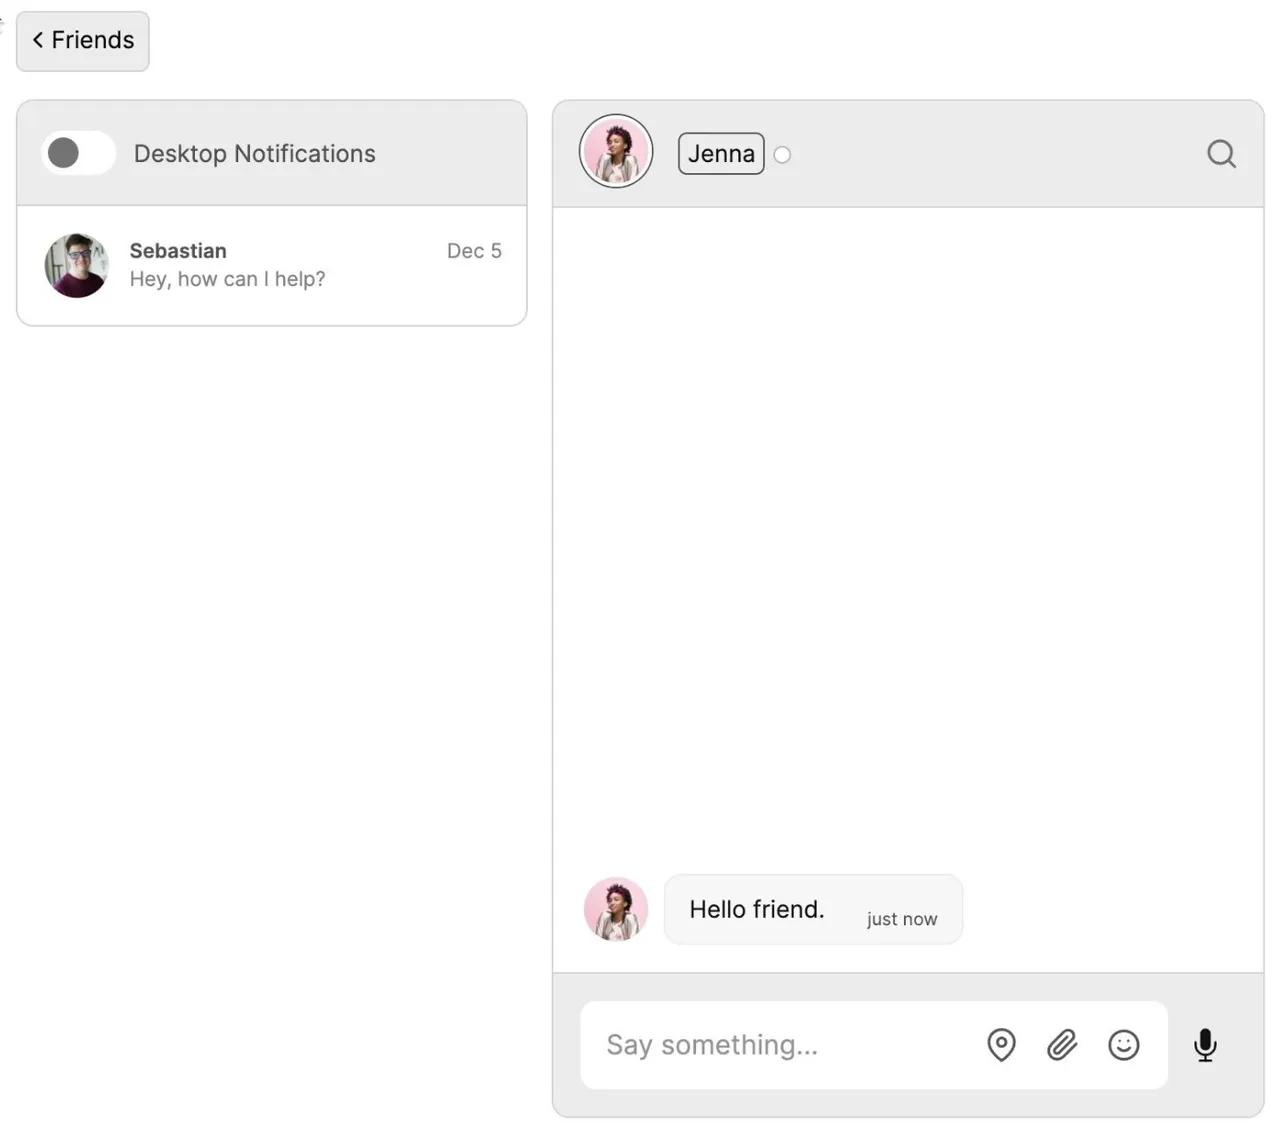
}You should now see a styled button with the user's name:

Clicking on it will take you to the user's profile page.
Make the user's profile picture into a link
Find the template code for displaying the conversation image (something like <ConversationImage conversation="{{ conversation }}" /> ) and replace it with the following:
<div t:if="{{ conversation.otherParticipants.length == 1 }}" class="image">
  <a href="http://localhost:3000/user-profile/{{conversation.otherParticipants[0].id}}" target="_top">
    <ConversationImage conversation="{{conversation }}" />
  </a>
</div>
<div t:else class="image">
  <ConversationImage conversation="{{conversation }}" />
</div>
As before, we've added a link to the user's profile page.
In the <style> section at the bottom of the template file, add the following CSS to style the image:
.image {
  border: 1px solid black;
  border-radius: 50%;
}

.image:hover {
  opacity: 70%;
}
The conversation image is now a clickable button in the case when there's one other participant in the conversation:

If there's more than one other participant (or if you're talking to yourself!) the conversation image still displays as normal, without a button.
Option 2: Add links to your theme with action buttons
If you have a single page app that handles routing internally, you'll need to use TalkJS's action buttons to link to your profile pages.
To add action buttons to your theme, go to the Themes tab of the TalkJS dashboard, and select to Edit the active theme for your "default" role. (You can find the active theme in the settings for the "default" role in the Roles tab of the dashboard.)
In the list of Built-in Components, select ChatHeader.
We'll add action buttons to each user's name in the chat header, and also to the conversation image in the case when there's only one other participant in the chat.
Add a button to the user's name
Find the template code for displaying the user name in the chat header (something like <span>{{user.name}}</span>) and replace it with the following:
<span>
  <ActionButton action="goToProfile" data-userId="{{user.id}}">{{user.name}}
  </ActionButton>
</span>
Note that the <span>{{user.name}}</span> might be in two branches of a t:if conditional block, one for if there is a conversation subject and one without – you'll want to replace it in both cases.
The updated code creates a button with the user’s name on it, using the {{user.name}} variable (see Using data in your templates):
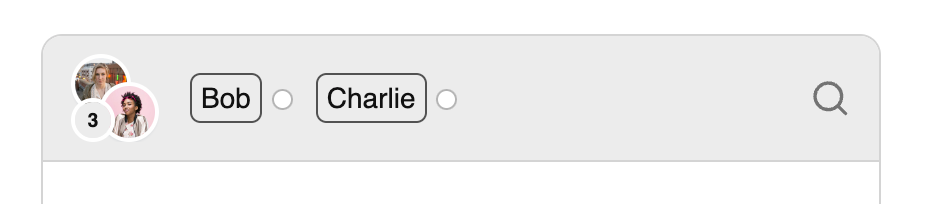
When you click on the button, it will send the goToProfile event with the user’s ID as a data parameter.
If you are in a chat with more than one other user, you will see a button for every name displayed in the chat header:
Add a button to the user's profile picture
Find the template code for displaying the conversation image (something like <ConversationImage conversation="{{ conversation }}" /> ) and replace it with the following:
<ActionButton t:if="{{ conversation.otherParticipants.length == 1 }}" class="action-button-image" action="goToProfile" data-userId="{{ conversation.otherParticipants[0].id }}">
  <ConversationImage conversation="{{ conversation }}" /></ActionButton>
<ConversationImage t:else conversation="{{ conversation }}" />
In the <style> section at the bottom of the template file, add the following CSS to style the button:
.header .image button[data-action] {
  border-radius: 50%;
  padding: 0;
}

.header .image button[data-action]:hover {
  opacity: 70%;
}
The conversation image is now a clickable button in the case when there's one other participant in the conversation:
As with the clickable user names, when you click on the button it will send the goToProfile event with the user’s ID as a data parameter.
If there's more than one other participant (or if you're talking to yourself!) the conversation image still displays as normal, without a button.
Listen for the custom conversation action
Next, we’ll listen for the goToProfile event. In your frontend TalkJS code, add the following:
inbox.onCustomConversationAction("goToProfile", (event) => {
  // Routing will depend on the details of your app.
  // We've navigated to a new URL in this example,
  // but in a single page app you will instead have something like:
  // someRouter.navigate(`/user-profile/${event.params.userId}`);
  location.href = `/user-profile/${event.params.userId}`;
});
This calls the onCustomConversationAction method on the TalkJS inbox and navigates to the user’s profile, using the userId parameter passed by the conversation action. The details of how to do this will depend on how routing works in your app. The example above uses the location.href property to navigate to a profile page hosted at a different URL, as with the direct link approach in Option 1, but you will need to replace this with your own routing logic.
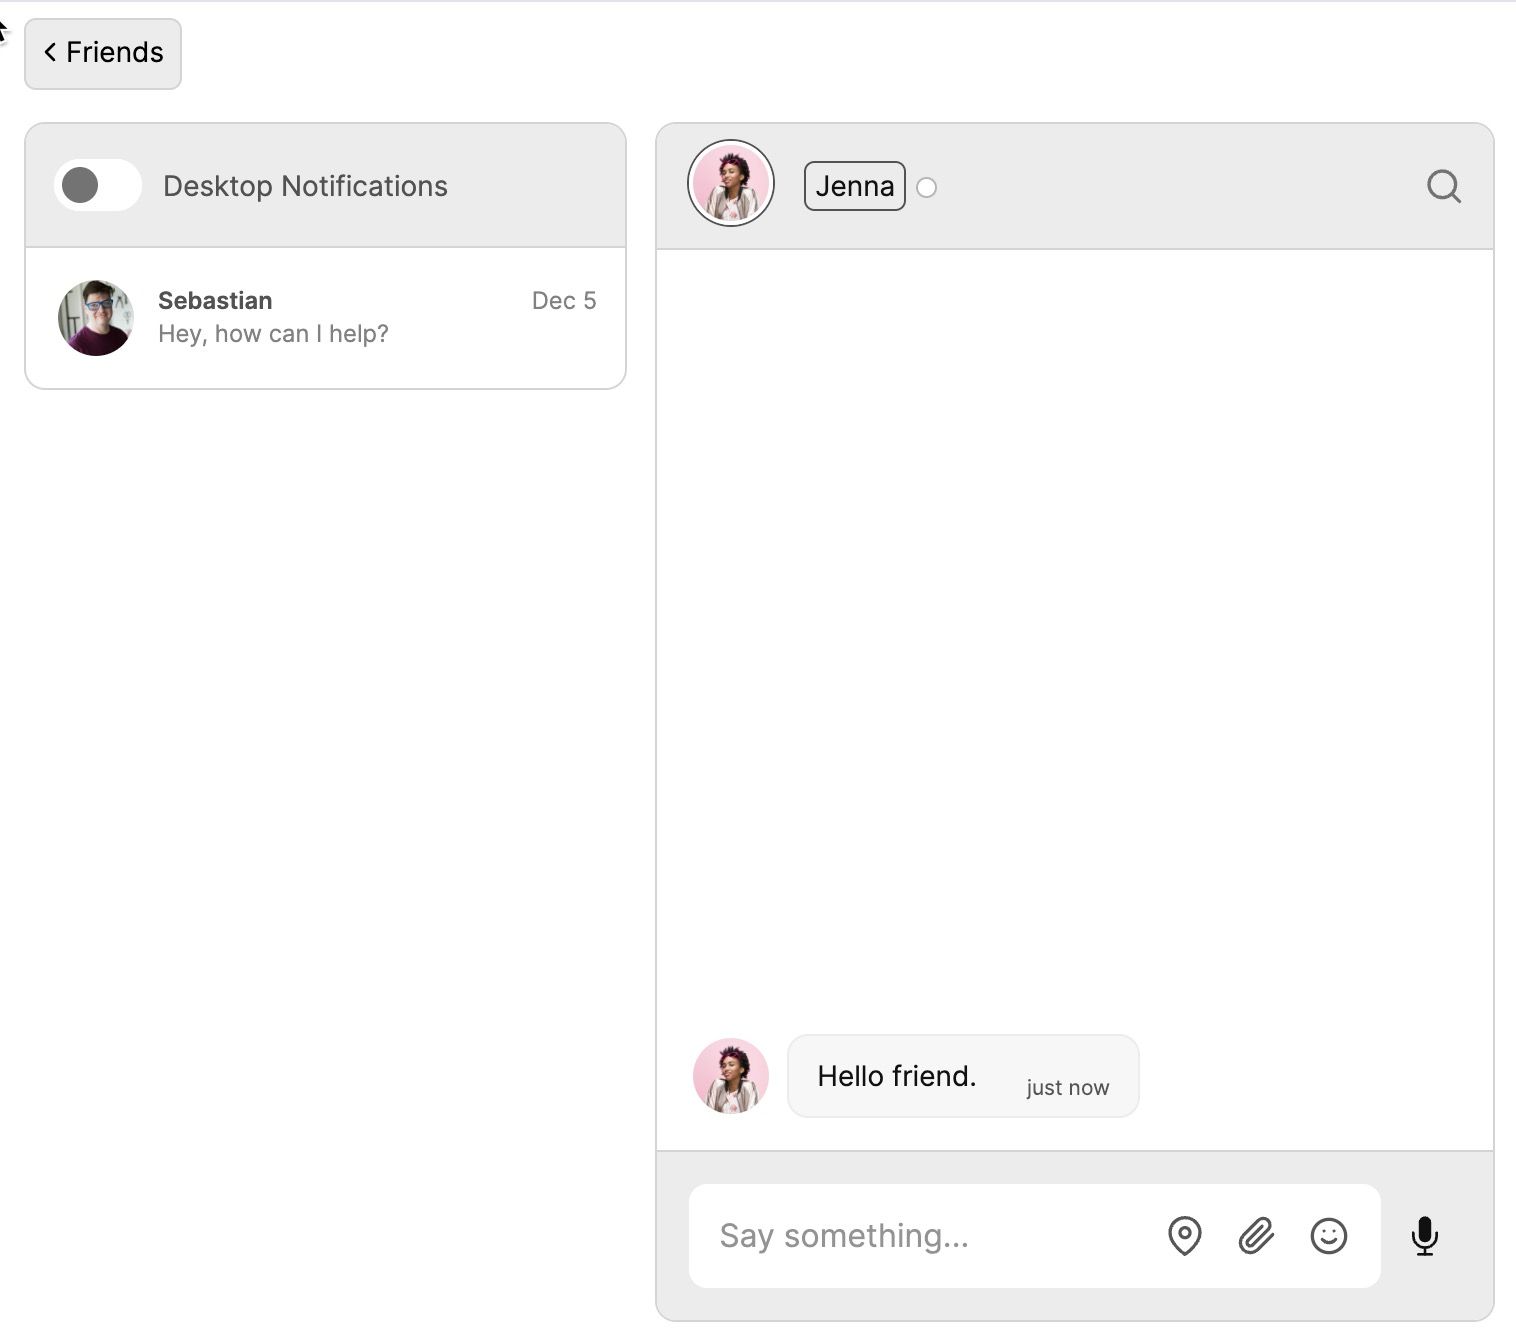
Now when you click on a user's name or profile picture you will be taken to their profile:

Conclusion
You now have a working demonstration of how to add a profile link in the chat header! To recap, in this tutorial we have shown you two ways to add clickable links to a profile page in your app.
For the full example code for this tutorial, see our GitHub repo.
If you want to learn more about TalkJS, here are some good places to start:
- The TalkJS Docs help you get started with TalkJS.
- TalkJS tutorials provide how-to guides for many common TalkJS use cases.
- The talkjs-examples Github repo has larger complete examples that demonstrate how to integrate with other libraries and frameworks.


