Angular
This guide will help you quickly add TalkJS to your Angular app and create a chat between users with the JavaScript SDK.
In the guide we'll walk you through installing TalkJS, creating a chatbox and starting a conversation. For the full code for this example, see our GitHub repo.
To follow this guide, you will need a TalkJS account.
You'll probably also have an existing Angular app that you want to add TalkJS to. If not, you can create an Angular starter app.
Add the talkjs package to your app:
1npm install talkjs
The details of how and where you want to integrate TalkJS will depend on your existing app, but for this example we'll use the generate component command to create a new talkjs-chat component in our project:
1ng generate component talkjs-chat
Next, import your new component. In this example we'll import the component in our top-level app.component.ts file:
1import { Component } from '@angular/core';2import { TalkjsChatComponent } from './talkjs-chat/talkjs-chat.component';34@Component({5 selector: 'app-root',6 standalone: true,7 imports: [TalkjsChatComponent],8 template: ` <app-talkjs-chat></app-talkjs-chat> `,9 styles: [],10})11export class AppComponent {12 title = 'angular-getting-started';13}
We're now ready to view a conversation. Add the following code to your talkjs-chat.component.ts file:
1import { Component } from '@angular/core';23import Talk from 'talkjs';45@Component({6 selector: 'app-talkjs-chat',7 standalone: true,8 imports: [],9 template: `10 <div id="talkjs-container" style="height: 600px">Loading chats..</div>11 `,12 styles: ``,13})14export class TalkjsChatComponent {15 constructor() {16 Talk.ready.then((): void => {17 const me = new Talk.User('sample_user_alice');18 const session = new Talk.Session({19 appId: '<APP_ID>',20 me: me,21 });2223 const conversation = session.getOrCreateConversation(24 'sample_conversation'25 );26 conversation.setParticipant(me);2728 const chatbox = session.createChatbox();29 chatbox.select(conversation);30 chatbox.mount(document.getElementById('talkjs-container'));31 });32 }33}
Let's step through what the code inside Talk.ready.then is doing:
- First, we make a connection to the TalkJS servers, known as a session. You'll need to replace
<APP_ID>with your own App ID, which you can find on the Settings page of your TalkJS dashboard. For this tutorial, we recommend using the App ID for TalkJS's Test Mode, which has built-in sample users and conversations which we'll use in this tutorial. You'll also need to specify a current user to send messages as. In this example, we've setmeto be an existing user, thesample_user_alicesample user. For a user that already exists, we can call theTalk.Userconstructor with just their user ID.
Next, we use the
getOrCreateConversationmethod to fetch the existing conversation with an ID ofsample_conversation.Then we create the chat UI. In this tutorial, we'll create a chatbox UI with the
createChatboxmethod. We use the chatbox'sselectmethod to display the sample conversation, and then use themountmethod to render the chatbox UI inside thetalkjs-containerelement that we created in our inline template.
You should see something like this:
Try sending Sebastian a message! You can also try switching your userId to sample_user_sebastian and viewing the other side of the conversation.
If you don't see the chat window, make sure that you entered your App ID, replacing <APP_ID> in the code.
So far in this guide we've used a sample user and conversation. Next, we'll create new users and a conversation between them, and sync them with the TalkJS servers. Usually, you would create users based on the data from your database. For this getting started guide, we've hard-coded our user data instead.
Modify your previous code inside Talk.ready.then by changing the highlighted lines:
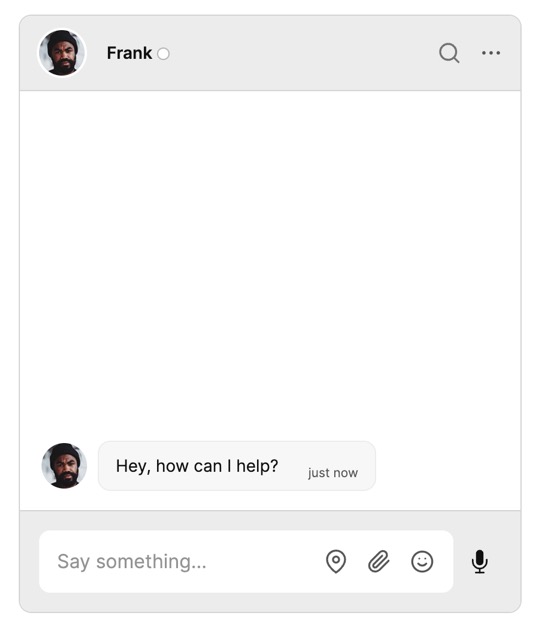
1Talk.ready.then(function () {2 const me = new Talk.User({3 id: 'nina',4 name: 'Nina',6 photoUrl: 'https://talkjs.com/new-web/avatar-7.jpg',7 welcomeMessage: 'Hi!',8 });9 const session = new Talk.Session({10 appId: '<APP_ID>',11 me: me,12 });13 const other = new Talk.User({14 id: 'frank',15 name: 'Frank',17 photoUrl: 'https://talkjs.com/new-web/avatar-8.jpg',18 welcomeMessage: 'Hey, how can I help?',19 });2021 const conversation = session.getOrCreateConversation('new_conversation');22 conversation.setParticipant(me);23 conversation.setParticipant(other);2425 const chatbox = session.createChatbox();26 chatbox.select(conversation);27 chatbox.mount(document.getElementById('talkjs-container'));28 });
Here's what we're doing in the updated version:
- We create a new user with an ID of
ninato be our current user. As this user is new, we pass the full user object to theTalk.Userconstructor rather than just the user ID. - We create a TalkJS session and add our new current user as in the previous section.
- We create a second new user with an ID of
frank. - We use the
getOrCreateConversationmethod to create a new conversation with an ID ofnew_conversation, and then add the two new users to the conversation with thesetParticipantmethod. - We create a chatbox, select the conversation and mount the chatbox as in the previous section.
When you mount the chatbox, the new users and conversation are synced with the TalkJS servers.
You should now see something like this:

If you prefer, you can instead create and sync users or conversations from your backend with our REST API. If you want to only sync users or conversations with the REST API, you can disable syncing in the browser. See Browser Synchronization for more details.
In this guide, you've added powerful user-to-user chat to your Angular app. You also learned more about the fundamentals of TalkJS, and how it all fits together.
Most importantly, you've built a starting point to try out all the features TalkJS offers. For example, you could create a new UI theme in the Theme Editor, customize your chat with action buttons or HTML panels, or enable email notifications.
Here's what your final TalkJS chat component should look like, in full:
1import { Component } from '@angular/core';23import Talk from 'talkjs';45@Component({6 selector: 'app-talkjs-chat',7 standalone: true,8 imports: [],9 template: `10 <div id="talkjs-container" style="height: 600px">Loading chats..</div>11 `,12 styles: ``,13})14export class TalkjsChatComponent {15 constructor() {16 Talk.ready.then(function () {17 const me = new Talk.User({18 id: 'nina',19 name: 'Nina',21 photoUrl: 'https://talkjs.com/new-web/avatar-7.jpg',22 welcomeMessage: 'Hi!',23 });24 const session = new Talk.Session({25 appId: '<APP_ID>',26 me: me,27 });28 const other = new Talk.User({29 id: 'frank',30 name: 'Frank',32 photoUrl: 'https://talkjs.com/new-web/avatar-8.jpg',33 welcomeMessage: 'Hey, how can I help?',34 });3536 const conversation = session.getOrCreateConversation('new_conversation');37 conversation.setParticipant(me);38 conversation.setParticipant(other);3940 const chatbox = session.createChatbox();41 chatbox.select(conversation);42 chatbox.mount(document.getElementById('talkjs-container'));43 });44 }45}
For full working code for this example, see our GitHub repo.